In my recent MQTT testing endeavors, I've found a reliable and efficient setup that I'd like to share with you. MQTT, or Message Queuing Telemetry Transport, is the go-to protocol for IoT messages. Surprisingly, it has a robust history, dating back to 1999 when it was initially developed for industrial IoT devices. With its proven track record, MQTT has become a cornerstone in the world of IoT communication.
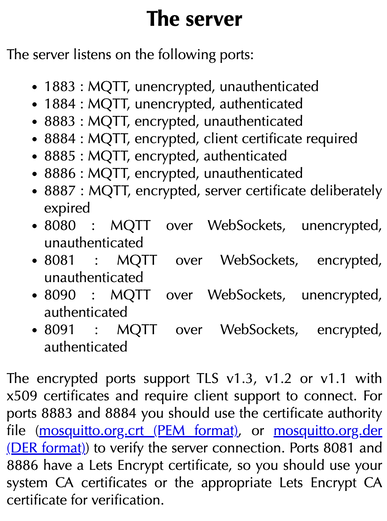
As I delve into testing my scripts, I find it essential to have a dual-setup: a tried-and-true subscriber to validate the successful delivery of my messages and my test code for experimentation. Currently, my focus is on streamlining the deployment process for a broker, publishers, and subscribers. This involves meticulous testing, especially considering the two primary MQTT protocols in use today: v3.1.1 and v5.0. For my public broker needs, I turn to https://test.mosquitto.org/. This platform, powered by Mosquitto, serves as an excellent public broker for both testing and practical utilization. You can see their connection protocols on the image to the right. There are, of course, others, but I like how this broker is documented, YMMV. To facilitate my testing process, I leverage a fantastic command-line subscriber called mqttx-cli, crafted by eqmx—a prominent figure in the MQTT landscape. This open-source, cross-platform MQTT client is versatile, supporting both v3.1.1 and v5.0 protocols. It seamlessly handles CA, self-signed certificates, and one-way or two-way SSL authentication. mqttx-cli proves invaluable as both a subscriber and publisher, ensuring thorough testing of message propagation and functionality. This setup not only streamlines my testing but also enhances the reliability and efficiency of my MQTT experiments. Okay, lets begin. brew install emqx/mqttx/mqttx-cli mqttx sub --hostname test.mosquitto.org --port 1883 --insecure --mqtt-version 5 -t hello/world mqttx pub --hostname test.mosquitto.org --port 1883 --insecure --mqtt-version 5 -t hello/world -m "hello world"
Incorporating mqttx-cli into your testing toolkit is a breeze. First, install the client to get started. Once that's done, you can seamlessly publish or subscribe to a topic of your choice and use your own code for the "other side" of the transmission. A word of caution, though: the popular topic `hello/world` may receive an avalanche of messages from various sources. To minimize the influx of test messages, consider opting for a more unique and specific topic.
This setup empowers you to rigorously test your own MQTT code and validate its functionality. It's worth noting that most public brokers don't support Quality of Service (QoS) beyond level 0, so keep that in mind as you fine-tune your testing parameters and of course, never put sensitive information on public brokers. Happy testing!
In version 3.2 of MaaS, automatic tags became available and while this is may be trivial for some, it helps quiet a bit by organizing items automatically. So lets get to it.
Below is a screenshot on what creating a tag looks like, the definitions are in XPath, so in case you weren't familiar, like me, the two backslashes are important. Originally, I thought they were there as comments as I'm unfamiliar with XPath, but the `//` selects nodes in the document from the current node that match the selection no matter where they are. So, be sure they are included. 
That said, the examples are nice to have as it shows how to do some basic searches, also MaaS' website also shows some more examples on their 'how to tag machines' page.
For us, we group them two different ways. The first is by machine type to verify their configurations match. This can be done a couple of ways, the first is just looking for an exact match under the `system_vendor` class, but we noticed this didn't always work because the system may include other information, so we had to make sure it contained a string. Both examples are below. //node[@class="system"]/product = "PowerEdge R610" //node[@class="system"]/product[contains(.,"PowerEdge R630")]
The next way to group machines is by their physical location and if their are VM's or not. Their physical location is still difficult to manage based off of the options available. But VM, LXD or physical servers is easy. LXD and and Virsh can be found by using one of their examples:
//node[@class="system"]/vendor = "QEMU"
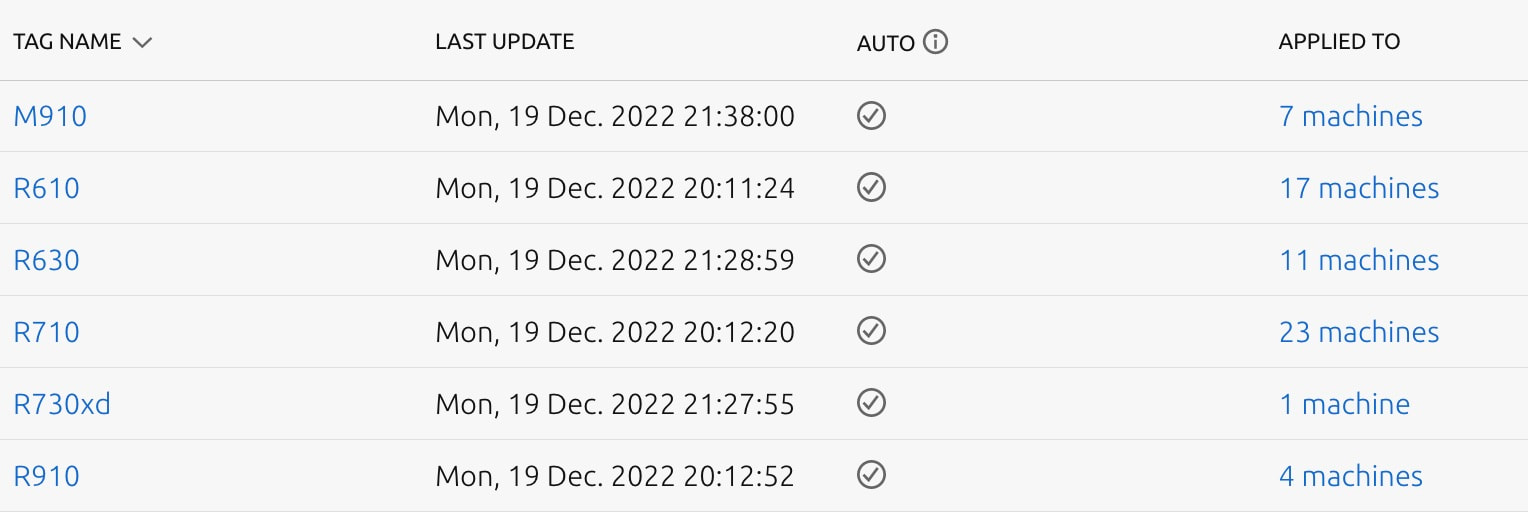
Based off of their physical location, IPMI power settings would be ideal as we organize the IP's from the racks that they are on. However, since that's not possible, I'm currently at a loss. If you have any ideas, please let me know! Here's a snapshot of the final result of auto tagging.
I recently bought a CloudKey+ from Ubiquiti and for several days, it wasn't loading or appearing to work. So, I finally SSH'ed into it with the default username/password: root/ubnt. I got the IP from the display port and once there, I issued ifconfig eth0.
root@UniFi-CloudKey-Gen2-Plus:~# ifconfig eth0 eth0: flags=4163<UP,BROADCAST,RUNNING,MULTICAST> mtu 1500 inet 192.168.1.119 netmask 255.255.255.0 broadcast 192.168.1.255 inet6 2600:1700:1102:27d0:7a45:58ff:fef5:6e47 prefixlen 64 scopeid 0x0<global> inet6 fe80::7a45:58ff:fef5:6e47 prefixlen 64 scopeid 0x20<link> inet6 2600:1700:1102:27d0::3e9 prefixlen 128 scopeid 0x0<global> ether 78:45:58:f5:6e:47 txqueuelen 1000 (Ethernet) RX packets 14809 bytes 10448243 (9.9 MiB) RX errors 0 dropped 428 overruns 0 frame 0 TX packets 4785 bytes 1652104 (1.5 MiB) TX errors 0 dropped 0 overruns 0 carrier 0 collisions 0 That is a lot of IPv6 networking which I don't use at home. So I issued 3 more commands to disable IPv6 and verify: root@UniFi-CloudKey-Gen2-Plus:~# sysctl -w net.ipv6.conf.all.disable_ipv6=1 net.ipv6.conf.all.disable_ipv6 = 1 root@UniFi-CloudKey-Gen2-Plus:~# sysctl -w net.ipv6.conf.default.disable_ipv6=1 net.ipv6.conf.default.disable_ipv6 = 1 root@UniFi-CloudKey-Gen2-Plus:~# ifconfig eth0 eth0: flags=4163<UP,BROADCAST,RUNNING,MULTICAST> mtu 1500 inet 192.168.1.119 netmask 255.255.255.0 broadcast 192.168.1.255 ether 78:45:58:f5:6e:47 txqueuelen 1000 (Ethernet) RX packets 21280 bytes 11006272 (10.4 MiB) RX errors 0 dropped 787 overruns 0 frame 0 TX packets 10731 bytes 8916935 (8.5 MiB) TX errors 0 dropped 0 overruns 0 carrier 0 collisions 0 Once I did that, everything worked immediately. Just a quick tip for you if you are having issues. Good luck!  In Canonical MaaS, there are several feature requests, filed bugs, and general frustration about gateways post-deployment. From the forums and bug requests I've seen and my opinion as well, people want one gateway for setting up PXE, but come deployment time, they want a different gateway so they can access the internet easier. While this may not be a solution for everyone, here are two ways that I've solved it. The first is a bit more Hocus Pocus, but I'll let you know just in case it helps. The second solution is what helped us 100% of the time and is used in our setup and is the ideal method.
A while back I wrote about how to deploy Openstack Ocata, considering that was 4 years ago I thought it best to update how to deploy Openstack. A few items first.
AIMS:
In this post, we will still be using Kolla - Xena, we will still have our 3 network planes (for public - 10.245.x.x, private - 192.168.x.x, and data networks - 10.100.x.x), at least 4 servers (3 controllers and 1 compute) with Ubuntu 20.04 LTS deployed on them. On the public network, you'll want to have a bridge and virtual interfaces (or at least that's how I deploy it. Let me know in the comments how your networking is done.). Check out the code snippet below on how I do that consistently after each reboot. The data network needs to be high speed 10G or better, private and public can be 1G if necessary but generally speaking, higher is always better ;-) sudo sh -c "cat > /etc/rc.local <<__EOF__ #!/bin/sh -e ip a | grep -Eq ': veno1.*state UP' || sudo ip link add veno0 type veth peer name veno1 ip link set veno0 up ip link set veno1 up ip link set veno0 master br0 exit 0 __EOF__" sudo chmod +x /etc/rc.local sudo chmod 755 /etc/rc.local sudo chown root:root /etc/rc.local sudo /etc/rc.local After our network is properly setup, we can bootstrap kolla. It's highly recommended to setup a virtual environment for Kolla so that nothing interferes with it. To do so, we will install a few python packages to setup the venv, install kolla and ansible, optimize ansible so it's a bit faster, then copy the kolla files (global and multinode) to the correct spaces. # "$HOME"/requirements.txt contents: # ansible<ANSIBLE_MAX_VERSION # https://tarballs.opendev.org/openstack/kolla-ansible/kolla-ansible-stable-OPENSTACK_RELEASE.tar.gz OPENSTACK_RELEASE=xena ANSIBLE_MAX_VERSION=5.0 # Dependencies sudo apt-get update sudo apt-get -qqy install python3-dev libffi-dev gcc libssl-dev python3-pip python3-venv # basedir and venv sudo mkdir -p /opt/kolla sudo chown "$USER":"$USER" /opt/kolla cd /opt/kolla python3 -m venv venv source venv/bin/activate python3 -m pip install -U pip wheel # Update requirements file sed -i s/OPENSTACK_RELEASE/"${OPENSTACK_RELEASE}"/ "$HOME"/requirements.txt sed -i s/ANSIBLE_MAX_VERSION/"${ANSIBLE_MAX_VERSION}"/ "$HOME"/requirements.txt python3 -m pip install -r "$HOME"/requirements.txt # General Ansible config sudo mkdir -p /etc/ansible sudo chown "$USER":"$USER" /etc/ansible cat > /etc/ansible/ansible.cfg <<__EOF__ [defaults] host_key_checking=False pipelining=True forks=100 interpreter_python=/usr/bin/python3 timeout = 30 __EOF__ # Configure kolla sudo mkdir -p /etc/kolla sudo chown "$USER":"$USER" /etc/kolla cp -r /opt/kolla/venv/share/kolla-ansible/etc_examples/kolla/* /etc/kolla || true cp /opt/kolla/venv/share/kolla-ansible/ansible/inventory/* . || true Once that is complete, we want to make sure:
After that, we can do two things simultaneously:
If we want to enable swift via ceph (i.e. enable radosgw), in the ceph tab below you'll see a line to enable swift. That refers to the swift tab. If you want to skip swift, then don't worry about the swift tab and just do everything else in the ceph tab. There were a couple of items that really tripped me up with getting rados to work properly. The first was with TLS enabled, we need to install the certificates into the system to be able to curl the endpoints properly. To do this, copy the certificates in the /etc/kolla/certificates/private to all of the servers ca-certificates folder: /usr/local/share/ca-certificates/ and `update-ca-certificates`. The next issue was getting the ports properly configured. Keep them set to 7480 as indicated. I'm not sure why, but in the globals file there is a line: #ceph_rgw_port: 7480 keep this line commented, otherwise, for me, uncommenting it and keeping it 7480, my HAProxy would fail to deploy. I do not know why, but that is what happened. So just keep that in mind. Also, port 7480 previously was used for Civetweb (depricated as of pacific), however, as of pacific, this is the default port of Beastmode. Lastly, and the biggest thing that tripped me up is the configuration file for swift, along with each of the radosgw that is deployed on, you need to have the same configuration for "client.rgw.default". I'm bolding that because it literally took me 2 weeks to figure that out. It is not documented anywhere and nearly impossible to find anything online about it. I only found it in one mail thread. Once the configs are set, you'll want to restart your rgw's using the "sudo ceph orch restart <cluster>" command. Lastly, one of the global options is only available from Xena onwards, so if you are trying to install something on an older openstack version, you'll likely run into some issues. And on that same note, the endpoints that are created, aren't 100% perfect and they'll need to be modified. By default, they are just 'http.../v1/...', they need to have 'http.../swift/v1/...''. Updating the endpoint needs to happen after the deploy of course. # These initial groups are the only groups required to be modified. The # additional groups are for more control of the environment. [control] # These hostname must be resolvable from your deployment host 192.168.1.40 192.168.1.38 192.168.1.36 # The above can also be specified as follows: #control[01:03] ansible_user=kolla # The network nodes are where your l3-agent and loadbalancers will run # This can be the same as a host in the control group [network] 192.168.1.40 192.168.1.38 192.168.1.36 [compute] 192.168.1.28 [monitoring] # When compute nodes and control nodes use different interfaces, # you need to comment out "api_interface" and other interfaces from the globals.yml # and specify like below: #compute01 neutron_external_interface=eth0 api_interface=em1 storage_interface=em1 tunnel_interface=em1 [storage] 192.168.1.40 192.168.1.38 192.168.1.36 192.168.1.28 [deployment] localhost ansible_connection=local kolla_base_distro: "centos" kolla_install_type: "source" network_interface: "eno1" kolla_external_vip_interface: "br0" neutron_external_interface: "veno1" keepalived_virtual_router_id: "63" kolla_internal_vip_address: "192.168.1.63" kolla_external_vip_address: "10.245.121.63" kolla_enable_tls_internal: "yes" kolla_enable_tls_external: "yes" kolla_enable_tls_backend: "yes" rabbitmq_enable_tls: "yes" kolla_copy_ca_into_containers: "yes" openstack_cacert: "{{ '/etc/pki/tls/certs/ca-bundle.crt' if kolla_enable_tls_external == 'yes' else '' }}" glance_backend_ceph: "yes" glance_backend_file: "no" glance_enable_rolling_upgrade: "yes" enable_cinder: "yes" ceph_nova_user: "cinder" cinder_backend_ceph: "yes" cinder_backup_driver: "ceph" nova_backend_ceph: "yes" # Swift (radosgw) options: enable_ceph_rgw: true # Feature from Xena onwards enable_swift: "no" # Feature for swift on disk, not through ceph. enable_swift_s3api: "yes" enable_ceph_rgw_keystone: true ceph_rgw_swift_compatibility: true ceph_rgw_swift_account_in_url: true enable_ceph_rgw_loadbalancer: true ceph_rgw_hosts: - host: r1-710-40 ip: 192.168.1.40 port: 7480 - host: r1-710-38 ip: 192.168.1.38 port: 7480 - host: r1-710-36 ip: 192.168.1.36 port: 7480 docker_registry: "10.245.0.14" docker_registry_insecure: "yes" docker_registry_username: "kolla" enable_mariabackup: "no" enable_haproxy: "yes" kolla_external_fqdn: "optional.fqdn.com" echo "deb http://download.opensuse.org/repositories/devel:/kubic:/libcontainers:/stable/xUbuntu_$(lsb_release -rs)/ /" | sudo tee /etc/apt/sources.list.d/devel:kubic:libcontainers:stable.list curl -fsSL https://download.opensuse.org/repositories/devel:kubic:libcontainers:stable/xUbuntu_"$(lsb_release -rs)"/Release.key | gpg --dearmor | sudo tee /etc/apt/trusted.gpg.d/devel_kubic_libcontainers_stable.gpg > /dev/null # Update to fetch the package index for ceph added above sudo apt-get update sudo apt-get -qqy install podman podman --version MONITOR_IP=$1 CEPH_RELEASE=pacific # Update to fetch the latest package index sudo apt-get update # Fetch most recent version of cephadm curl --silent --remote-name --location https://github.com/ceph/ceph/raw/"$CEPH_RELEASE"/src/cephadm/cephadm chmod +x cephadm sudo ./cephadm add-repo --release "$CEPH_RELEASE" # Update to fetch the package index for ceph added above sudo apt-get update # Install ceph-common and cephadm packages sudo ./cephadm install ceph-common sudo ./cephadm install sudo mkdir -p /etc/ceph sudo ./cephadm bootstrap --mon-ip "$MONITOR_IP" # Turn on telemetry and accept Community Data License Agreement - Sharing sudo ceph telemetry on --license sharing-1-0 sudo ceph -v sudo ceph status sudo ceph orch host ls sudo ceph orch device ls --refresh sudo ceph orch apply osd --all-available-devices # Create pool for Cinder sudo ceph osd pool create volumes sudo rbd pool init volumes # Create pool for Cinder Backup sudo ceph osd pool create backups sudo rbd pool init backups # Create pool for Glance sudo ceph osd pool create images sudo rbd pool init images # Create pool for Nova sudo ceph osd pool create vms sudo rbd pool init vms # Create pool for Gnocchi #sudo ceph osd pool create metrics #sudo rbd pool init metrics # Enable swift, 1 for refstack, 3 for production source "$HOME"/swift_settings.sh 3 # Get cinder and cinder-backup ready sudo mkdir -p /etc/kolla/config/cinder/cinder-backup sudo chown -R ubuntu:ubuntu /etc/kolla/config/ sudo cp /etc/ceph/ceph.conf /etc/kolla/config/cinder/cinder-backup/ceph.conf sudo ceph auth get-or-create client.cinder-backup mon 'profile rbd' osd 'profile rbd pool=backups' mgr 'profile rbd pool=backups' > /etc/kolla/config/cinder/cinder-backup/ceph.client.cinder-backup.keyring sudo ceph auth get-or-create client.cinder mon 'profile rbd' osd 'profile rbd pool=volumes, profile rbd pool=vms, profile rbd pool=images' mgr 'profile rbd pool=volumes, profile rbd pool=vms, profile rbd pool=images' > /etc/kolla/config/cinder/cinder-backup/ceph.client.cinder.keyring sudo sed -i $'s/\t//g' /etc/kolla/config/cinder/cinder-backup/ceph.conf sudo sed -i $'s/\t//g' /etc/kolla/config/cinder/cinder-backup/ceph.client.cinder.keyring sudo sed -i $'s/\t//g' /etc/kolla/config/cinder/cinder-backup/ceph.client.cinder-backup.keyring # Get cinder-volume ready sudo mkdir -p /etc/kolla/config/cinder/cinder-volume sudo chown -R ubuntu:ubuntu /etc/kolla/config/ sudo cp /etc/ceph/ceph.conf /etc/kolla/config/cinder/cinder-volume/ceph.conf sudo ceph auth get-or-create client.cinder > /etc/kolla/config/cinder/cinder-volume/ceph.client.cinder.keyring sudo sed -i $'s/\t//g' /etc/kolla/config/cinder/cinder-volume/ceph.conf sudo sed -i $'s/\t//g' /etc/kolla/config/cinder/cinder-volume/ceph.client.cinder.keyring # Get glance ready sudo mkdir -p /etc/kolla/config/glance sudo chown -R ubuntu:ubuntu /etc/kolla/config/ sudo cp /etc/ceph/ceph.conf /etc/kolla/config/glance/ceph.conf sudo ceph auth get-or-create client.glance mon 'profile rbd' osd 'profile rbd pool=volumes, profile rbd pool=images' mgr 'profile rbd pool=volumes, profile rbd pool=images' > /etc/kolla/config/glance/ceph.client.glance.keyring sudo sed -i $'s/\t//g' /etc/kolla/config/glance/ceph.conf sudo sed -i $'s/\t//g' /etc/kolla/config/glance/ceph.client.glance.keyring # Get nova ready sudo mkdir -p /etc/kolla/config/nova sudo chown -R ubuntu:ubuntu /etc/kolla/config/ sudo cp /etc/ceph/ceph.conf /etc/kolla/config/nova/ceph.conf sudo ceph auth get-or-create client.cinder > /etc/kolla/config/nova/ceph.client.cinder.keyring sudo sed -i $'s/\t//g' /etc/kolla/config/nova/ceph.conf sudo sed -i $'s/\t//g' /etc/kolla/config/nova/ceph.client.cinder.keyring # Get Gnocchi ready #sudo mkdir -p /etc/kolla/config/gnocchi #sudo chown -R ubuntu:ubuntu /etc/kolla/config/ #sudo cp /etc/ceph/ceph.conf /etc/kolla/config/gnocchi/ceph.conf #sudo ceph auth get-or-create client.gnocchi mon 'profile rbd' osd 'profile rbd pool=metrics' mgr 'profile rbd pool=metrics' > /etc/kolla/config/gnocchi/ceph.client.gnocchi.keyring #sudo sed -i $'s/\t//g' /etc/kolla/config/gnocchi/ceph.conf #sudo sed -i $'s/\t//g' /etc/kolla/config/gnocchi/ceph.client.gnocchi.keyring # Verify all permissions are correct. sudo chown -R ubuntu:ubuntu /etc/kolla/config/ sudo ceph status #!/bin/bash set -euxo pipefail NUM_OF_WHOS=$1 sudo ceph orch apply rgw osiasswift --port=7480 --placement="$NUM_OF_WHOS" # Default port results in port conflict and fails. sudo ceph dashboard set-rgw-api-ssl-verify False sudo ceph orch apply mgr "$HOSTNAME" if [[ $(grep -c ceph_rgw_keystone_password /etc/kolla/passwords.yml) -eq 1 ]] then ceph_rgw_pass=$( grep ceph_rgw_keystone_password /etc/kolla/passwords.yml | cut -d':' -f2 | xargs ) rgw_keystone_admin_user="ceph_rgw" else ceph_rgw_pass=$( grep keystone_admin_password /etc/kolla/passwords.yml | cut -d':' -f2 | xargs ) rgw_keystone_admin_user="admin" fi internal_url=$( grep ^kolla_internal_vip_address: /etc/kolla/globals.yml | cut -d':' -f2 | xargs ) # https://docs.ceph.com/en/latest/radosgw/keystone/#integrating-with-openstack-keystone # https://www.spinics.net/lists/ceph-users/msg64137.html # The "WHO" field in the "ceph config set" needs to be "client.rgw.default" NOT # "client.radosgw.gateway". This can be verified by issuing "ceph config dump" # Additionally, the name of all of the gateways need to be present. WHO_IS="" NUM_WHO_IS=$(echo "$WHO_IS" | wc -w) while [[ "$NUM_WHO_IS" -lt "$NUM_OF_WHOS" ]] do WHO_IS="$(sudo ceph auth ls | grep client.rgw | grep client)" || true echo "Waiting..." sleep 10 NUM_WHO_IS=$(echo "$WHO_IS" | wc -w) done WHO_IS="client.rgw.default $WHO_IS" echo "RGW CLIENTS: $WHO_IS" for WHO in $WHO_IS; do sudo ceph config set "$WHO" rgw_keystone_api_version 3 sudo ceph config set "$WHO" rgw_keystone_url https://"$internal_url":35357 sudo ceph config set "$WHO" rgw_keystone_accepted_admin_roles "admin, ResellerAdmin" sudo ceph config set "$WHO" rgw_keystone_accepted_roles "_member_, member, admin, ResellerAdmin" sudo ceph config set "$WHO" rgw_keystone_implicit_tenants true # Implicitly create new users in their own tenant with the same name when authenticating via Keystone. Can be limited to s3 or swift only. sudo ceph config set "$WHO" rgw_keystone_admin_user "$rgw_keystone_admin_user" sudo ceph config set "$WHO" rgw_keystone_admin_password "$ceph_rgw_pass" # Got from the passwords.yml sudo ceph config set "$WHO" rgw_keystone_admin_project service sudo ceph config set "$WHO" rgw_keystone_admin_domain default sudo ceph config set "$WHO" rgw_keystone_verify_ssl false sudo ceph config set "$WHO" rgw_content_length_compat true sudo ceph config set "$WHO" rgw_enable_apis "s3, swift, swift_auth, admin" sudo ceph config set "$WHO" rgw_s3_auth_use_keystone true sudo ceph config set "$WHO" rgw_enforce_swift_acls true sudo ceph config set "$WHO" rgw_swift_account_in_url true sudo ceph config set "$WHO" rgw_swift_versioning_enabled true sudo ceph config set "$WHO" rgw_verify_ssl true done # Redeploy your rgw daemon sudo ceph orch restart rgw.osiasswift HOSTNAMES=$(sudo ceph orch host ls | grep -v HOST | awk '{print $1}' | tr '\n' ',') sudo ceph orch apply mgr "$HOSTNAMES" # Add back-up mgr hosts Okay, so at this point, Ceph and swift have been installed completely, kolla bootstrap-servers and kolla pull has been completed. Next up, you can kolla-ansible deploy and kolla-ansible post-deploy and install the python-openstackclient. I like creating the flavors as follows. This gives you some general compute (GP), CPU focused compute (CB), and Memory focused compute (MB), and then two options for disk, 20GB or 40GB. openstack flavor create --id 1 --vcpus 1 --ram 2048 --disk 20 gp1.small openstack flavor create --id 2 --vcpus 2 --ram 4096 --disk 20 gp1.medium openstack flavor create --id 3 --vcpus 4 --ram 9216 --disk 20 gp1.large openstack flavor create --id 4 --vcpus 1 --ram 1024 --disk 20 cb1.small openstack flavor create --id 5 --vcpus 2 --ram 2048 --disk 20 cb1.medium openstack flavor create --id 6 --vcpus 4 --ram 4096 --disk 20 cb1.large openstack flavor create --id 7 --vcpus 1 --ram 3072 --disk 20 mb1.small openstack flavor create --id 8 --vcpus 2 --ram 6144 --disk 20 mb1.medium openstack flavor create --id 9 --vcpus 4 --ram 12288 --disk 20 mb1.large openstack flavor create --id 11 --vcpus 1 --ram 2048 --disk 40 gp2.small openstack flavor create --id 12 --vcpus 2 --ram 4096 --disk 40 gp2.medium openstack flavor create --id 13 --vcpus 4 --ram 9216 --disk 40 gp2.large openstack flavor create --id 14 --vcpus 1 --ram 1024 --disk 40 cb2.small openstack flavor create --id 15 --vcpus 2 --ram 2048 --disk 40 cb2.medium openstack flavor create --id 16 --vcpus 4 --ram 4096 --disk 40 cb2.large openstack flavor create --id 17 --vcpus 1 --ram 3072 --disk 40 mb2.small openstack flavor create --id 18 --vcpus 2 --ram 6144 --disk 40 mb2.medium openstack flavor create --id 19 --vcpus 4 --ram 12288 --disk 40 mb2.large Closing notes: I realize that this is a long post and due to the nature of it, complicated. If you have ANY question, please reach out in the comments and I'll try to update the post if anything is unclear. I was mulling over this for weeks, so I don't expect it to work out the first time for you, but hopefully you'll get some nuggets from this. Some things are probably very clear to me after starring at it for so long, so please let me help you make it clear as well. Good luck!
What we plan on accomplishing:
In part one, we created all of the accounts we needed and established an API connection to our infura project. Now we are going to deploy our vyper smart contract, read some values, and execute some transactions. There are two ways to install the latest version of vyper, docker and pip, follow their instructions (I used pip in a venv). Once installed, we can issue vyper commands: vyper --version 0.2.12+commit.2c6842c I will be using the company stock example, we can copy and paste that into a file, company_stock.vy and execute the `vyper file.vy` for the byte code, and with the tag `-f abi` which will display the ABI. Both the Bytecode and ABI are needed for deploying the smart contract, verifying the code, and most importantly, connecting to the smart contract to execute commands. If you are copying the Bytecode or ABI below, take precaution, they are very long, copy carefully, copy fully. If you are having issues, there are also online compilers. vyper company_stock.vy 0x60606105e86101403960206105e860c03960c05160a01c1561002057600080fd5b6000610160511161003057600080fd5b6000610180511161004057600080fd5b61014051600055610160516001556101805160025561016051600360005460e05260c052604060c020556105d056600436101561000d576104b6565b600035601c52600051631d1dc1f08114156100ef5734600254808061003157600080fd5b820490509050610140526101405161014051600658016104bc565b610160526101405261016051101561006357600080fd5b600360005460e05260c052604060c0208054610140518082101561008657600080fd5b8082039050905081555060033360e05260c052604060c0208054610140518181830110156100b357600080fd5b808201905090508155506101405161016052337fe3d4187f6ca4248660cc0ac8b8056515bac4a8132be2eca31d6d0cc170722a7e6020610160a2005b34156100fa57600080fd5b633ce828de81141561012057600658016104bc565b610140526101405160005260206000f35b63eeb466348114156101615760043560a01c1561013c57600080fd5b6004356101405261014051600658016104dd565b6101a0526101a05160005260206000f35b63961be391811415610177574760005260206000f35b639104c81e8114156102a65760006004351161019257600080fd5b600435336101405261014051600658016104dd565b6101a0526101a05110156101ba57600080fd5b60043560025480820282158284830414176101d457600080fd5b809050905090504710156101e757600080fd5b60033360e05260c052604060c02080546004358082101561020757600080fd5b80820390509050815550600360005460e05260c052604060c020805460043581818301101561023557600080fd5b808201905090508155506000600060006000600435600254808202821582848304141761026157600080fd5b80905090509050336000f161027557600080fd5b60043561014052337f5e5e995ce3133561afceaa51a9a154d5db228cd7525d34df5185582c18d3df096020610140a2005b637f59e5348114156103855760043560a01c156102c257600080fd5b6000602435116102d157600080fd5b602435336101405261014051600658016104dd565b6101a0526101a05110156102f957600080fd5b60033360e05260c052604060c02080546024358082101561031957600080fd5b80820390509050815550600360043560e05260c052604060c020805460243581818301101561034757600080fd5b8082019050905081555060243561014052600435337fddf252ad1be2c89b69c2b068fc378daa952ba7f163c4a11628f55a4df523b3ef6020610140a3005b632293448781141561040b5760043560a01c156103a157600080fd5b60005433146103af57600080fd5b6024354710156103be57600080fd5b60006000600060006024356004356000f16103d857600080fd5b602435610140526004357f357b676c439b9e49b4410f8eb8680bee4223724802d8e3fd422e1756f87b475f6020610140a2005b630dca59c18114156104315760065801610503565b610140526101405160005260206000f35b63ad11c13181141561046c574760065801610503565b61014052610140518082101561045c57600080fd5b8082039050905060005260206000f35b636904c94d8114156104845760005460005260206000f35b633a98ef3981141561049c5760015460005260206000f35b63a035b1fe8114156104b45760025460005260206000f35b505b60006000fd5b61014052600360005460e05260c052604060c0205460005260005161014051565b610160526101405260036101405160e05260c052604060c0205460005260005161016051565b6101405260015461014051600658016104bc565b6101605261014052610160518082101561053057600080fd5b80820390509050600254808202821582848304141761054e57600080fd5b8090509050905060005260005161014051565b61006f6105d00361006f60003961006f6105d0036000f3 vyper -f abi company_stock.vy [{"name": "Transfer", "inputs": [{"name": "sender", "type": "address", "indexed": true}, {"name": "receiver", "type": "address", "indexed": true}, {"name": "value", "type": "uint256", "indexed": false}], "anonymous": false, "type": "event"}, {"name": "Buy", "inputs": [{"name": "buyer", "type": "address", "indexed": true}, {"name": "buy_order", "type": "uint256", "indexed": false}], "anonymous": false, "type": "event"}, {"name": "Sell", "inputs": [{"name": "seller", "type": "address", "indexed": true}, {"name": "sell_order", "type": "uint256", "indexed": false}], "anonymous": false, "type": "event"}, {"name": "Pay", "inputs": [{"name": "vendor", "type": "address", "indexed": true}, {"name": "amount", "type": "uint256", "indexed": false}], "anonymous": false, "type": "event"}, {"stateMutability": "nonpayable", "type": "constructor", "inputs": [{"name": "_company", "type": "address"}, {"name": "_total_shares", "type": "uint256"}, {"name": "initial_price", "type": "uint256"}], "outputs": []}, {"stateMutability": "view", "type": "function", "name": "stockAvailable", "inputs": [], "outputs": [{"name": "", "type": "uint256"}], "gas": 4952}, {"stateMutability": "payable", "type": "function", "name": "buyStock", "inputs": [], "outputs": [], "gas": 85886}, {"stateMutability": "view", "type": "function", "name": "getHolding", "inputs": [{"name": "_stockholder", "type": "address"}], "outputs": [{"name": "", "type": "uint256"}], "gas": 3171}, {"stateMutability": "view", "type": "function", "name": "cash", "inputs": [], "outputs": [{"name": "", "type": "uint256"}], "gas": 380}, {"stateMutability": "nonpayable", "type": "function", "name": "sellStock", "inputs": [{"name": "sell_order", "type": "uint256"}], "outputs": [], "gas": 122880}, {"stateMutability": "nonpayable", "type": "function", "name": "transferStock", "inputs": [{"name": "receiver", "type": "address"}, {"name": "transfer_order", "type": "uint256"}], "outputs": [], "gas": 80332}, {"stateMutability": "nonpayable", "type": "function", "name": "payBill", "inputs": [{"name": "vendor", "type": "address"}, {"name": "amount", "type": "uint256"}], "outputs": [], "gas": 40765}, {"stateMutability": "view", "type": "function", "name": "debt", "inputs": [], "outputs": [{"name": "", "type": "uint256"}], "gas": 14965}, {"stateMutability": "view", "type": "function", "name": "worth", "inputs": [], "outputs": [{"name": "", "type": "uint256"}], "gas": 15164}, {"stateMutability": "view", "type": "function", "name": "company", "inputs": [], "outputs": [{"name": "", "type": "address"}], "gas": 2658}, {"stateMutability": "view", "type": "function", "name": "totalShares", "inputs": [], "outputs": [{"name": "", "type": "uint256"}], "gas": 2688}, {"stateMutability": "view", "type": "function", "name": "price", "inputs": [], "outputs": [{"name": "", "type": "uint256"}], "gas": 2718}] There are various test networks, Ropsten, Rinkeby, Gorli, and many, many more. As mentioned in Part 1, we will be using Ropsten, but you can compare some of the common ones below, their block time, faucets, proof of work/authority, etc. If you are interested in another network not listed below, there are a ton of different networks many of which can be explored here. Now let's talk about some history and provide some insight into where Etherium Classic (ETC) came from and where it is going Etherium (ETH). There was a hard fork in the Etherium Classic code (ETC), which by the way, has a market cap of $15 Billion compared to Etherium (ETH) which has a $411 Billion market cap as of May 2021. "Another difference between the two is that the Etherium chain will soon update from aproof-of-work (PoW) consensus mechanism to adopt proof-of-stake (PoS) algorithm, in an upgrade known as Ethereum 2.0. This should mean that the Ethereum network will be faster, more efficient and will be able to significantly scale transactions. As the fork meant that the new blockchain isn’t backwards compatible, many in the Ethereum Classic camp are waiting to see if they will also follow in the same direction (source)." So while you do dev work, it is important to check which chain you are working on, ETH vs ETC, PoW vs PoA vs PoS, block times, what is supported, and any other specifics for your needs. I've included these 5 tabs below to show you some comparison between the different chains.
TL;DR....
For those who are not comfortable with deploying the contract in code, or run into issues, you can deploy the contract in MEW. You'll need the Byte Code, ABI, and Contract Name.
Once you enter the information, you can sign and verify the contract. If you take a look at the vyper code, you'll see the various functions, such as `getHolding` or`TransferStock` shown below. Let's take a look at the code for these two functions and then how to create the code to call them. Parts of the Contract
# Find out how much stock any address (that's owned by someone) has.
@view
@internal
def _getHolding(_stockholder: address) -> uint256:
    return self.holdings[_stockholder]

# Public function to allow external access to _getHolding
@view
@external
def getHolding(_stockholder: address) -> uint256:
    return self._getHolding(_stockholder)
# Transfer stock from one stockholder to another. (Assume that the # receiver is given some compensation, but this is not enforced.) @external def transferStock(receiver: address, transfer_order: uint256): assert transfer_order > 0 # This is similar to sellStock above. # Similarly, you can only trade as much stock as you own. assert self._getHolding(msg.sender) >= transfer_order # Debit the sender's stock and add to the receiver's address. self.holdings[msg.sender] -= transfer_order self.holdings[receiver] += transfer_order # Log the transfer event. log Transfer(msg.sender, receiver, transfer_order) Initializing the Code
To begin coding, we will need to initialize our environment. First, we'll connect to the infura project that we created in Part 1. Web3 should return a `True` value. Next, we'll make sure our ABI, Bytecode, and contract address are available, create a sender and a receiver account. And finally we'll initialize our contract_instance. This contract instance will then be able to issue the various functions/standards from ERC20 and ERC721.
ERC20 defines the functions balanceOf , totalSupply , transfer , transferFrom , approve , and allowance. The ERC-721 standard defines many of the same functions from ERC20 and the following functions: name, symbol, ownerOf, takeOwnership, tokenOfOwnerByIndex, and tokenMetadata. It also defines two events: Transfer and Approval. A more in-depth look into the various functions can be found here. So, below is fairly self-explanatory, we are going to start with some imports, connect to our project, verify that is it connected and set some variables like the abi, and bytecode. from web3 import Web3 import json import os import pickle import time # Connect to the Infura project your_infura_project_id = "93fd067aa3d34ba1bb7b1110ca535409" infura_url = f"https://ropsten.infura.io/v3/{your_infura_project_id}" w3 = Web3(Web3.HTTPProvider(infura_url)) print(f"Web3 is connected?: {w3.isConnected()}") # vyper -f abi company_stock.vy ABI = '[{"name": "Transfer", "inputs": [{"name": "sender", "type": "address", "indexed": true}, {"name": "receiver", "type": "address", "indexed": true}, {"name": "value", "type": "uint256", "indexed": false}], "anonymous": false, "type": "event"}, {"name": "Buy", "inputs": [{"name": "buyer", "type": "address", "indexed": true}, {"name": "buy_order", "type": "uint256", "indexed": false}], "anonymous": false, "type": "event"}, {"name": "Sell", "inputs": [{"name": "seller", "type": "address", "indexed": true}, {"name": "sell_order", "type": "uint256", "indexed": false}], "anonymous": false, "type": "event"}, {"name": "Pay", "inputs": [{"name": "vendor", "type": "address", "indexed": true}, {"name": "amount", "type": "uint256", "indexed": false}], "anonymous": false, "type": "event"}, {"stateMutability": "nonpayable", "type": "constructor", "inputs": [{"name": "_company", "type": "address"}, {"name": "_total_shares", "type": "uint256"}, {"name": "initial_price", "type": "uint256"}], "outputs": []}, {"stateMutability": "view", "type": "function", "name": "stockAvailable", "inputs": [], "outputs": [{"name": "", "type": "uint256"}], "gas": 4952}, {"stateMutability": "payable", "type": "function", "name": "buyStock", "inputs": [], "outputs": [], "gas": 85886}, {"stateMutability": "view", "type": "function", "name": "getHolding", "inputs": [{"name": "_stockholder", "type": "address"}], "outputs": [{"name": "", "type": "uint256"}], "gas": 3171}, {"stateMutability": "view", "type": "function", "name": "cash", "inputs": [], "outputs": [{"name": "", "type": "uint256"}], "gas": 380}, {"stateMutability": "nonpayable", "type": "function", "name": "sellStock", "inputs": [{"name": "sell_order", "type": "uint256"}], "outputs": [], "gas": 122880}, {"stateMutability": "nonpayable", "type": "function", "name": "transferStock", "inputs": [{"name": "receiver", "type": "address"}, {"name": "transfer_order", "type": "uint256"}], "outputs": [], "gas": 80332}, {"stateMutability": "nonpayable", "type": "function", "name": "payBill", "inputs": [{"name": "vendor", "type": "address"}, {"name": "amount", "type": "uint256"}], "outputs": [], "gas": 40765}, {"stateMutability": "view", "type": "function", "name": "debt", "inputs": [], "outputs": [{"name": "", "type": "uint256"}], "gas": 14965}, {"stateMutability": "view", "type": "function", "name": "worth", "inputs": [], "outputs": [{"name": "", "type": "uint256"}], "gas": 15164}, {"stateMutability": "view", "type": "function", "name": "company", "inputs": [], "outputs": [{"name": "", "type": "address"}], "gas": 2658}, {"stateMutability": "view", "type": "function", "name": "totalShares", "inputs": [], "outputs": [{"name": "", "type": "uint256"}], "gas": 2688}, {"stateMutability": "view", "type": "function", "name": "price", "inputs": [], "outputs": [{"name": "", "type": "uint256"}], "gas": 2718}]' abi = json.loads(ABI) # vyper -f bytecode company_stock.vy BYTECODE = '0x60606105e86101403960206105e860c03960c05160a01c1561002057600080fd5b6000610160511161003057600080fd5b6000610180511161004057600080fd5b61014051600055610160516001556101805160025561016051600360005460e05260c052604060c020556105d056600436101561000d576104b6565b600035601c52600051631d1dc1f08114156100ef5734600254808061003157600080fd5b820490509050610140526101405161014051600658016104bc565b610160526101405261016051101561006357600080fd5b600360005460e05260c052604060c0208054610140518082101561008657600080fd5b8082039050905081555060033360e05260c052604060c0208054610140518181830110156100b357600080fd5b808201905090508155506101405161016052337fe3d4187f6ca4248660cc0ac8b8056515bac4a8132be2eca31d6d0cc170722a7e6020610160a2005b34156100fa57600080fd5b633ce828de81141561012057600658016104bc565b610140526101405160005260206000f35b63eeb466348114156101615760043560a01c1561013c57600080fd5b6004356101405261014051600658016104dd565b6101a0526101a05160005260206000f35b63961be391811415610177574760005260206000f35b639104c81e8114156102a65760006004351161019257600080fd5b600435336101405261014051600658016104dd565b6101a0526101a05110156101ba57600080fd5b60043560025480820282158284830414176101d457600080fd5b809050905090504710156101e757600080fd5b60033360e05260c052604060c02080546004358082101561020757600080fd5b80820390509050815550600360005460e05260c052604060c020805460043581818301101561023557600080fd5b808201905090508155506000600060006000600435600254808202821582848304141761026157600080fd5b80905090509050336000f161027557600080fd5b60043561014052337f5e5e995ce3133561afceaa51a9a154d5db228cd7525d34df5185582c18d3df096020610140a2005b637f59e5348114156103855760043560a01c156102c257600080fd5b6000602435116102d157600080fd5b602435336101405261014051600658016104dd565b6101a0526101a05110156102f957600080fd5b60033360e05260c052604060c02080546024358082101561031957600080fd5b80820390509050815550600360043560e05260c052604060c020805460243581818301101561034757600080fd5b8082019050905081555060243561014052600435337fddf252ad1be2c89b69c2b068fc378daa952ba7f163c4a11628f55a4df523b3ef6020610140a3005b632293448781141561040b5760043560a01c156103a157600080fd5b60005433146103af57600080fd5b6024354710156103be57600080fd5b60006000600060006024356004356000f16103d857600080fd5b602435610140526004357f357b676c439b9e49b4410f8eb8680bee4223724802d8e3fd422e1756f87b475f6020610140a2005b630dca59c18114156104315760065801610503565b610140526101405160005260206000f35b63ad11c13181141561046c574760065801610503565b61014052610140518082101561045c57600080fd5b8082039050905060005260206000f35b636904c94d8114156104845760005460005260206000f35b633a98ef3981141561049c5760015460005260206000f35b63a035b1fe8114156104b45760025460005260206000f35b505b60006000fd5b61014052600360005460e05260c052604060c0205460005260005161014051565b610160526101405260036101405160e05260c052604060c0205460005260005161016051565b6101405260015461014051600658016104bc565b6101605261014052610160518082101561053057600080fd5b80820390509050600254808202821582848304141761054e57600080fd5b8090509050905060005260005161014051565b61006f6105d00361006f60003961006f6105d0036000f3' Next, because we will probably run this a few times, I'm going to create our accounts fresh, pickle them and save them to a file. If we have to re-run our code, this will load those files so we don't have to keep on creating accounts and modifying account numbers, etc. Also, to avoid spamming our faucet, we can only get a drip, once per 24 hrs, after that you'll be graylisted. We will load our one ropsten to our sender account, which will end up being our contract creator. print("Checking for saved receiver account") if os.path.exists("receiver_account.p"): file = open("receiver_account.p", 'rb') receiver_account = pickle.load(file) file.close() else: print("Couldn't find saved receiver account, creating a new one.") receiver_account = w3.eth.account.create("receiver_account") file = open("receiver_account.p", 'wb') pickle.dump(receiver_account, file) file.close() print("Checking for saved sender account") if os.path.exists("sender_account.p"): file = open("sender_account.p", 'rb') sender_account = pickle.load(file) file.close() else: print("Couldn't find saved sender account, creating a new one.") sender_account = w3.eth.account.create("sender_account") file = open("sender_account.p", 'wb') pickle.dump(sender_account, file) file.close() print("Getting ropsten token, you can do this only once per day.") os.system(f"wget https://faucet.ropsten.be/donate/{sender_account.address}") Now that we have our account info set and our ropsten token, we can build our contract and deploy it. Once it is deployed, depending on how much gas was used, it might take a few minutes to a few hours. I've set a delay of 4 minutes, but you should really check that it is deployed before you try to transfer anything. In the contract, I've set 100,000 shares, each valued at $1. It is very possible that the current gas and gasPrice may need to be modified to deploy successfully. To deploy a contract we need to build the contract, sign it, then send the raw transaction. Once it is sent, we will wait (times out at 2 minutes), for the transaction to be accepted. However, it might take longer until it is fully written to a block. Inside of the contract, the ChainID is unique to each of the blockchains. If you look at the table above, you'll see that Ropsten is 3, Rinkeby is 4, etc. The gas used should be somewhere between 50,000 to 100,000 to be successful (I received errors that the gas was too low, so I jumped it to 700k, don't do this in real life!), with an absolute minimum of 21,000. Meanwhile, gas price will and certainly do change, but as of today (May 2021):
#================ BUILD CONTRACT ================
company_shares = 100000
company_shares_price = 1

company_stock = w3.eth.contract(abi=abi, bytecode=BYTECODE)
construct_txn = company_stock.constructor(sender_account.address, company_shares, company_shares_price).buildTransaction({
    'chainId': 3,
    'from': sender_account.address,
    'gas': 700000,
    'gasPrice': w3.toWei('220', 'gwei'),
    'nonce': w3.eth.getTransactionCount(sender_account.address)})
# You may need to adjust the gas and the gasPrice for this to complete.
# Upon completion, all of the shares will be given to the contract creator.

# Sign, create the contract, and wait until the transaction is complete.
print("Creating the contract transaction")
signed_txn = w3.eth.account.signTransaction(construct_txn, sender_account.privateKey)
print(f"Signed Txn: {signed_txn}")
tx_hash = w3.eth.sendRawTransaction(signed_txn.rawTransaction)
print(f"tx HASH: {tx_hash}")
tx_receipt = w3.eth.waitForTransactionReceipt(tx_hash)
print(f"TX RECEIPT: {tx_receipt}")
print(f"NEW CONTRACT ADDRESS: {tx_receipt.contractAddress}")

time_to_wait = 240
print(f"It may take a few minutes to create your contract, sleeping for {time_to_wait} seconds.")
time.sleep(time_to_wait)
Now that we have waited and the contract has been created, I'm going to display the addresses (you can show the private keys if you want, just in case something goes very south). Then we can check our holdings for the various accounts. This should show that the sender has all of the shares, 100,000, and both the contract and the receiver will have none. amount_to_buy = 20 contract_addr = tx_receipt.contractAddress #contract_addr="0x39898B49021fa1d7847D8C507fe3a750f5DcDfba" contract_instance = w3.eth.contract(address=contract_addr, abi=abi) print(f"Sender Account: {sender_account.address}") #print(f"Sender Account Private Key: {sender_account.privateKey}") print(f"Receiver Account: {receiver_account.address}") #print(f"Receiver Account Private Key: {receiver_account.privateKey}") print(f"Contract Address: {contract_addr}") contract_owner = sender_account.address contract_owner_private = sender_account.privateKey print(f"Contract Owner address: {contract_owner}") print(f"Get holding for contract_addr:") print(contract_instance.functions.getHolding(contract_addr).call()) print(f"Get holding for contract_owner address:") print(contract_instance.functions.getHolding(contract_owner).call()) print(f"Get holding for sender_account address:") print(contract_instance.functions.getHolding(sender_account.address).call()) print(f"Get holding for receiver_account address:") print(contract_instance.functions.getHolding(receiver_account.address).call()) Now that we have verified that the balances are correct, we will transfer some of the funds from the sender to the receiver. We will follow a similar process as building the contract: create the transaction, sign it, send it, and wait for receipt. Once it is complete, we will check the balances once more. print(f"\n{receiver_account.address} is transfering {amount_to_buy} shares of stock.\n") # Functions: payBill, sellStock, buyStock, transferStock transaction = contract_instance.functions.transferStock(receiver_account.address, amount_to_buy).buildTransaction({'chainId': 3, 'gas':75000, 'nonce': w3.eth.getTransactionCount(sender_account.address)}) signed_txn = w3.eth.account.signTransaction(transaction, sender_account.privateKey) txn_hash = w3.eth.sendRawTransaction(signed_txn.rawTransaction) tx_receipt = w3.eth.waitForTransactionReceipt(txn_hash) print(f"Get holding for Contract address:") print(contract_instance.functions.getHolding(contract_addr).call()) print(f"Get holding for sender_account address:") print(contract_instance.functions.getHolding(sender_account.address).call()) print(f"Get holding for receiver_account address:") print(contract_instance.functions.getHolding(receiver_account.address).call()) print("\nFINISHED.") Congratulations on building, deploying, reading and writing to your smart contract. If you have any questions or comments, please leave them below. Here is a link to the complete code used.
What we plan on accomplishing:
As with everything, documentation is lacking and it took me a few days to find all of the resources to deploy an example smart contract and find the necessary resources. I'm hoping that this will help students and developers to quickly get going with all of the resources necessary to start doing development work on Blockchain, in python, quickly. That said, this "guide", may not be complete, may not be accurate (especially since things are evolving so rapidly), but it is my guide from not having an address or account anywhere, to deploying a smart vyper contract and interacting with it in CLI. Consider it a cheat sheet on how to get started fast. We will be doing everything free, so we will be using the "Ropsten Testnet Network" and for completeness, we'll be using vyper most complete example for smart contract, their company stock example. From their website: This contract is just a tad bit more thorough than the ones we’ve previously encountered. In this example, we are going to look at a comprehensive contract that manages the holdings of all shares of a company. The contract allows for a person to buy, sell and transfer shares of a company as well as allowing for the company to pay a person in ether. The company, upon initialization of the contract, holds all shares of the company at first but can sell them all. Currently, most smart contracts are written in solidity and vyper. Solidity follows javascript, while vyper is more pythonic. Older, no longer supported, or rarely updated languages include Mutan, LLL, Serpant, and Bamboo. While solidity is akin to the 800 pound gorilla, vyper has some strong benefits and focuses on security and has been well studied (pdf) and actively maintained. So without further adieu, lets begin. TL;DR....
pip3 install web3
from web3 import Web3

infura_url = "https://ropsten.infura.io/v3/<PROJECT ID>"
web3 = Web3(Web3.HTTPProvider(infura_url))

my_account = web3.eth.account.create('Awesome test')

print(f"Web3 is connected?: {web3.isConnected()}")
Note: my_account will then have your: my_account.address, my_account.key, and my_account.privateKey
Your web3, should show as connected, returning a True. You can also create a wallet from places like, https://www.myetherwallet.com. If you made your key manually and have a text file, for example, `UTC--2021-04-26T20-00-11.234Z--ABCDEFGHIJKLMNOP`, you can create your private key as follows: with open('UTC--2021-04-26T20-00-11.234Z--ABCDEFGHIJKLMNOP') as keyfile: encrypted_key = keyfile.read() private_key = web3.eth.account.decrypt(encrypted_key, '<SUPER SECURE PASSWORD HERE USED AT CREATION>')
4. Go to https://faucet.ropsten.be/ and enter your address. This will give you a test Ether.
5. Go to https://ropsten.etherscan.io and verify that your account now has one test Ether. 6. Go to https://www.myetherwallet.com (MEW)and connect to your account. If you followed the steps above, you can enter your private key into the "Access by Software" section on the website and entering your private key in hex form: `print(my_account.privateKey.hex())` Since none of us are bitcoin millionaires and this is for testing purposes, I don't mind the relaxed security for testing. If there is ANY real currency, I highly recommend other, more secure, approaches. MEW is a nice tool to easily view 1. that you have received your test ethers, 2. displaying & 3. deploying smart contracts, and 4. viewing transactions. The above 6 steps are essential in getting you started and paving the way for starting your development work in Blockchain technology. In the next part, we will deploy our smart contract, and create some simple code to start interacting with it. Resources:
After migrating some VM's from OpenStack to VMware, we ran into some issues where vCenter refuses to boot a VM due to the error: Object type requires hosted I/O.
To fix this, SSH into the ESXi host where the VM is being hosted, or where you can reach the disk files if it is on a network datastore. Once SSH'ed into the host, browse to the VM folder containing the disk: cd /vmfs/volumes/DS1/VM1/ vmkfstools -x check disk.vmdk Disk needs repaired vmkfstools -x repair “disk.vmdk” Disk was successfully repaired. Start VM from vCenter. Remember the vmdk may be different if you have snapshotted the VM. Take a look at the VM hardware and disk location if you need help finding the disk.
Recently, there were some issues within OpenStack which we wanted to investigate further, but to keep our users happy, we migrated their VM's from OpenStack to VMware. Our setup is as follows:
First, in OpenStack snapshot your VM, then save your image locally:
openstack image save myVM --file=myVM.img
Ideally the OpenStack command will work, but if you have large files, the command may timeout. If that's the case, you can save it directly from ceph, here are the command you'll need:
rbd export images/<VM UUID> myVM.img
Now convert the image to vmdk:
qemu-img convert -f raw -O vmdk myVM.img myVM.vmdk
Next create your VMX file, it is best to create as minimal a vmx file as possible, this is what worked for me for a ubuntu server VM:
.encoding = “UTF-8”
config.version = "8"
virtualHW.version = "14"
memsize = "2048"
displayName = "VM1"
scsi0.present = "true"
scsi0.sharedBus = "none"
scsi0.virtualDev = "lsilogic"
virtualHW.productCompatibility = "hosted"
guestOS = "linux"
ethernet0.present= "true"
ethernet0.startConnected = "false"
ethernet0.virtualDev = "e1000"
ethernet0.connectionType = "hostonly"
ethernet1.present= "true"
ethernet1.startConnected = "true"
ethernet1.virtualDev = "e1000"
ethernet1.connectionType = "nat"
ethernet1.networkName = "Public VM Network"
ide0:0.present = "TRUE"
ide0:0.fileName = "myVM.vmdk"
ide0:0.redo = ""
sched.ide0:0.shares = "normal"
sched.ide0:0.throughputCap = "off"
Here are some further details/references about some of those lines. There are only three required lines in a VMX file: config.version = "8" This value should most likely be "8", "7" is legacy, and 6 is for even older hardware. virtualHW.version = "14" This value depends on the product version and compatibility, 14 is for a minimum of ESXi 6.5. guestOS = "linux" For windows VM's this list may not be complete and you might want to dig into this file to find more. For example, windows 10, 64-bit, should be "windows9-64". To help determine the nic, you should pick this based off of the guestOS. ethernet0.virtualDev = "e1000" This also shows how the guestOS is tied to the ethernet. numvcpus = "2" To change the default, number of CPU's from 1 to 2. memsize = "2048 To change the RAM in MB, there are some limitations based on virtualHW version and ESXi version. I hope this helps anyone who is trying to migrate OpenStack VM's to VMware.
"RefStack intends on being THE source of tools for interoperability testing of OpenStack clouds." [1]. If you are a cloud admin, it's important to be able to test that your cloud works properly. While you submit bugs to OpenStack, for example, it goes through a series of tests. Those tests are conducted by tempest to verify everything is working properly and returning the correct results. For me, Tempest has been a sore point for some time because of the difficulty I've had deploying the tool until I recently became aware of RefStack. That said, Tempest is a tool I've wanted to learn how to use for some time because once you learn how it is used, you can verify everything in your cloud is working properly AND you can even stress test it using standardized tools that everyone else in the community is using. A lot of these instructions will come from [2] using the "easy button" but I have expanded upon some items and provided additional information on our personal infrastructure.
Infrastructure/Background Tempest and RefStack-client will be installed on an Ubuntu 18.04 LTS VM. OpenStack Ussuri is deployed with TLS1.3 on internal and external networks and the admin-openrc.sh file is on the VM and able to reach/issue openstack commands successfully. If you require a SSL cert, then that should be local as well to avoid any SSL errors. Steps
Building etc/accounts.yaml The accounts file is easy to compile. The username, project_name, and password are all from the admin-openrc.sh file. Just copy them in the format below and place in the etc/accounts.yaml. Please remember, this is NOT /etc/accounts.yaml, but etc/accounts.yaml, so not the /etc folder. Building etc/tempest.conf The tempest.conf file has a lot of different options. I've included both a minimial version (updated with my values) and an unmodified complete file with all of the options and comments from [3]. The things I would like to highlight are as follows:
Results Once a test is complete, the summary results will be displayed on the screen and two files will be stored in the: refstack-client/.tempest/.stestr/<some number> refstack-client/.tempest/.stestr/<some number>.json These files will be lengthy since they can be verbose. To quickly find the failed tasks:
Feedback Did this work for you? Anything I'm missing or need to expand upon further? Please let me know in the comments! # A minimal accounts.yaml file # Will likely not work with swift, since additional # roles are required. For more documentation see: # https://git.openstack.org/cgit/openstack/tempest/tree/etc/accounts.yaml.sample - username: 'admin' project_name: 'admin' password: 'supersecretpassword' # This is a minimal example of what your tempest.conf file # can look like. You will need to supply your own values # and possibly add additional configurations for your cloud # You can use this as a starting point for configuring # tempest for the refstack client. [auth] test_accounts_file = /home/ubuntu/refstack-client/etc/accounts.yaml use_dynamic_credentials = true tempest_roles = admin default_credentials_domain_name = Default # If use_dynamic_credentials is set to True and Neutron is enabled # Tempest will try to create a usable network, subnet, and router when # needed for each project it creates. However in some neutron # configurations, like with VLAN provider networks, this doesn't work. # So if set to False the isolated networks will not be created # (boolean value) create_isolated_networks = true admin_username = admin admin_project_name = admin admin_password = supersecretpassword admin_domain_name = Default [compute] image_ref = 8fd584d1-b1c0-4b01-b09c-c17d2056c8d3 image_ref_alt = 8fd584d1-b1c0-4b01-b09c-c17d2056c8d3 flavor_ref = 1 flavor_ref_alt = 2 # Name of the fixed network that is visible to all test projects. If # multiple networks are available for a project, this is the network # which will be used for creating servers if tempest does not create a # network or a network is not specified elsewhere. It may be used for # ssh validation only if floating IPs are disabled. (string value) #fixed_network_name = private # The minimum number of compute nodes expected. This will be utilized # by some multinode specific tests to ensure that requests match the # expected size of the cluster you are testing with. (integer value) min_compute_nodes = 3 endpoint_type = internalURL [compute-feature-enabled] console_output = true resize = true pause = true # Does the test environment support shelving/unshelving? (boolean # value) shelve = true # Does the test environment support suspend/resume? (boolean value) suspend = true # Does the test environment support cold migration? (boolean value) cold_migration = true # Does the test environment support live migration? (boolean value) live_migration = true # Enable VNC console. This configuration value should be same as # [nova.vnc]->vnc_enabled in nova.conf (boolean value) vnc_console = true [identity] catalog_type = identity disable_ssl_certificate_validation = false ca_certificates_file = /home/ubuntu/root.crt uri = https://10.245.131.252:35357/v3 uri_v3 = https://10.245.131.252:35357/v3 auth_version = v3 region = RegionOne v3_endpoint_type = internalURL [identity-feature-enabled] api_v2 = false api_v3 = true [network] public_network_id = db7e48f5-a823-4d4a-aa4b-32a8f7edb2a4 floating_network_name = public [object-storage] operator_role = SwiftOperator reseller_admin_role = ResellerAdmin [oslo_concurrency] lock_path = /tmp/tempest [service_available] cinder = false neutron = true glance = true swift = true nova = true heat = true [validation] run_validation = true connect_method = floating auth_method = keypair image_ssh_user = cirros image_ssh_password = gocubsgo ip_version_for_ssh = 4 [DEFAULT] # # From oslo.log # # If set to true, the logging level will be set to DEBUG instead of # the default INFO level. (boolean value) # Note: This option can be changed without restarting. #debug = false # The name of a logging configuration file. This file is appended to # any existing logging configuration files. For details about logging # configuration files, see the Python logging module documentation. # Note that when logging configuration files are used then all logging # configuration is set in the configuration file and other logging # configuration options are ignored (for example, # logging_context_format_string). (string value) # Note: This option can be changed without restarting. # Deprecated group/name - [DEFAULT]/log_config #log_config_append = <None> # Defines the format string for %%(asctime)s in log records. Default: # %(default)s . This option is ignored if log_config_append is set. # (string value) #log_date_format = %Y-%m-%d %H:%M:%S # (Optional) Name of log file to send logging output to. If no default # is set, logging will go to stderr as defined by use_stderr. This # option is ignored if log_config_append is set. (string value) # Deprecated group/name - [DEFAULT]/logfile #log_file = <None> # (Optional) The base directory used for relative log_file paths. # This option is ignored if log_config_append is set. (string value) # Deprecated group/name - [DEFAULT]/logdir #log_dir = <None> # Uses logging handler designed to watch file system. When log file is # moved or removed this handler will open a new log file with # specified path instantaneously. It makes sense only if log_file # option is specified and Linux platform is used. This option is # ignored if log_config_append is set. (boolean value) #watch_log_file = false # Use syslog for logging. Existing syslog format is DEPRECATED and # will be changed later to honor RFC5424. This option is ignored if # log_config_append is set. (boolean value) #use_syslog = false # Enable journald for logging. If running in a systemd environment you # may wish to enable journal support. Doing so will use the journal # native protocol which includes structured metadata in addition to # log messages.This option is ignored if log_config_append is set. # (boolean value) #use_journal = false # Syslog facility to receive log lines. This option is ignored if # log_config_append is set. (string value) #syslog_log_facility = LOG_USER # Use JSON formatting for logging. This option is ignored if # log_config_append is set. (boolean value) #use_json = false # Log output to standard error. This option is ignored if # log_config_append is set. (boolean value) #use_stderr = false # Format string to use for log messages with context. (string value) #logging_context_format_string = %(asctime)s.%(msecs)03d %(process)d %(levelname)s %(name)s [%(request_id)s %(user_identity)s] %(instance)s%(message)s # Format string to use for log messages when context is undefined. # (string value) #logging_default_format_string = %(asctime)s.%(msecs)03d %(process)d %(levelname)s %(name)s [-] %(instance)s%(message)s # Additional data to append to log message when logging level for the # message is DEBUG. (string value) #logging_debug_format_suffix = %(funcName)s %(pathname)s:%(lineno)d # Prefix each line of exception output with this format. (string # value) #logging_exception_prefix = %(asctime)s.%(msecs)03d %(process)d ERROR %(name)s %(instance)s # Defines the format string for %(user_identity)s that is used in # logging_context_format_string. (string value) #logging_user_identity_format = %(user)s %(tenant)s %(domain)s %(user_domain)s %(project_domain)s # List of package logging levels in logger=LEVEL pairs. This option is # ignored if log_config_append is set. (list value) #default_log_levels = amqp=WARN,amqplib=WARN,boto=WARN,qpid=WARN,sqlalchemy=WARN,suds=INFO,oslo.messaging=INFO,oslo_messaging=INFO,iso8601=WARN,requests.packages.urllib3.connectionpool=WARN,urllib3.connectionpool=WARN,websocket=WARN,requests.packages.urllib3.util.retry=WARN,urllib3.util.retry=WARN,keystonemiddleware=WARN,routes.middleware=WARN,stevedore=WARN,taskflow=WARN,keystoneauth=WARN,oslo.cache=INFO,dogpile.core.dogpile=INFO # Enables or disables publication of error events. (boolean value) #publish_errors = false # The format for an instance that is passed with the log message. # (string value) #instance_format = "[instance: %(uuid)s] " # The format for an instance UUID that is passed with the log message. # (string value) #instance_uuid_format = "[instance: %(uuid)s] " # Interval, number of seconds, of log rate limiting. (integer value) #rate_limit_interval = 0 # Maximum number of logged messages per rate_limit_interval. (integer # value) #rate_limit_burst = 0 # Log level name used by rate limiting: CRITICAL, ERROR, INFO, # WARNING, DEBUG or empty string. Logs with level greater or equal to # rate_limit_except_level are not filtered. An empty string means that # all levels are filtered. (string value) #rate_limit_except_level = CRITICAL # Enables or disables fatal status of deprecations. (boolean value) #fatal_deprecations = false # # From tempest.config # # Whether to pause a test in global teardown. # # The best use case is investigating used resources of one test. # A test can be run as follows: # $ ostestr --pdb TEST_ID # or # $ python -m testtools.run TEST_ID (boolean value) #pause_teardown = false [auth] # # From tempest.config # # Path to the yaml file that contains the list of credentials to use # for running tests. If used when running in parallel you have to make # sure sufficient credentials are provided in the accounts file. For # example if no tests with roles are being run it requires at least `2 # * CONC` distinct accounts configured in the `test_accounts_file`, # with CONC == the number of concurrent test processes. (string value) test_accounts_file = /home/user/tempest/etc/accounts.yaml # Allows test cases to create/destroy projects and users. This option # requires that OpenStack Identity API admin credentials are known. If # false, isolated test cases and parallel execution, can still be # achieved configuring a list of test accounts (boolean value) # Deprecated group/name - [auth]/allow_tenant_isolation # Deprecated group/name - [compute]/allow_tenant_isolation use_dynamic_credentials = true # Roles to assign to all users created by tempest (list value) tempest_roles = admin # Default domain used when getting v3 credentials. This is the name # keystone uses for v2 compatibility. (string value) # Deprecated group/name - [auth]/tenant_isolation_domain_name default_credentials_domain_name = Default # If use_dynamic_credentials is set to True and Neutron is enabled # Tempest will try to create a usable network, subnet, and router when # needed for each project it creates. However in some neutron # configurations, like with VLAN provider networks, this doesn't work. # So if set to False the isolated networks will not be created # (boolean value) create_isolated_networks = false # Username for an administrative user. This is needed for # authenticating requests made by project isolation to create users # and projects (string value) admin_username = admin # Project name to use for an administrative user. This is needed for # authenticating requests made by project isolation to create users # and projects (string value) # Deprecated group/name - [auth]/admin_tenant_name # Deprecated group/name - [identity]/admin_tenant_name admin_project_name = admin # Password to use for an administrative user. This is needed for # authenticating requests made by project isolation to create users # and projects (string value) admin_password = Madawaska1* # Admin domain name for authentication (Keystone V3).The same domain # applies to user and project (string value) admin_domain_name = Default [compute] # # From tempest.config # # Valid primary image reference to be used in tests. This is a # required option (string value) image_ref = 3c8995af-4223-42b6-8872-7ed75bf19ddd # Valid secondary image reference to be used in tests. This is a # required option, but if only one image is available duplicate the # value of image_ref above (string value) image_ref_alt = 3c8995af-4223-42b6-8872-7ed75bf19ddd # Valid primary flavor to use in tests. (string value) flavor_ref = 1 # Valid secondary flavor to be used in tests. (string value) flavor_ref_alt = 2 # Time in seconds between build status checks. (integer value) #build_interval = 1 # Timeout in seconds to wait for an instance to build. Other services # that do not define build_timeout will inherit this value. (integer # value) #build_timeout = 300 # Additional wait time for clean state, when there is no OS-EXT-STS # extension available (integer value) #ready_wait = 0 # Name of the fixed network that is visible to all test projects. If # multiple networks are available for a project, this is the network # which will be used for creating servers if tempest does not create a # network or a network is not specified elsewhere. It may be used for # ssh validation only if floating IPs are disabled. (string value) fixed_network_name = network.nano # Catalog type of the Compute service. (string value) #catalog_type = compute # The compute region name to use. If empty, the value of # identity.region is used instead. If no such region is found in the # service catalog, the first found one is used. (string value) #region = # The endpoint type to use for the compute service. (string value) # Possible values: # public - <No description provided> # admin - <No description provided> # internal - <No description provided> # publicURL - <No description provided> # adminURL - <No description provided> # internalURL - <No description provided> endpoint_type = publicURL # Expected device name when a volume is attached to an instance. Not # all hypervisors guarantee that they will respect the user defined # device name, tests may fail if inappropriate device name is set. # (string value) #volume_device_name = vdb # Time in seconds before a shelved instance is eligible for removing # from a host. -1 never offload, 0 offload when shelved. This # configuration value should be same as # [nova.DEFAULT]->shelved_offload_time in nova.conf, and some tests # will run for as long as the time. (integer value) #shelved_offload_time = 0 # The minimum number of compute nodes expected. This will be utilized # by some multinode specific tests to ensure that requests match the # expected size of the cluster you are testing with. (integer value) min_compute_nodes = 4 # Hypervisor type of the test target on heterogeneous compute # environment. The value can be 'QEMU', 'xen' or something. (string # value) #hypervisor_type = <None> # Lower version of the test target microversion range. The format is # 'X.Y', where 'X' and 'Y' are int values. Tempest selects tests based # on the range between min_microversion and max_microversion. If both # values are not specified, Tempest avoids tests which require a # microversion. Valid values are string with format 'X.Y' or string # 'latest' (string value) #min_microversion = <None> # Upper version of the test target microversion range. The format is # 'X.Y', where 'X' and 'Y' are int values. Tempest selects tests based # on the range between min_microversion and max_microversion. If both # values are not specified, Tempest avoids tests which require a # microversion. Valid values are string with format 'X.Y' or string # 'latest' (string value) #max_microversion = <None> [compute-feature-enabled] # # From tempest.config # # If false, skip disk config tests (boolean value) #disk_config = true # DEPRECATED: A list of enabled compute extensions with a special # entry all which indicates every extension is enabled. Each extension # should be specified with alias name. Empty list indicates all # extensions are disabled (list value) # This option is deprecated for removal. # Its value may be silently ignored in the future. # Reason: The Nova extensions API and mechanism is deprecated. This # option will be removed when all releases supported by tempest no # longer contain the Nova extensions API and mechanism. #api_extensions = all # Does the test environment support changing the admin password? # (boolean value) #change_password = false # Does the test environment support obtaining instance serial console # output? (boolean value) #console_output = true # Does the test environment support resizing? When you enable this # feature, 'flavor_ref_alt' should be set and it should refer to a # larger flavor than 'flavor_ref' one. (boolean value) #resize = false # Does the test environment support pausing? (boolean value) #pause = true # Does the test environment support shelving/unshelving? (boolean # value) #shelve = true # Does the test environment support suspend/resume? (boolean value) #suspend = true # Does the test environment support cold migration? (boolean value) #cold_migration = true # Does the test environment support live migration? (boolean value) #live_migration = true # Does the test environment support live migrating VM back and forth # between different versions of nova-compute? (boolean value) #live_migrate_back_and_forth = false # Does the test environment support metadata service? Ignored unless # validation.run_validation=true. (boolean value) #metadata_service = true # Does the test environment use block devices for live migration # (boolean value) #block_migration_for_live_migration = false # Does the test environment support block migration with Cinder iSCSI # volumes. Note: libvirt >= 1.2.17 is required to support this if # using the libvirt compute driver. (boolean value) #block_migrate_cinder_iscsi = false # Enable VNC console. This configuration value should be same as # [nova.vnc]->vnc_enabled in nova.conf (boolean value) #vnc_console = false # Enable Spice console. This configuration value should be same as # [nova.spice]->enabled in nova.conf (boolean value) #spice_console = false # Enable RDP console. This configuration value should be same as # [nova.rdp]->enabled in nova.conf (boolean value) #rdp_console = false # Enable serial console. This configuration value should be the same # as [nova.serial_console]->enabled in nova.conf (boolean value) #serial_console = false # Does the test environment support instance rescue mode? (boolean # value) #rescue = true # Enables returning of the instance password by the relevant server # API calls such as create, rebuild or rescue. This configuration # value should be same as nova.conf: DEFAULT.enable_instance_password # (boolean value) #enable_instance_password = true # Does the test environment support dynamic network interface # attachment? (boolean value) #interface_attach = true # Does the test environment support creating snapshot images of # running instances? (boolean value) #snapshot = true # DEPRECATED: Does the test environment have the nova cert running? # (boolean value) # This option is deprecated for removal. # Its value may be silently ignored in the future. # Reason: On Nova side, the nova-cert service is deprecated and the # service will be removed as early as Ocata. #nova_cert = false # Does the test environment support server personality (boolean value) #personality = false # Does the test environment support attaching an encrypted volume to a # running server instance? This may depend on the combination of # compute_driver in nova and the volume_driver(s) in cinder. (boolean # value) #attach_encrypted_volume = true # Enable special configuration drive with metadata. (boolean value) #config_drive = true # A list of enabled filters that nova will accept as hints to the # scheduler when creating a server. A special entry 'all' indicates # all filters that are included with nova are enabled. Empty list # indicates all filters are disabled. The full list of available # filters is in nova.conf: DEFAULT.scheduler_available_filters. If the # default value is overridden in nova.conf by the test environment # (which means that a different set of filters is enabled than what is # included in Nova by default) then, this option must be configured to # contain the same filters that Nova uses in the test environment. # (list value) #scheduler_available_filters = all # Does the test environment support in-place swapping of volumes # attached to a server instance? (boolean value) #swap_volume = false # Does the test environment support volume-backed live migration? # (boolean value) #volume_backed_live_migration = false # Does the test environment support attaching a volume to more than # one instance? This depends on hypervisor and volume backend/type and # compute API version 2.60. (boolean value) #volume_multiattach = false [debug] # # From tempest.config # # A regex to determine which requests should be traced. # # This is a regex to match the caller for rest client requests to be # able to # selectively trace calls out of specific classes and methods. It # largely # exists for test development, and is not expected to be used in a # real deploy # of tempest. This will be matched against the discovered # ClassName:method # in the test environment. # # Expected values for this field are: # # * ClassName:test_method_name - traces one test_method # * ClassName:setUp(Class) - traces specific setup functions # * ClassName:tearDown(Class) - traces specific teardown functions # * ClassName:_run_cleanups - traces the cleanup functions # # If nothing is specified, this feature is not enabled. To trace # everything # specify .* as the regex. # (string value) #trace_requests = [identity] # # From tempest.config # # Catalog type of the Identity service. (string value) catalog_type = identity # Set to True if using self-signed SSL certificates. (boolean value) #disable_ssl_certificate_validation = false # Specify a CA bundle file to use in verifying a TLS (https) server # certificate. (string value) #ca_certificates_file = <None> # Full URI of the OpenStack Identity API (Keystone), v2 (string value) uri = http://10.10.10.2:5000/v3 # Full URI of the OpenStack Identity API (Keystone), v3 (string value) uri_v3 = http://10.10.10.2:5000/v3 # Identity API version to be used for authentication for API tests. # (string value) auth_version = v3 # The identity region name to use. Also used as the other services' # region name unless they are set explicitly. If no such region is # found in the service catalog, the first found one is used. (string # value) region = RegionOne # The admin endpoint type to use for OpenStack Identity (Keystone) API # v2 (string value) # Possible values: # public - <No description provided> # admin - <No description provided> # internal - <No description provided> # publicURL - <No description provided> # adminURL - <No description provided> # internalURL - <No description provided> #v2_admin_endpoint_type = adminURL # The public endpoint type to use for OpenStack Identity (Keystone) # API v2 (string value) # Possible values: # public - <No description provided> # admin - <No description provided> # internal - <No description provided> # publicURL - <No description provided> # adminURL - <No description provided> # internalURL - <No description provided> # Deprecated group/name - [identity]/endpoint_type #v2_public_endpoint_type = publicURL # The endpoint type to use for OpenStack Identity (Keystone) API v3. # The default value adminURL is deprecated and will be modified to # publicURL in the next release. (string value) # Possible values: # public - <No description provided> # admin - <No description provided> # internal - <No description provided> # publicURL - <No description provided> # adminURL - <No description provided> # internalURL - <No description provided> v3_endpoint_type = publicURL # Role required to administrate keystone. (string value) admin_role = admin # ID of the default domain (string value) default_domain_id = default # Whether keystone identity v3 policy required a domain scoped token # to use admin APIs (boolean value) admin_domain_scope = false # The number of unsuccessful login attempts the user is allowed before # having the account locked. (integer value) user_lockout_failure_attempts = 2 # The number of seconds a user account will remain locked. (integer # value) user_lockout_duration = 5 # The number of passwords for a user that must be unique before an old # password can be reused. (integer value) user_unique_last_password_count = 2 [identity-feature-enabled] # # From tempest.config # # Does the identity service have delegation and impersonation enabled # (boolean value) #trust = true # DEPRECATED: Is the v2 identity API enabled (boolean value) # This option is deprecated for removal. # Its value may be silently ignored in the future. # Reason: The identity v2.0 API was removed in the Queens release. # Tests that exercise the v2.0 API will be removed from tempest in the # v22.0.0 release. They are kept only to test stable branches. #api_v2 = false # Is the v2 identity admin API available? This setting only applies if # api_v2 is set to True. (boolean value) #api_v2_admin = true # Is the v3 identity API enabled (boolean value) api_v3 = true # A list of enabled identity extensions with a special entry all which # indicates every extension is enabled. Empty list indicates all # extensions are disabled. To get the list of extensions run: # 'openstack extension list --identity' (list value) #api_extensions = all # Are domain specific drivers enabled? This configuration value should # be same as [identity]->domain_specific_drivers_enabled in # keystone.conf. (boolean value) #domain_specific_drivers = false # Does the environment have the security compliance settings enabled? # (boolean value) #security_compliance = false # Is the project tags identity v3 API available? (boolean value) #project_tags = false [image] # # From tempest.config # # Catalog type of the Image service. (string value) #catalog_type = image # The image region name to use. If empty, the value of identity.region # is used instead. If no such region is found in the service catalog, # the first found one is used. (string value) #region = # The endpoint type to use for the image service. (string value) # Possible values: # public - <No description provided> # admin - <No description provided> # internal - <No description provided> # publicURL - <No description provided> # adminURL - <No description provided> # internalURL - <No description provided> #endpoint_type = publicURL # http accessible image (string value) #http_image = http://download.cirros-cloud.net/0.3.1/cirros-0.3.1-x86_64-uec.tar.gz # Timeout in seconds to wait for an image to become available. # (integer value) #build_timeout = 300 # Time in seconds between image operation status checks. (integer # value) #build_interval = 1 # A list of image's container formats users can specify. (list value) #container_formats = ami,ari,aki,bare,ovf,ova # A list of image's disk formats users can specify. (list value) #disk_formats = ami,ari,aki,vhd,vmdk,raw,qcow2,vdi,iso,vhdx [image-feature-enabled] # # From tempest.config # # DEPRECATED: Is the v2 image API enabled (boolean value) # This option is deprecated for removal. # Its value may be silently ignored in the future. # Reason: Glance v1 APIs are deprecated and v2 APIs are current one. # In future, Tempest will test v2 APIs only so this config option will # be removed. #api_v2 = true # DEPRECATED: Is the v1 image API enabled (boolean value) # This option is deprecated for removal. # Its value may be silently ignored in the future. # Reason: Glance v1 APIs are deprecated and v2 APIs are current one. # In future, Tempest will test v2 APIs only so this config option will # be removed. #api_v1 = true [network] # # From tempest.config # # Catalog type of the Neutron service. (string value) #catalog_type = network # The network region name to use. If empty, the value of # identity.region is used instead. If no such region is found in the # service catalog, the first found one is used. (string value) #region = # The endpoint type to use for the network service. (string value) # Possible values: # public - <No description provided> # admin - <No description provided> # internal - <No description provided> # publicURL - <No description provided> # adminURL - <No description provided> # internalURL - <No description provided> #endpoint_type = publicURL # The cidr block to allocate project ipv4 subnets from (string value) #project_network_cidr = 10.100.0.0/16 # The mask bits for project ipv4 subnets (integer value) #project_network_mask_bits = 28 # The cidr block to allocate project ipv6 subnets from (string value) #project_network_v6_cidr = 2003::/48 # The mask bits for project ipv6 subnets (integer value) #project_network_v6_mask_bits = 64 # Whether project networks can be reached directly from the test # client. This must be set to True when the 'fixed' connect_method is # selected. (boolean value) project_networks_reachable = true # Id of the public network that provides external connectivity (string # value) #public_network_id = # Default floating network name. Used to allocate floating IPs when # neutron is enabled. (string value) #floating_network_name = <None> # Id of the public router that provides external connectivity. This # should only be used when Neutron's 'allow_overlapping_ips' is set to # 'False' in neutron.conf. usually not needed past 'Grizzly' release # (string value) #public_router_id = # Timeout in seconds to wait for network operation to complete. # (integer value) #build_timeout = 300 # Time in seconds between network operation status checks. (integer # value) #build_interval = 1 # List of dns servers which should be used for subnet creation (list # value) #dns_servers = 8.8.8.8,8.8.4.4 # vnic_type to use when launching instances with pre-configured ports. # Supported ports are: ['normal','direct','macvtap'] (string value) # Possible values: # <None> - <No description provided> # normal - <No description provided> # direct - <No description provided> # macvtap - <No description provided> #port_vnic_type = <None> # port profile to use when launching instances with pre-configured # ports. (dict value) #port_profile = # List of ip pools for subnetpools creation (list value) #default_network = 1.0.0.0/16,2.0.0.0/16 # The environment does not support network separation between tenants. # (boolean value) #shared_physical_network = false [network-feature-enabled] # # From tempest.config # # Allow the execution of IPv6 tests (boolean value) #ipv6 = true # A list of enabled network extensions with a special entry all which # indicates every extension is enabled. Empty list indicates all # extensions are disabled. To get the list of extensions run: 'neutron # ext-list' (list value) #api_extensions = all # Allow the execution of IPv6 subnet tests that use the extended IPv6 # attributes ipv6_ra_mode and ipv6_address_mode (boolean value) #ipv6_subnet_attributes = false # Does the test environment support changing port admin state (boolean # value) #port_admin_state_change = true # Does the test environment support port security? (boolean value) #port_security = false # Does the test environment support floating_ips (boolean value) #floating_ips = true [object-storage] # # From tempest.config # # Catalog type of the Object-Storage service. (string value) #catalog_type = object-store # The object-storage region name to use. If empty, the value of # identity.region is used instead. If no such region is found in the # service catalog, the first found one is used. (string value) #region = # The endpoint type to use for the object-store service. (string # value) # Possible values: # public - <No description provided> # admin - <No description provided> # internal - <No description provided> # publicURL - <No description provided> # adminURL - <No description provided> # internalURL - <No description provided> #endpoint_type = publicURL # Number of seconds to time on waiting for a container to container # synchronization complete. (integer value) #container_sync_timeout = 600 # Number of seconds to wait while looping to check the status of a # container to container synchronization (integer value) #container_sync_interval = 5 # Role to add to users created for swift tests to enable creating # containers (string value) #operator_role = Member # User role that has reseller admin (string value) #reseller_admin_role = ResellerAdmin # Name of sync realm. A sync realm is a set of clusters that have # agreed to allow container syncing with each other. Set the same # realm name as Swift's container-sync-realms.conf (string value) #realm_name = realm1 # One name of cluster which is set in the realm whose name is set in # 'realm_name' item in this file. Set the same cluster name as Swift's # container-sync-realms.conf (string value) #cluster_name = name1 [object-storage-feature-enabled] # # From tempest.config # # A list of the enabled optional discoverable apis. A single entry, # all, indicates that all of these features are expected to be enabled # (list value) #discoverable_apis = all # Execute (old style) container-sync tests (boolean value) #container_sync = true # Execute object-versioning tests (boolean value) #object_versioning = true # Execute discoverability tests (boolean value) #discoverability = true [oslo_concurrency] # # From oslo.concurrency # # Enables or disables inter-process locks. (boolean value) #disable_process_locking = false # Directory to use for lock files. For security, the specified # directory should only be writable by the user running the processes # that need locking. Defaults to environment variable OSLO_LOCK_PATH. # If external locks are used, a lock path must be set. (string value) #lock_path = <None> [scenario] # # From tempest.config # # DEPRECATED: Directory containing image files (string value) # This option is deprecated for removal. # Its value may be silently ignored in the future. #img_dir = /opt/stack/new/devstack/files/images/cirros-0.3.1-x86_64-uec # Image file name (string value) # Deprecated group/name - [scenario]/qcow2_img_file #img_file = cirros-0.3.1-x86_64-disk.img # Image disk format (string value) #img_disk_format = qcow2 # Image container format (string value) #img_container_format = bare # Glance image properties. Use for custom images which require them # (dict value) #img_properties = <None> # DEPRECATED: AMI image file name (string value) # This option is deprecated for removal. # Its value may be silently ignored in the future. #ami_img_file = cirros-0.3.1-x86_64-blank.img # DEPRECATED: ARI image file name (string value) # This option is deprecated for removal. # Its value may be silently ignored in the future. #ari_img_file = cirros-0.3.1-x86_64-initrd # DEPRECATED: AKI image file name (string value) # This option is deprecated for removal. # Its value may be silently ignored in the future. #aki_img_file = cirros-0.3.1-x86_64-vmlinuz # DHCP client used by images to renew DCHP lease. If left empty, # update operation will be skipped. Supported clients: "udhcpc", # "dhclient" (string value) # Possible values: # udhcpc - <No description provided> # dhclient - <No description provided> # '' - <No description provided> #dhcp_client = udhcpc [service-clients] # # From tempest.config # # Timeout in seconds to wait for the http request to return (integer # value) #http_timeout = 60 # Specify an http proxy to use. (string value) #proxy_url = <None> [service_available] # # From tempest.config # # Whether or not cinder is expected to be available (boolean value) #cinder = true # Whether or not neutron is expected to be available (boolean value) neutron = true # Whether or not glance is expected to be available (boolean value) #glance = true # Whether or not swift is expected to be available (boolean value) #swift = true # Whether or not nova is expected to be available (boolean value) #nova = true [validation] # # From tempest.config # # Enable ssh on created servers and creation of additional validation # resources to enable remote access (boolean value) #run_validation = false # Enable/disable security groups. (boolean value) #security_group = true # Enable/disable security group rules. (boolean value) #security_group_rules = true # Default IP type used for validation: -fixed: uses the first IP # belonging to the fixed network -floating: creates and uses a # floating IP (string value) # Possible values: # fixed - <No description provided> # floating - <No description provided> #connect_method = floating # Default authentication method to the instance. Only ssh via keypair # is supported for now. Additional methods will be handled in a # separate spec. (string value) # Possible values: # keypair - <No description provided> #auth_method = keypair # Default IP version for ssh connections. (integer value) #ip_version_for_ssh = 4 # Timeout in seconds to wait for ping to succeed. (integer value) #ping_timeout = 120 # Timeout in seconds to wait for the TCP connection to be successful. # (integer value) #connect_timeout = 60 # Timeout in seconds to wait for the ssh banner. (integer value) #ssh_timeout = 300 # User name used to authenticate to an instance. (string value) #image_ssh_user = root # Password used to authenticate to an instance. (string value) #image_ssh_password = password # Shell fragments to use before executing a command when sshing to a # guest. (string value) #ssh_shell_prologue = set -eu -o pipefail; PATH=$$PATH:/sbin; # The packet size for ping packets originating from remote linux hosts # (integer value) #ping_size = 56 # The number of ping packets originating from remote linux hosts # (integer value) #ping_count = 1 # Unallocated floating IP range, which will be used to test the # floating IP bulk feature for CRUD operation. This block must not # overlap an existing floating IP pool. (string value) #floating_ip_range = 10.0.0.0/29 # Network used for SSH connections. Ignored if # connect_method=floating. (string value) #network_for_ssh = public [volume] # # From tempest.config # # Time in seconds between volume availability checks. (integer value) #build_interval = 1 # Timeout in seconds to wait for a volume to become available. # (integer value) #build_timeout = 300 # Catalog type of the Volume Service (string value) #catalog_type = volume # The volume region name to use. If empty, the value of # identity.region is used instead. If no such region is found in the # service catalog, the first found one is used. (string value) #region = # The endpoint type to use for the volume service. (string value) # Possible values: # public - <No description provided> # admin - <No description provided> # internal - <No description provided> # publicURL - <No description provided> # adminURL - <No description provided> # internalURL - <No description provided> #endpoint_type = publicURL # A list of backend names separated by comma. The backend name must be # declared in cinder.conf (list value) #backend_names = BACKEND_1,BACKEND_2 # Backend protocol to target when creating volume types (string value) #storage_protocol = iSCSI # Backend vendor to target when creating volume types (string value) #vendor_name = Open Source # Disk format to use when copying a volume to image (string value) #disk_format = raw # Default size in GB for volumes created by volumes tests (integer # value) #volume_size = 1 # A reference to existing volume for volume manage. It contains two # elements, the first is ref type (like 'source-name', 'source-id', # etc), the second is volume name template used in storage backend # (list value) #manage_volume_ref = source-name,volume-%s # A reference to existing snapshot for snapshot manage. It contains # two elements, the first is ref type (like 'source-name', 'source- # id', etc), the second is snapshot name template used in storage # backend (list value) #manage_snapshot_ref = source-name,_snapshot-%s # Lower version of the test target microversion range. The format is # 'X.Y', where 'X' and 'Y' are int values. Tempest selects tests based # on the range between min_microversion and max_microversion. If both # values are not specified, Tempest avoids tests which require a # microversion. Valid values are string with format 'X.Y' or string # 'latest' (string value) #min_microversion = <None> # Upper version of the test target microversion range. The format is # 'X.Y', where 'X' and 'Y' are int values. Tempest selects tests based # on the range between min_microversion and max_microversion. If both # values are not specified, Tempest avoids tests which require a # microversion. Valid values are string with format 'X.Y' or string # 'latest' (string value) #max_microversion = <None> [volume-feature-enabled] # # From tempest.config # # Runs Cinder multi-backend test (requires 2 backends) (boolean value) #multi_backend = false # Runs Cinder volumes backup test (boolean value) #backup = true # Runs Cinder volume snapshot test (boolean value) #snapshot = true # Runs Cinder volume clone test (boolean value) #clone = true # Runs Cinder manage snapshot tests (boolean value) #manage_snapshot = false # Runs Cinder manage volume tests (boolean value) #manage_volume = false # A list of enabled volume extensions with a special entry all which # indicates every extension is enabled. Empty list indicates all # extensions are disabled (list value) #api_extensions = all # DEPRECATED: Is the v1 volume API enabled (boolean value) # This option is deprecated for removal. # Its value may be silently ignored in the future. # Reason: The v1 volume API has been deprecated since Juno release, # and the API will be removed. #api_v1 = false # Is the v2 volume API enabled (boolean value) #api_v2 = true # Is the v3 volume API enabled (boolean value) #api_v3 = true # Does the cloud support extending the size of a volume which is # currently attached to a server instance? This depends on the 3.42 # volume API microversion and the 2.51 compute API microversion. Also, # not all volume or compute backends support this operation. (boolean # value) #extend_attached_volume = false References:
|
AuthorJames Benson is an IT professional. 
Archives
August 2022
Categories
All
|
 RSS Feed

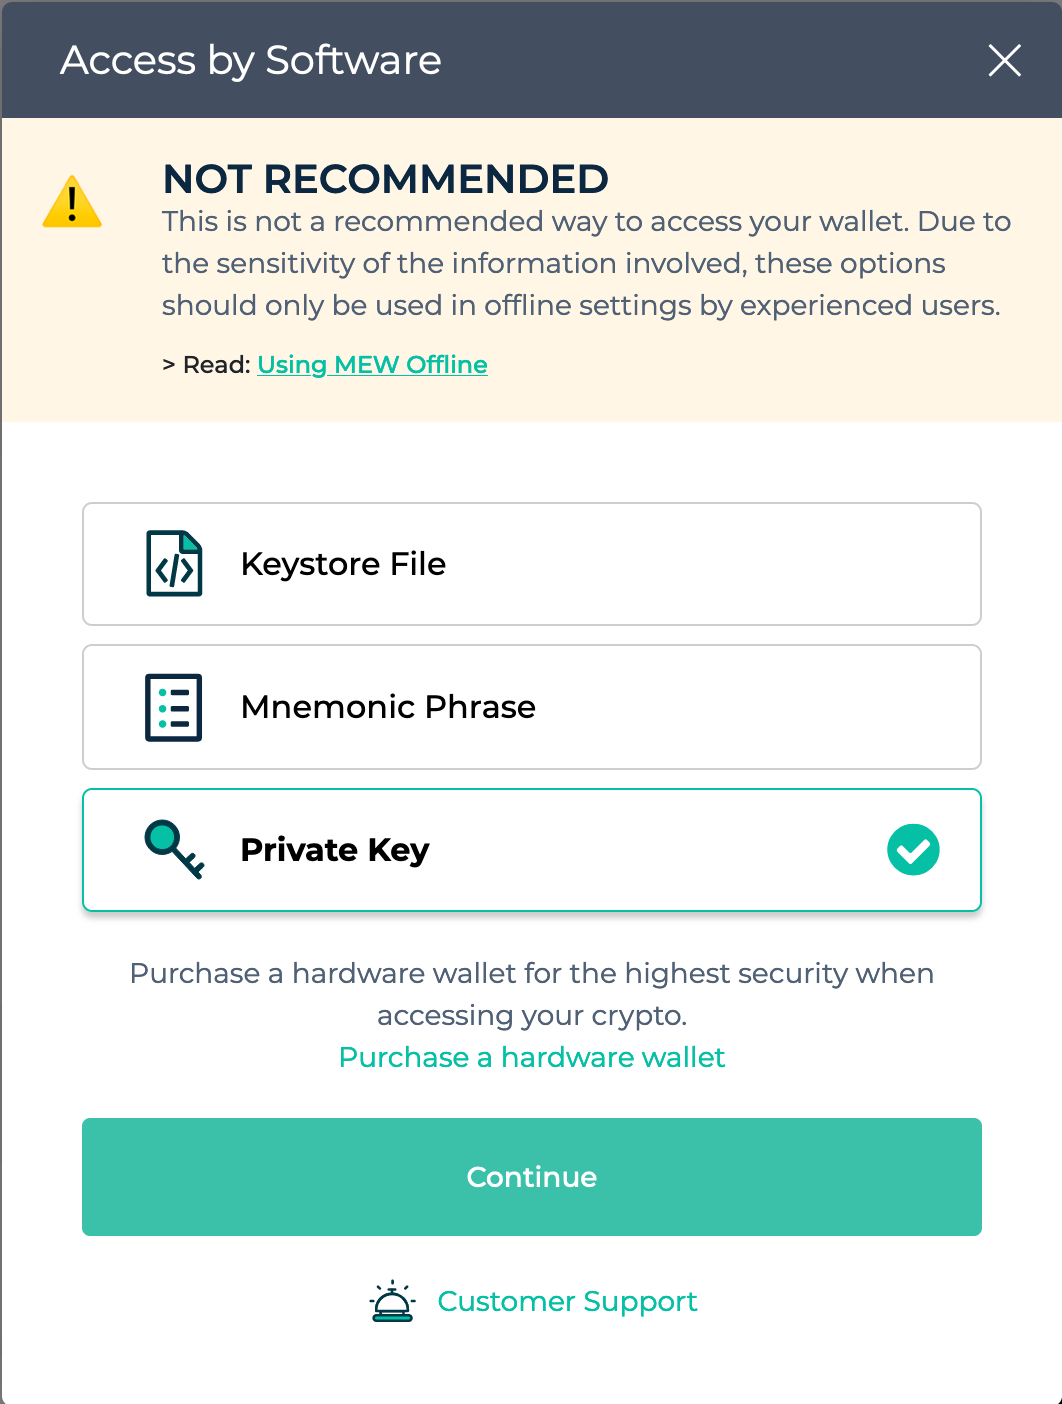