|
A while back I wrote about how to deploy Openstack Ocata, considering that was 4 years ago I thought it best to update how to deploy Openstack. A few items first.
AIMS:
In this post, we will still be using Kolla - Xena, we will still have our 3 network planes (for public - 10.245.x.x, private - 192.168.x.x, and data networks - 10.100.x.x), at least 4 servers (3 controllers and 1 compute) with Ubuntu 20.04 LTS deployed on them. On the public network, you'll want to have a bridge and virtual interfaces (or at least that's how I deploy it. Let me know in the comments how your networking is done.). Check out the code snippet below on how I do that consistently after each reboot. The data network needs to be high speed 10G or better, private and public can be 1G if necessary but generally speaking, higher is always better ;-) sudo sh -c "cat > /etc/rc.local <<__EOF__ #!/bin/sh -e ip a | grep -Eq ': veno1.*state UP' || sudo ip link add veno0 type veth peer name veno1 ip link set veno0 up ip link set veno1 up ip link set veno0 master br0 exit 0 __EOF__" sudo chmod +x /etc/rc.local sudo chmod 755 /etc/rc.local sudo chown root:root /etc/rc.local sudo /etc/rc.local After our network is properly setup, we can bootstrap kolla. It's highly recommended to setup a virtual environment for Kolla so that nothing interferes with it. To do so, we will install a few python packages to setup the venv, install kolla and ansible, optimize ansible so it's a bit faster, then copy the kolla files (global and multinode) to the correct spaces. # "$HOME"/requirements.txt contents: # ansible<ANSIBLE_MAX_VERSION # https://tarballs.opendev.org/openstack/kolla-ansible/kolla-ansible-stable-OPENSTACK_RELEASE.tar.gz OPENSTACK_RELEASE=xena ANSIBLE_MAX_VERSION=5.0 # Dependencies sudo apt-get update sudo apt-get -qqy install python3-dev libffi-dev gcc libssl-dev python3-pip python3-venv # basedir and venv sudo mkdir -p /opt/kolla sudo chown "$USER":"$USER" /opt/kolla cd /opt/kolla python3 -m venv venv source venv/bin/activate python3 -m pip install -U pip wheel # Update requirements file sed -i s/OPENSTACK_RELEASE/"${OPENSTACK_RELEASE}"/ "$HOME"/requirements.txt sed -i s/ANSIBLE_MAX_VERSION/"${ANSIBLE_MAX_VERSION}"/ "$HOME"/requirements.txt python3 -m pip install -r "$HOME"/requirements.txt # General Ansible config sudo mkdir -p /etc/ansible sudo chown "$USER":"$USER" /etc/ansible cat > /etc/ansible/ansible.cfg <<__EOF__ [defaults] host_key_checking=False pipelining=True forks=100 interpreter_python=/usr/bin/python3 timeout = 30 __EOF__ # Configure kolla sudo mkdir -p /etc/kolla sudo chown "$USER":"$USER" /etc/kolla cp -r /opt/kolla/venv/share/kolla-ansible/etc_examples/kolla/* /etc/kolla || true cp /opt/kolla/venv/share/kolla-ansible/ansible/inventory/* . || true Once that is complete, we want to make sure:
After that, we can do two things simultaneously:
If we want to enable swift via ceph (i.e. enable radosgw), in the ceph tab below you'll see a line to enable swift. That refers to the swift tab. If you want to skip swift, then don't worry about the swift tab and just do everything else in the ceph tab. There were a couple of items that really tripped me up with getting rados to work properly. The first was with TLS enabled, we need to install the certificates into the system to be able to curl the endpoints properly. To do this, copy the certificates in the /etc/kolla/certificates/private to all of the servers ca-certificates folder: /usr/local/share/ca-certificates/ and `update-ca-certificates`. The next issue was getting the ports properly configured. Keep them set to 7480 as indicated. I'm not sure why, but in the globals file there is a line: #ceph_rgw_port: 7480 keep this line commented, otherwise, for me, uncommenting it and keeping it 7480, my HAProxy would fail to deploy. I do not know why, but that is what happened. So just keep that in mind. Also, port 7480 previously was used for Civetweb (depricated as of pacific), however, as of pacific, this is the default port of Beastmode. Lastly, and the biggest thing that tripped me up is the configuration file for swift, along with each of the radosgw that is deployed on, you need to have the same configuration for "client.rgw.default". I'm bolding that because it literally took me 2 weeks to figure that out. It is not documented anywhere and nearly impossible to find anything online about it. I only found it in one mail thread. Once the configs are set, you'll want to restart your rgw's using the "sudo ceph orch restart <cluster>" command. Lastly, one of the global options is only available from Xena onwards, so if you are trying to install something on an older openstack version, you'll likely run into some issues. And on that same note, the endpoints that are created, aren't 100% perfect and they'll need to be modified. By default, they are just 'http.../v1/...', they need to have 'http.../swift/v1/...''. Updating the endpoint needs to happen after the deploy of course. # These initial groups are the only groups required to be modified. The # additional groups are for more control of the environment. [control] # These hostname must be resolvable from your deployment host 192.168.1.40 192.168.1.38 192.168.1.36 # The above can also be specified as follows: #control[01:03] ansible_user=kolla # The network nodes are where your l3-agent and loadbalancers will run # This can be the same as a host in the control group [network] 192.168.1.40 192.168.1.38 192.168.1.36 [compute] 192.168.1.28 [monitoring] # When compute nodes and control nodes use different interfaces, # you need to comment out "api_interface" and other interfaces from the globals.yml # and specify like below: #compute01 neutron_external_interface=eth0 api_interface=em1 storage_interface=em1 tunnel_interface=em1 [storage] 192.168.1.40 192.168.1.38 192.168.1.36 192.168.1.28 [deployment] localhost ansible_connection=local kolla_base_distro: "centos" kolla_install_type: "source" network_interface: "eno1" kolla_external_vip_interface: "br0" neutron_external_interface: "veno1" keepalived_virtual_router_id: "63" kolla_internal_vip_address: "192.168.1.63" kolla_external_vip_address: "10.245.121.63" kolla_enable_tls_internal: "yes" kolla_enable_tls_external: "yes" kolla_enable_tls_backend: "yes" rabbitmq_enable_tls: "yes" kolla_copy_ca_into_containers: "yes" openstack_cacert: "{{ '/etc/pki/tls/certs/ca-bundle.crt' if kolla_enable_tls_external == 'yes' else '' }}" glance_backend_ceph: "yes" glance_backend_file: "no" glance_enable_rolling_upgrade: "yes" enable_cinder: "yes" ceph_nova_user: "cinder" cinder_backend_ceph: "yes" cinder_backup_driver: "ceph" nova_backend_ceph: "yes" # Swift (radosgw) options: enable_ceph_rgw: true # Feature from Xena onwards enable_swift: "no" # Feature for swift on disk, not through ceph. enable_swift_s3api: "yes" enable_ceph_rgw_keystone: true ceph_rgw_swift_compatibility: true ceph_rgw_swift_account_in_url: true enable_ceph_rgw_loadbalancer: true ceph_rgw_hosts: - host: r1-710-40 ip: 192.168.1.40 port: 7480 - host: r1-710-38 ip: 192.168.1.38 port: 7480 - host: r1-710-36 ip: 192.168.1.36 port: 7480 docker_registry: "10.245.0.14" docker_registry_insecure: "yes" docker_registry_username: "kolla" enable_mariabackup: "no" enable_haproxy: "yes" kolla_external_fqdn: "optional.fqdn.com" echo "deb http://download.opensuse.org/repositories/devel:/kubic:/libcontainers:/stable/xUbuntu_$(lsb_release -rs)/ /" | sudo tee /etc/apt/sources.list.d/devel:kubic:libcontainers:stable.list curl -fsSL https://download.opensuse.org/repositories/devel:kubic:libcontainers:stable/xUbuntu_"$(lsb_release -rs)"/Release.key | gpg --dearmor | sudo tee /etc/apt/trusted.gpg.d/devel_kubic_libcontainers_stable.gpg > /dev/null # Update to fetch the package index for ceph added above sudo apt-get update sudo apt-get -qqy install podman podman --version MONITOR_IP=$1 CEPH_RELEASE=pacific # Update to fetch the latest package index sudo apt-get update # Fetch most recent version of cephadm curl --silent --remote-name --location https://github.com/ceph/ceph/raw/"$CEPH_RELEASE"/src/cephadm/cephadm chmod +x cephadm sudo ./cephadm add-repo --release "$CEPH_RELEASE" # Update to fetch the package index for ceph added above sudo apt-get update # Install ceph-common and cephadm packages sudo ./cephadm install ceph-common sudo ./cephadm install sudo mkdir -p /etc/ceph sudo ./cephadm bootstrap --mon-ip "$MONITOR_IP" # Turn on telemetry and accept Community Data License Agreement - Sharing sudo ceph telemetry on --license sharing-1-0 sudo ceph -v sudo ceph status sudo ceph orch host ls sudo ceph orch device ls --refresh sudo ceph orch apply osd --all-available-devices # Create pool for Cinder sudo ceph osd pool create volumes sudo rbd pool init volumes # Create pool for Cinder Backup sudo ceph osd pool create backups sudo rbd pool init backups # Create pool for Glance sudo ceph osd pool create images sudo rbd pool init images # Create pool for Nova sudo ceph osd pool create vms sudo rbd pool init vms # Create pool for Gnocchi #sudo ceph osd pool create metrics #sudo rbd pool init metrics # Enable swift, 1 for refstack, 3 for production source "$HOME"/swift_settings.sh 3 # Get cinder and cinder-backup ready sudo mkdir -p /etc/kolla/config/cinder/cinder-backup sudo chown -R ubuntu:ubuntu /etc/kolla/config/ sudo cp /etc/ceph/ceph.conf /etc/kolla/config/cinder/cinder-backup/ceph.conf sudo ceph auth get-or-create client.cinder-backup mon 'profile rbd' osd 'profile rbd pool=backups' mgr 'profile rbd pool=backups' > /etc/kolla/config/cinder/cinder-backup/ceph.client.cinder-backup.keyring sudo ceph auth get-or-create client.cinder mon 'profile rbd' osd 'profile rbd pool=volumes, profile rbd pool=vms, profile rbd pool=images' mgr 'profile rbd pool=volumes, profile rbd pool=vms, profile rbd pool=images' > /etc/kolla/config/cinder/cinder-backup/ceph.client.cinder.keyring sudo sed -i $'s/\t//g' /etc/kolla/config/cinder/cinder-backup/ceph.conf sudo sed -i $'s/\t//g' /etc/kolla/config/cinder/cinder-backup/ceph.client.cinder.keyring sudo sed -i $'s/\t//g' /etc/kolla/config/cinder/cinder-backup/ceph.client.cinder-backup.keyring # Get cinder-volume ready sudo mkdir -p /etc/kolla/config/cinder/cinder-volume sudo chown -R ubuntu:ubuntu /etc/kolla/config/ sudo cp /etc/ceph/ceph.conf /etc/kolla/config/cinder/cinder-volume/ceph.conf sudo ceph auth get-or-create client.cinder > /etc/kolla/config/cinder/cinder-volume/ceph.client.cinder.keyring sudo sed -i $'s/\t//g' /etc/kolla/config/cinder/cinder-volume/ceph.conf sudo sed -i $'s/\t//g' /etc/kolla/config/cinder/cinder-volume/ceph.client.cinder.keyring # Get glance ready sudo mkdir -p /etc/kolla/config/glance sudo chown -R ubuntu:ubuntu /etc/kolla/config/ sudo cp /etc/ceph/ceph.conf /etc/kolla/config/glance/ceph.conf sudo ceph auth get-or-create client.glance mon 'profile rbd' osd 'profile rbd pool=volumes, profile rbd pool=images' mgr 'profile rbd pool=volumes, profile rbd pool=images' > /etc/kolla/config/glance/ceph.client.glance.keyring sudo sed -i $'s/\t//g' /etc/kolla/config/glance/ceph.conf sudo sed -i $'s/\t//g' /etc/kolla/config/glance/ceph.client.glance.keyring # Get nova ready sudo mkdir -p /etc/kolla/config/nova sudo chown -R ubuntu:ubuntu /etc/kolla/config/ sudo cp /etc/ceph/ceph.conf /etc/kolla/config/nova/ceph.conf sudo ceph auth get-or-create client.cinder > /etc/kolla/config/nova/ceph.client.cinder.keyring sudo sed -i $'s/\t//g' /etc/kolla/config/nova/ceph.conf sudo sed -i $'s/\t//g' /etc/kolla/config/nova/ceph.client.cinder.keyring # Get Gnocchi ready #sudo mkdir -p /etc/kolla/config/gnocchi #sudo chown -R ubuntu:ubuntu /etc/kolla/config/ #sudo cp /etc/ceph/ceph.conf /etc/kolla/config/gnocchi/ceph.conf #sudo ceph auth get-or-create client.gnocchi mon 'profile rbd' osd 'profile rbd pool=metrics' mgr 'profile rbd pool=metrics' > /etc/kolla/config/gnocchi/ceph.client.gnocchi.keyring #sudo sed -i $'s/\t//g' /etc/kolla/config/gnocchi/ceph.conf #sudo sed -i $'s/\t//g' /etc/kolla/config/gnocchi/ceph.client.gnocchi.keyring # Verify all permissions are correct. sudo chown -R ubuntu:ubuntu /etc/kolla/config/ sudo ceph status #!/bin/bash set -euxo pipefail NUM_OF_WHOS=$1 sudo ceph orch apply rgw osiasswift --port=7480 --placement="$NUM_OF_WHOS" # Default port results in port conflict and fails. sudo ceph dashboard set-rgw-api-ssl-verify False sudo ceph orch apply mgr "$HOSTNAME" if [[ $(grep -c ceph_rgw_keystone_password /etc/kolla/passwords.yml) -eq 1 ]] then ceph_rgw_pass=$( grep ceph_rgw_keystone_password /etc/kolla/passwords.yml | cut -d':' -f2 | xargs ) rgw_keystone_admin_user="ceph_rgw" else ceph_rgw_pass=$( grep keystone_admin_password /etc/kolla/passwords.yml | cut -d':' -f2 | xargs ) rgw_keystone_admin_user="admin" fi internal_url=$( grep ^kolla_internal_vip_address: /etc/kolla/globals.yml | cut -d':' -f2 | xargs ) # https://docs.ceph.com/en/latest/radosgw/keystone/#integrating-with-openstack-keystone # https://www.spinics.net/lists/ceph-users/msg64137.html # The "WHO" field in the "ceph config set" needs to be "client.rgw.default" NOT # "client.radosgw.gateway". This can be verified by issuing "ceph config dump" # Additionally, the name of all of the gateways need to be present. WHO_IS="" NUM_WHO_IS=$(echo "$WHO_IS" | wc -w) while [[ "$NUM_WHO_IS" -lt "$NUM_OF_WHOS" ]] do WHO_IS="$(sudo ceph auth ls | grep client.rgw | grep client)" || true echo "Waiting..." sleep 10 NUM_WHO_IS=$(echo "$WHO_IS" | wc -w) done WHO_IS="client.rgw.default $WHO_IS" echo "RGW CLIENTS: $WHO_IS" for WHO in $WHO_IS; do sudo ceph config set "$WHO" rgw_keystone_api_version 3 sudo ceph config set "$WHO" rgw_keystone_url https://"$internal_url":35357 sudo ceph config set "$WHO" rgw_keystone_accepted_admin_roles "admin, ResellerAdmin" sudo ceph config set "$WHO" rgw_keystone_accepted_roles "_member_, member, admin, ResellerAdmin" sudo ceph config set "$WHO" rgw_keystone_implicit_tenants true # Implicitly create new users in their own tenant with the same name when authenticating via Keystone. Can be limited to s3 or swift only. sudo ceph config set "$WHO" rgw_keystone_admin_user "$rgw_keystone_admin_user" sudo ceph config set "$WHO" rgw_keystone_admin_password "$ceph_rgw_pass" # Got from the passwords.yml sudo ceph config set "$WHO" rgw_keystone_admin_project service sudo ceph config set "$WHO" rgw_keystone_admin_domain default sudo ceph config set "$WHO" rgw_keystone_verify_ssl false sudo ceph config set "$WHO" rgw_content_length_compat true sudo ceph config set "$WHO" rgw_enable_apis "s3, swift, swift_auth, admin" sudo ceph config set "$WHO" rgw_s3_auth_use_keystone true sudo ceph config set "$WHO" rgw_enforce_swift_acls true sudo ceph config set "$WHO" rgw_swift_account_in_url true sudo ceph config set "$WHO" rgw_swift_versioning_enabled true sudo ceph config set "$WHO" rgw_verify_ssl true done # Redeploy your rgw daemon sudo ceph orch restart rgw.osiasswift HOSTNAMES=$(sudo ceph orch host ls | grep -v HOST | awk '{print $1}' | tr '\n' ',') sudo ceph orch apply mgr "$HOSTNAMES" # Add back-up mgr hosts Okay, so at this point, Ceph and swift have been installed completely, kolla bootstrap-servers and kolla pull has been completed. Next up, you can kolla-ansible deploy and kolla-ansible post-deploy and install the python-openstackclient. I like creating the flavors as follows. This gives you some general compute (GP), CPU focused compute (CB), and Memory focused compute (MB), and then two options for disk, 20GB or 40GB. openstack flavor create --id 1 --vcpus 1 --ram 2048 --disk 20 gp1.small openstack flavor create --id 2 --vcpus 2 --ram 4096 --disk 20 gp1.medium openstack flavor create --id 3 --vcpus 4 --ram 9216 --disk 20 gp1.large openstack flavor create --id 4 --vcpus 1 --ram 1024 --disk 20 cb1.small openstack flavor create --id 5 --vcpus 2 --ram 2048 --disk 20 cb1.medium openstack flavor create --id 6 --vcpus 4 --ram 4096 --disk 20 cb1.large openstack flavor create --id 7 --vcpus 1 --ram 3072 --disk 20 mb1.small openstack flavor create --id 8 --vcpus 2 --ram 6144 --disk 20 mb1.medium openstack flavor create --id 9 --vcpus 4 --ram 12288 --disk 20 mb1.large openstack flavor create --id 11 --vcpus 1 --ram 2048 --disk 40 gp2.small openstack flavor create --id 12 --vcpus 2 --ram 4096 --disk 40 gp2.medium openstack flavor create --id 13 --vcpus 4 --ram 9216 --disk 40 gp2.large openstack flavor create --id 14 --vcpus 1 --ram 1024 --disk 40 cb2.small openstack flavor create --id 15 --vcpus 2 --ram 2048 --disk 40 cb2.medium openstack flavor create --id 16 --vcpus 4 --ram 4096 --disk 40 cb2.large openstack flavor create --id 17 --vcpus 1 --ram 3072 --disk 40 mb2.small openstack flavor create --id 18 --vcpus 2 --ram 6144 --disk 40 mb2.medium openstack flavor create --id 19 --vcpus 4 --ram 12288 --disk 40 mb2.large Closing notes: I realize that this is a long post and due to the nature of it, complicated. If you have ANY question, please reach out in the comments and I'll try to update the post if anything is unclear. I was mulling over this for weeks, so I don't expect it to work out the first time for you, but hopefully you'll get some nuggets from this. Some things are probably very clear to me after starring at it for so long, so please let me help you make it clear as well. Good luck!
After migrating some VM's from OpenStack to VMware, we ran into some issues where vCenter refuses to boot a VM due to the error: Object type requires hosted I/O.
To fix this, SSH into the ESXi host where the VM is being hosted, or where you can reach the disk files if it is on a network datastore. Once SSH'ed into the host, browse to the VM folder containing the disk: cd /vmfs/volumes/DS1/VM1/ vmkfstools -x check disk.vmdk Disk needs repaired vmkfstools -x repair “disk.vmdk” Disk was successfully repaired. Start VM from vCenter. Remember the vmdk may be different if you have snapshotted the VM. Take a look at the VM hardware and disk location if you need help finding the disk.
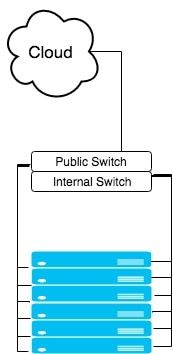
Recently, there were some issues within OpenStack which we wanted to investigate further, but to keep our users happy, we migrated their VM's from OpenStack to VMware. Our setup is as follows:
First, in OpenStack snapshot your VM, then save your image locally:
openstack image save myVM --file=myVM.img
Ideally the OpenStack command will work, but if you have large files, the command may timeout. If that's the case, you can save it directly from ceph, here are the command you'll need:
rbd export images/<VM UUID> myVM.img
Now convert the image to vmdk:
qemu-img convert -f raw -O vmdk myVM.img myVM.vmdk
Next create your VMX file, it is best to create as minimal a vmx file as possible, this is what worked for me for a ubuntu server VM:
.encoding = “UTF-8”
config.version = "8"
virtualHW.version = "14"
memsize = "2048"
displayName = "VM1"
scsi0.present = "true"
scsi0.sharedBus = "none"
scsi0.virtualDev = "lsilogic"
virtualHW.productCompatibility = "hosted"
guestOS = "linux"
ethernet0.present= "true"
ethernet0.startConnected = "false"
ethernet0.virtualDev = "e1000"
ethernet0.connectionType = "hostonly"
ethernet1.present= "true"
ethernet1.startConnected = "true"
ethernet1.virtualDev = "e1000"
ethernet1.connectionType = "nat"
ethernet1.networkName = "Public VM Network"
ide0:0.present = "TRUE"
ide0:0.fileName = "myVM.vmdk"
ide0:0.redo = ""
sched.ide0:0.shares = "normal"
sched.ide0:0.throughputCap = "off"
Here are some further details/references about some of those lines. There are only three required lines in a VMX file: config.version = "8" This value should most likely be "8", "7" is legacy, and 6 is for even older hardware. virtualHW.version = "14" This value depends on the product version and compatibility, 14 is for a minimum of ESXi 6.5. guestOS = "linux" For windows VM's this list may not be complete and you might want to dig into this file to find more. For example, windows 10, 64-bit, should be "windows9-64". To help determine the nic, you should pick this based off of the guestOS. ethernet0.virtualDev = "e1000" This also shows how the guestOS is tied to the ethernet. numvcpus = "2" To change the default, number of CPU's from 1 to 2. memsize = "2048 To change the RAM in MB, there are some limitations based on virtualHW version and ESXi version. I hope this helps anyone who is trying to migrate OpenStack VM's to VMware.
Now that you've deployed OpenStack from my previous post, it's time to configure OpenStack so that we can use it. This will be a short post showing you the commands necessary to create a functional external network for VM's to reach, along with users, local networking, updating security groups, creating flavors and images. It sounds like a lot, but it's easy to do with the CLI.
####################
# VIRTUAL INTERFACES
####################
auto eno1

auto eno1:1
iface eno1:1 inet static
    address 192.168.6.31
    netmask 255.255.255.0

auto eno1:2
iface eno1:2 inet static
    name exteno
    address 10.245.126.5
    netmask 255.255.255.0
    gateway 10.245.126.253
    dns-nameservers 10.245.0.10
    mtu 1500
#########################
# END VIRTUAL INTERFACES
#########################
Let's begin....
Node setup: First on all of your controllers, we will need to install bridge-utils and update the /etc/network/interfaces file. In the file below my eno1 is internal and my eno2 is public facing. I converted my eno2 into a bridge:
OpenStack Heat can be a powerful tool to help demonstrate a specific environment for testing, for autoscaling real-world applications, and more. I would like to detail a simple example to help a user get started.
Traditionally, if a user was given a new project in OpenStack, a network, subnet, and router would need to be created. The interfaces in the networking would need to be connected and finally a user would be able to create the VM’s. All of this could be done automatically in a HOT template if desired. To begin, lets decipher a simple OpenStack Heat template (written in a yaml format) where we just boot a VM and have it attached to an already existing private network.
If we dissect this template, we see a few main features:
Lets inspect each of these one at a time. Heat_template_version This is a specific date that specifies what features are possible. The options are: 2013-05-23 - Icehouse 2014-10-16 - Juno 2015-04-30 - Kilo 2015-10-15 - Liberty 2016-04-08 - Mitaka 2016-10-14 - Newton 2017-02-24 - Octa Each of these dates, offer different features and possibilities. However, like many things in openstack, many features have been backported to earlier versions if possible. If you attempt a date other than these, your template will be refused. You can use any one of these dates on your OpenStack cluster as long as it is designed for that OpenStack or earlier. For example, you can deploy an Icehouse template on Mitaka, but you wouldn’t be able to deploy a Mitaka heat template on Icehouse. Note: For AWS Cloudformation, they have similar template, however, they have only a single date that is valid: AWSTemplateFormatVersion "2010-09-09" Parameters: This section can be laid out as follows: 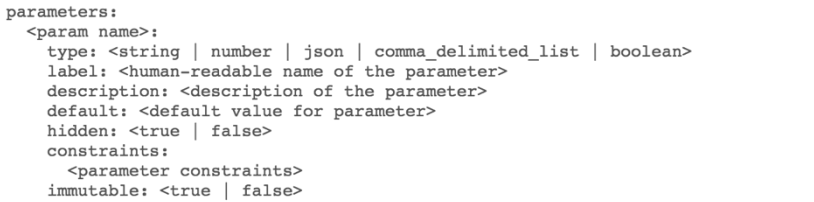
In the case shown above, I used image, flavor, key, and private_network. Any name is possible, but it should include as least the required sections: type and label. A description is, of course, a helpful thing to have and would always recommend it. Likewise, default might be good to help users always have a default keypair selected, or image type. Constraints is nice as well, because you could implement constraints that limit images, for example, to only images that glance recognizes. When you select a constraint, a drop down menu will be shown giving you only those options provided. Also with constraints, you don't need to have all options, you can choose which options are available, like what flavor sizes or images a user can select. Passwords could be required to be somewhere in the range of 8 to 25 characters, etc. Tying constraints and defaults could give a user a standard but also options. Perhaps, you want the user to use a medium sized vm, but the option to go larger if needed. Here are a few constraint examples that could be used.
Constraints examples: - custom_constraint: nova.flavor - allowed_values: [m1.small, m1.medium, m1.large] - length: { min: 8, max: 25 } - custom_constraint: glance.image Resources: This section is what you’ll be creating the resources you need; this is the VM that you’ll be spinning up, the router and network that you’ll be creating, and the floating IP’s that you’ll be allocating and assigning. The following is the syntax for the resources section: 
The only required section here is the type, however, you’ll frequently need to include properties. To boot a server, you’ll need at minimum an image and flavor, to be useful, you’ll also need to include the network and a key.
Depends_on is interesting because it can make servers dependent upon other servers allowing for more complex environments including things like load balancing. Likewise, the deletion policy is great for load balancing as well. This allows for servers to be deleted based off of their utilization, Output: Lastly, a helpful section is the outputs. 
You’ll need to include a value here, but this can be helpful in displaying items such as the instances floating IP. However, it can also be rather advanced by displaying web-hooks to dynamically scale a cluster, links to storage clusters, and display randomly generated passwords used in the cluster creation.
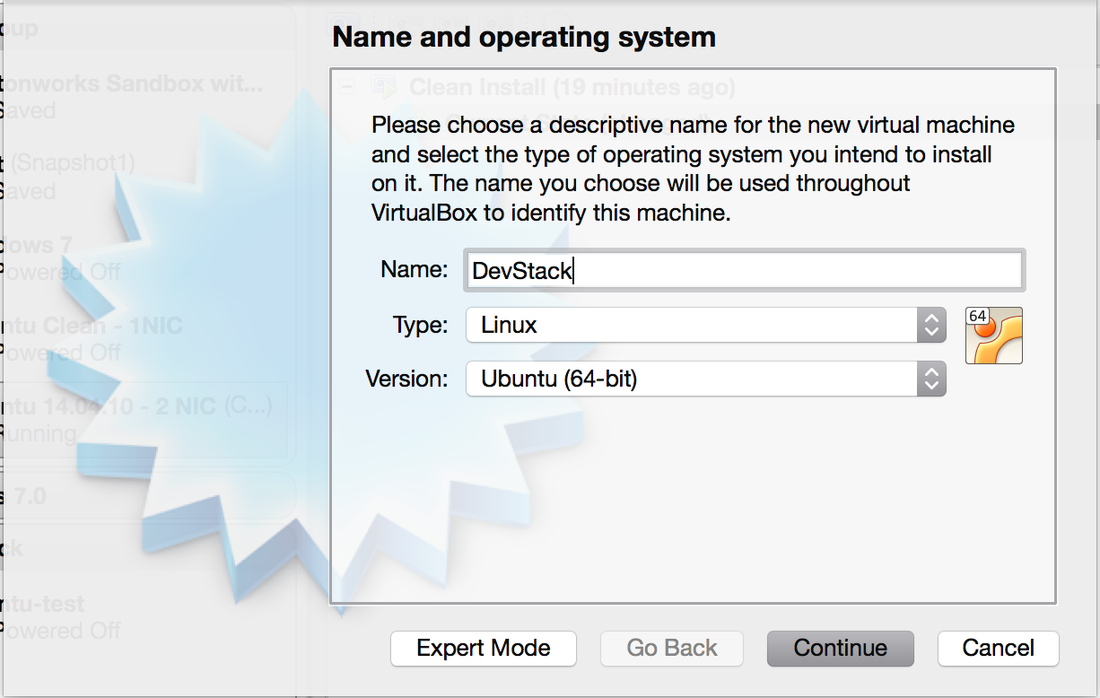
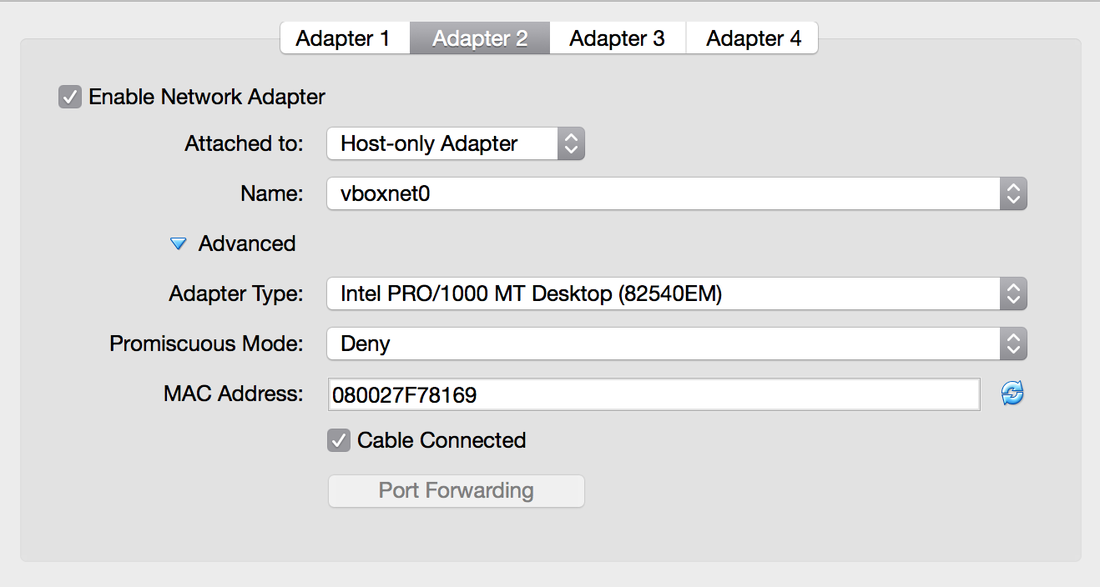
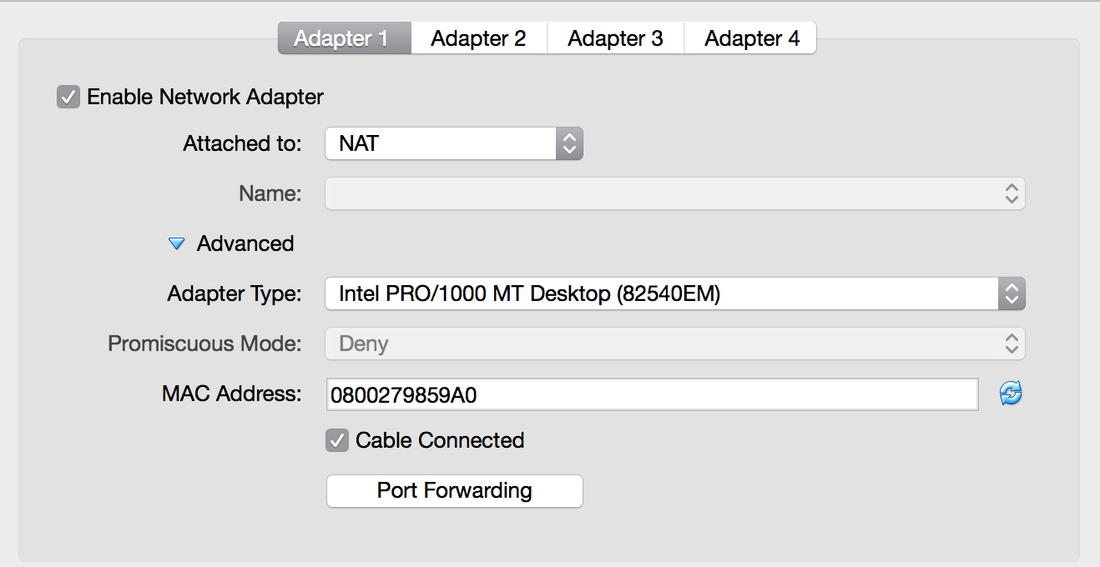
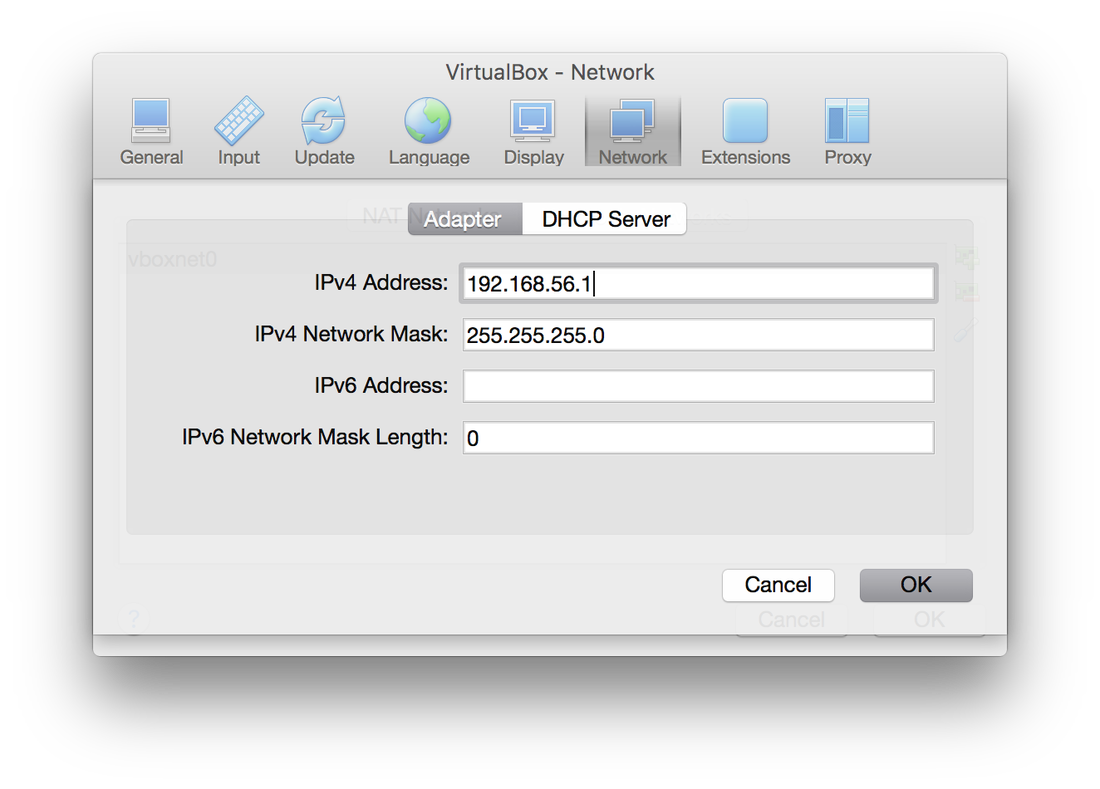
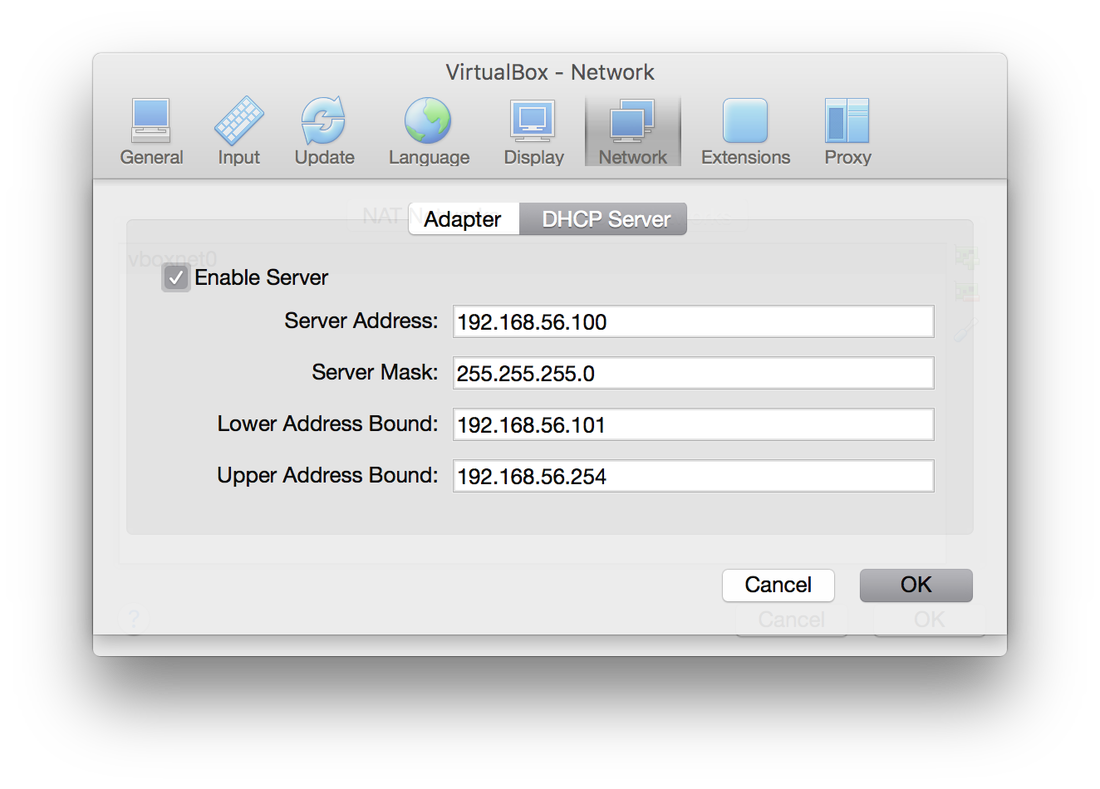
You can find more OpenStack Heat templates on my github page that detail assign floating IP's, create networking, even autoscaling. All of them have been tested using OpenStack Mitaka. You'll find that heat templates are relatively easy to create and manipulate once you understand the basics. References: https://github.com/JamesOBenson/OpenStack-Heat-Templates https://github.com/openstack/heat-templates/tree/master/hot http://docs.openstack.org/developer/heat/template_guide/hot_spec.html#heat-template-version https://docs.aws.amazon.com/AWSCloudFormation/latest/UserGuide/format-version-structure.html  OpenStack just recently came out with their latest version - Liberty. Below I will show you a quick tutorial on how to install your own DevStack on your laptop inside of a VirtualBox environment. Things you need: 64-Bit Laptop (I'm using a macbook pro running Mac OS 10.11.1) VirtualBox (I'm using 5.0.8 r103449) Ubuntu Server Image. Setting up VirtualBox I started off by creating a new VirtualBox Image called DevStack with 8192MB (8GB of RAM), 2 cores, and a 60GB Dynamically Allocated VDI storage. These are DevStacks recommended settings and will allow you to create a few instances of larger sizes. Please note, DevStack states that you can go as low as 1GB of RAM, however, I had issues with the installation completing. They recommend those settings for only creating one small instance. I would highly recommend doing as close to the recommended settings as possible or better if available. First create a Host-only Network called vboxnet0 (this can be found in the preferences of VirtualBox itself). The properties of that network are as follows (Pictures can be seen in the gallery). Once created go into the settings of your instance and modified the network adaptors. Adaptor 1 will be NAT, Adaptor 2 is a Host-only Adaptor attached to vboxnet0. Adaptor: IPv4 address: 192.168.56.1 IPvNetwork Mask: 255.255.255.0 DHCP Server Enabled: Server Address: 192.168.56.100 Server Mask 255.255.255.0 Lower Address Bound: 192.168.56.101 Upper Address Bound: 192.168.56.254 Installing Ubuntu Server and configurations At this point, I installed Ubuntu Server 14.04.3 LTS. I wont go through all of the details of setting up a server. But a few quick highlights:
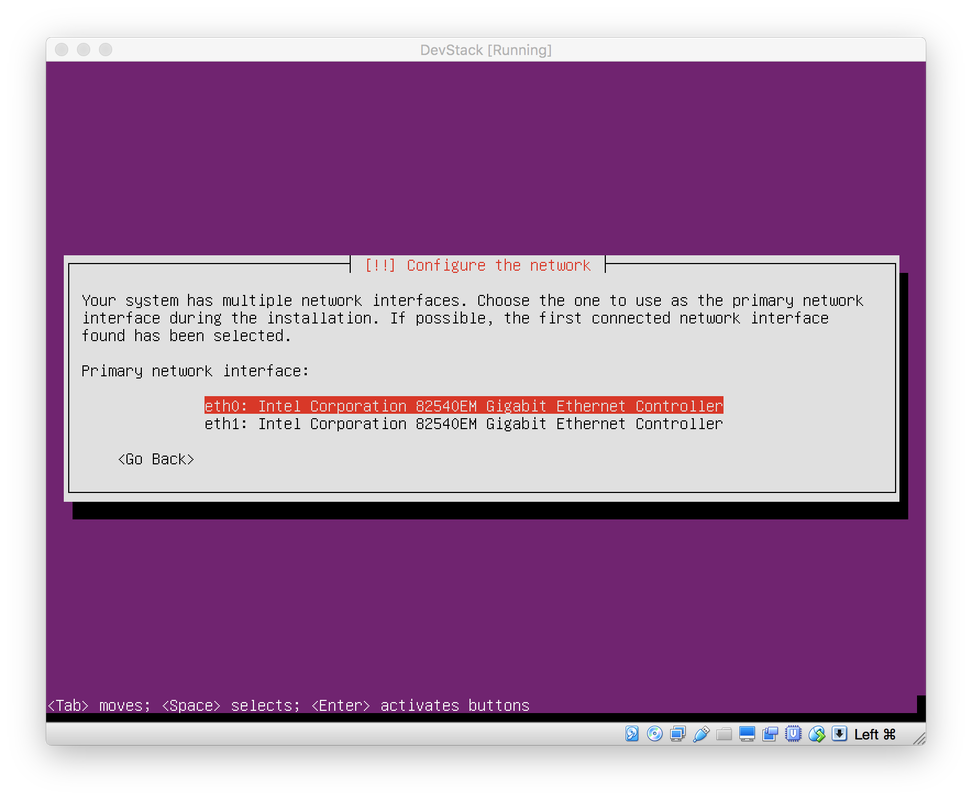
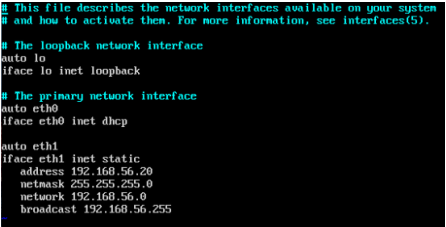 Now that we have Ubuntu server installed, we can get into the meat of installing DevStack (It's very simple, honest). Before we start to install DevStack, we want to make sure your network configurations are configured properly. $ ifconfig What you want to see is both eth0 and eth1 with an ip address. However, you'll likely only see eth0 with an IP address and nothing for eth1. So eth1 will need to be created and made a static IP that way you can always access it on the same IP address and also so that DevStack doesn't get crash because the IP changes due to eth0 being dynamic. So, first go to the following file: /etc/network/interfaces. You will need to add the following 6 lines to the end of the file so it can be reflected like the image on the right. auto eth1 iface eth1 inet static address 192.168.56.20 netmask 255.255.255.0 network 192.168.56.0 broadcast 192.168.56.255 Once this is complete, you can reboot your instance and run the ifconfig command once more and you should see both eth0 and eth1 appear. At this point you can SSH into your instance using your normal SSH client with the IP address used above, 192.168.56.20. Installing DevStack $ sudo apt-get install git $ git clone https://git.openstack.org/openstack-dev/devstack -b stable/liberty These two commands install git and clone the DevStack repository for the stable version of liberty. Next, change directory into DevStack and launch the installer: $ cd devstack/ $ ./stack.sh Now DevStack will install. Throughout the installation it will ask you for passwords. You can fill them out or let the be generated automatically. The file that they get saved to will be in: /devstack/samples/local.conf Once the installation is complete, you should see a nice printout on the screen indicating how to connect to horizon, keystone, how to run some examples and the default users and their passwords. It also mentions your host IP and how long it took to complete. At this point, you will likely notice that your host IP is different than the static IP that you created earlier, it's time to change it. 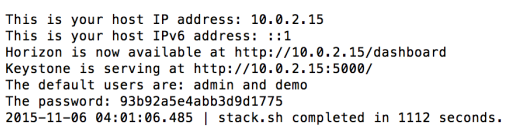 How to Migrate Keystone to Another IP address: This process is important for me at least to always have a uniform IP address on what is public and on how to access it. The IP address that DevStack uses are linked in a database and files. That means as you reboot your system or bring your laptop to other location and your instance acquirers a new IP, DevStack will cease to function properly. There are many ways to update the IP address. I perhaps do a simpler method, but have yet to find any issues with it. First go into your openrc file and search for these lines: if [[ $SERVICE_IP_VERSION == 6 ]]; then HOST_IPV6=${HOST_IPV6:-::1} SERVICE_HOST=${SERVICE_HOST:-[$HOST_IPV6]} GLANCE_HOST=${GLANCE_HOST:-[$HOST_IPV6]} else HOST_IP=${HOST_IP:-127.0.0.1} SERVICE_HOST=${SERVICE_HOST:-$HOST_IP} GLANCE_HOST=${GLANCE_HOST:-$HOST_IP} fi I am not using IPv6, so, I updated the HOST_IP line to the following: HOST_IP=${HOST_IP:-192.168.56.20} Once this was complete, I ran $ source openrc What this does, is many of the services reference that initial HOST_IP so updating that, will update all of them once you source it. At this point you can open your favorite web browser and type in 192.168.56.20 and your horizon dashboard should appear. Remember! That password that was printed out just after DevStack finished is your password for the admin account. Also, this is a GREAT time to take a snapshot in VirtualBox so you can always revert back to a fresh install of DevStack. Good luck coding! UPDATE (12/28/2015): I realized that my OS_AUTH_URL still reported as wrong when I downloaded my credentials, so here is how to fix that. First, you'll need to log into the sql database. $ mysql -u root keystone $ select id, url from endpoint where interface='public'; You should see a list of url's and id's, for my auth_url, I used the following command to update it to my static IP: $ update endpoint set url='http://192.168.56.20:5000/v2.0' where id='f268eed3e55c4395831809546e36acd8'; then restart your apache2 service: sudo /etc/init.d/apache2 restart at this point when you download your source file, you'll see that the auth_url is now correct. |
AuthorJames Benson is an IT professional. 
Archives
August 2022
Categories
All
|
 RSS Feed
