####################
# VIRTUAL INTERFACES
####################
auto eno1

auto eno1:1
iface eno1:1 inet static
    address 192.168.6.31
    netmask 255.255.255.0

auto eno1:2
iface eno1:2 inet static
    name exteno
    address 10.245.126.5
    netmask 255.255.255.0
    gateway 10.245.126.253
    dns-nameservers 10.245.0.10
    mtu 1500
#########################
# END VIRTUAL INTERFACES
#########################
Let's begin....
Node setup: First on all of your controllers, we will need to install bridge-utils and update the /etc/network/interfaces file. In the file below my eno1 is internal and my eno2 is public facing. I converted my eno2 into a bridge: $ apt install bridge-utils $ cat /etc/network/interfaces source /etc/network/interfaces.d/* auto lo iface lo inet loopback auto eno1 iface eno1 inet static address 192.168.2.8 netmask 255.255.255.0 #auto eno2 #iface eno2 inet static # address 10.245.126.8 # netmask 255.255.255.0 # network 10.245.126.0 # broadcast 10.245.126.255 # gateway 10.245.126.254 # dns-nameservers 1.1.1.1 8.8.8.8 auto br0 iface br0 inet static pre-up ip link add veno0 type veth peer name veno1 pre-up ifconfig veno0 up pre-up ifconfig veno1 up bridge_ports eno2 veno0 bridge_fd 0 bridge_maxwait 0 address 10.245.126.8 netmask 255.255.255.0 gateway 10.245.126.254 up route add -net 10.245.126.0 netmask 255.255.255.0 gw 10.245.126.254 br0 dns-nameservers 1.1.1.1 8.8.8.8 # reboot
"Next, you will need passwordless sudo; append to the bottom of the visudo file, this line where superuser is your non-root user:
superuser ALL=(ALL) NOPASSWD:ALL This will need to happen on all of your nodes. If you mess this up, you will be locked out of sudo, so make sure you have a way to log in as root, or verify BEFORE you logout/leave root user. If you lost root access, you might as well reinstall the operating system, there is no easy way to fix this. Next, configuring ceph. On your storage nodes, you need at least 2 drives, /dev/sda and /dev/sdb. Your primary OS should be on SDA and ceph will using your SDB, SDC, SDD, etc. To configure kolla to use ceph, issue the following commands: umount sdb1 sudo sgdisk --zap-all /dev/sdb sudo sgdisk --largest-new=1 -c 1:"KOLLA_CEPH_OSD_BOOTSTRAP" /dev/sdb reboot If there is nothing mounted on sdb, then the first command will produce and error, but that's okay. What is important is that when you issue a "parted -l" command, you see "KOLLA_CEPH_OSD_BOOTSTRAP" as your sdb label. I reboot at the end to make sure that there isn't any issue with partition tables, etc after issuing those commands. Remember: zaping a disk/partition will ERASE all of the data, so be sure you have the right one Kolla setup: This is where hopefully it will get a lot easier with those things configured. # Install required packages and dependancies apt update apt install python-dev libffi-dev gcc libssl-dev python-selinux python-pip ansible # Install Kolla packages pip install -U pip pip install kolla kolla-ansible # Copy kolla files locally, specifically multinode and create template globals file. cp -r /usr/local/share/kolla-ansible/etc_examples/kolla /etc/ cp /usr/local/share/kolla-ansible/ansible/inventory/* . # Install dependancies on all nodes ansible -m raw -a "sudo apt -y install python-dev all" If you are looking to install a specific version of OpenStack, I recommend issuing the following command (pip install kolla==999) so you can see the versions of kolla that are available and installing that specific version. You can look at the table below for the options available as of today, April 24, 2018. Current Kolla Versions
Once ansible, kolla, and kolla-ansible are installed, you'll need to need to start to configure 2 main files, multinode and /etc/kolla/globals.yml The multinode file will change slightly between versions of openstack, so be sure to have the latest if you change versions. But here you will need to insert the nodes how you want them configured. You can also add specific ansible configurations here as well, like the ansible ssh user, passwords, ports, etc. Below is my multinode file. I have 4 nodes, and have specified an ansible_user and that they should escalate privileges. I've also updated my /etc/hosts with the corresponding IP's and hostnames of these nodes (you should use the internal IP's either in this multinode file or the etc/hosts). 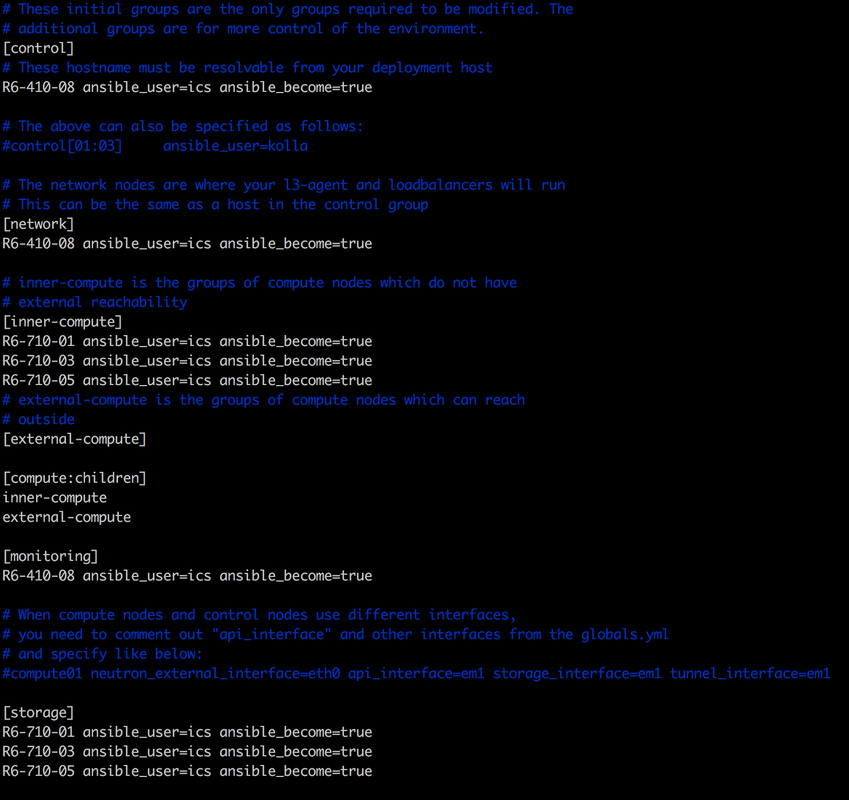
Configured multinode file.
Next the globals file needs to be heavily modified and updated. This is where all of your configurations will go. Here are the most important settings to update for a successful deployment.
# Valid options are [ centos, oraclelinux, ubuntu ]
kolla_base_distro: "ubuntu"

# Valid options are [ binary, source ]
kolla_install_type: "source"

# Rule of thumb: ubuntu uses source, centos uses binary.

# Valid option is Docker repository tag
openstack_release: "ocata"
# Valid tags can be found https://hub.docker.com/u/kolla/
# click on image and view tags.

# NETWORKING INFO:
kolla_internal_vip_address: "192.168.2.252"
kolla_external_vip_address: "10.245.126.2"
network_interface: "eno1"
kolla_external_vip_interface: "br0"
neutron_external_interface: "veno1"

# To enable Ceph and enable services to use ceph:
enable_ceph: "yes"
enable_ceph_rgw: "yes"
enable_cinder: "yes"
enable_ceph_rgw_keystone: "yes"
glance_backend_file: "no"
glance_backend_ceph: "yes"
cinder_backend_ceph: "yes"
nova_backend_ceph: "yes"
Once everything is configured, you'll begin issuing the Kolla commands: kolla-genpwd kolla-ansible -i multinode certificates kolla-ansible -i multinode bootstrap-servers kolla-ansible -i multinode prechecks kolla-ansible -i multinode deploy The first commands, genpwd, create all of the passwords the services and accounts will need to be deployed. That file can be found: /etc/kolla/passwords The certificates command creates the TLS 1.2 self-signed certificates needed for a secure website and communication. Bootstrap-servers will make sure all of the nodes have docker installed along with all of the other software needed, configure the firewall, etc. Next, prechecks verifies that a deployment will likely succeed. If you get failures here, you WILL get failures in deployment. However, a pass here, likely means that your deployment will be a success. Lastly, deploy will deploy all of the services and kick start openstack. This can take anywhere from a few minutes to maybe an hour depending on node speed, download speed, and number of nodes. But it shouldn't take an excessive amount of time. I've heard of hundreds being deployed in under 2 hours. If your internet speed is slow, I recommend issuing a "kolla-ansible -i multinode pull" command to download all of the docker images prior to the deploy to make sure all of the docker images are available when the deploy begins. An optional step after the deploy is post-deploy. This will generate your admin-openrc.sh file to issue your openstack CLI commands. Please check out Part 2, Deploying OpenStack Part 2 - Post Deployment. Where you'll learn to setup the external network, internal network, flavors, security groups, and deploy a VM.
REFERENCES:
[1] https://github.com/openstack/kolla-ansible [2] https://launchpad.net/kolla-ansible [3] https://hub.docker.com/u/kolla/ [4] https://docs.openstack.org/kolla-ansible/latest/user/quickstart.html [5] https://gist.github.com/JamesOBenson/38d5a63592ae108d58c952cbcadfaffd (Create basic openstack users, networking, security groups, flavors, and upload latest ubuntu 16 image.) [6] https://github.com/JamesOBenson/Kolla-misc (A lot of the commands issued here can be found in my github.) Your comment will be posted after it is approved.
Leave a Reply. |
AuthorJames Benson is an IT professional. 
Archives
August 2022
Categories
All
|
 RSS Feed
