|
Receiving an error like this:
root@r6-410-1:/home/ubuntu# ansible all -i tmp -m setup --tree /tmp/facts
192.168.6.29 | FAILED! => {
    "changed": false,
    "failed": true,
    "module_stderr": "Shared connection to 192.168.6.29 closed.\r\n",
    "module_stdout": "/bin/sh: 1: /usr/bin/python: not found\r\n",
    "msg": "MODULE FAILURE",
    "rc": 0
}
Go to your inventory file and add this:
ansible_python_interpreter=/usr/bin/python3 So your inventory file might look something like this now: 192.168.6.29 ansible_python_interpreter=/usr/bin/python3
In this post I would like to show you how to integrate Apache Ranger with LDAP. I'll be using a minimal development 6-node Hortonworks cluster and FreeIPA as our LDAP provider. This will of course work similarly in a HDP 2.5 sandbox.

I won't go into much detail in regards to Apache Ranger or FreeIPA, because I will assume you'll know about these products and what you are trying to accomplish if you are reading this. However, that said, taken from Rangers website:
Ranger is a framework to enable, monitor and manage comprehensive data security across the Hadoop platform. The vision with Ranger is to provide comprehensive security across the Apache Hadoop ecosystem. Apache Ranger has the following goals:
And FreeIPA has the following Main features (again taken from their website):
I personally like FreeIPA because it takes two difficult things to setup and does so very clean and easy with a wonderful website GUI. Also, open source is wonderful (and free!). Environment Setup
Operating System for HDP and FreeIPA: centos-release-6-8.el6.centos.12.3.x86_64
HDP Version: 2.5.3.0-37 Ambari Version: 2.4.2.0 Ranger Version: 0.6.0 FreeIPA 3.0.0 Openldap Version: 2.4.40 Configuration Changes
To enable and incorporate LDAP you must implement a few things first. First, you'll need to incorporate LDAP into your client nodes, for CentOS6, this will install freeIPA v3.0.0. To have the latest version you'll have to use the tarball:
yum -y install ipa-client
TIP:
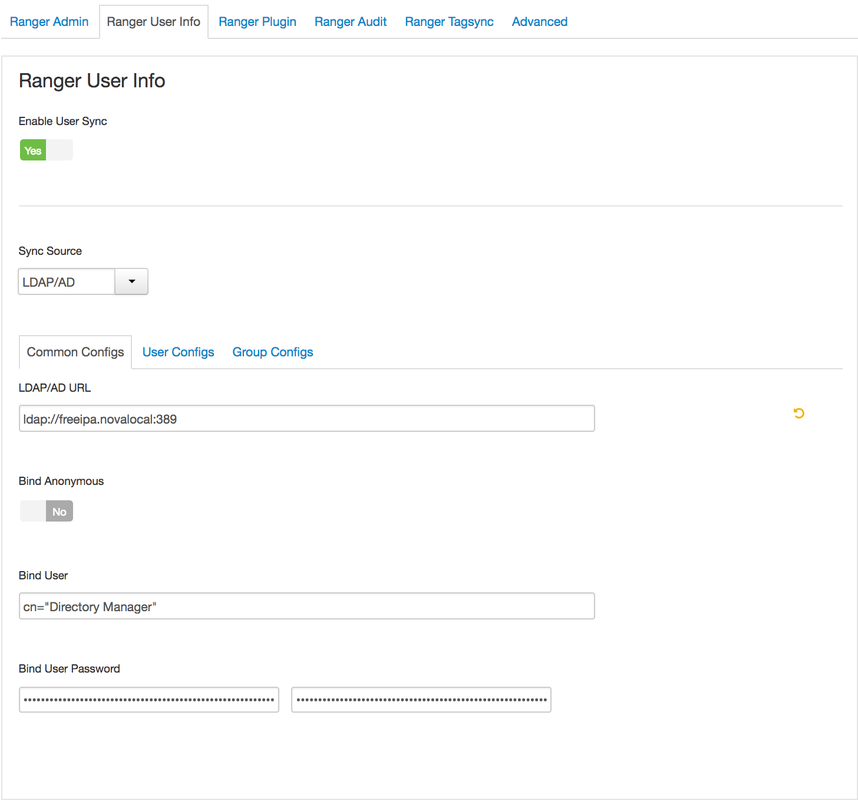
Once installed you'll need to keep track of the basic info, your bind DN, bind password (for simple authentication), the LDAP url, port and base dn for search. I found using this command to be helpful to debug and find exactly what you are looking for: ldapsearch -x -h ldaps://<FREEIPA_SERVER_FQDN> -p <PORT_NUMBER> -D "<BIND DN>" -w <PASSWORD> -b "<BASE DN>" uid=<USEDNAME> for example: ldapsearch -x -h ldaps://freeipa.novalocal -p 636 -D "cn=Directory Manager" -w SuperSecretPassword -b "dc=novalocal" uid=admin Step One: Log into Ambari and go into Ranger service and the Configuration menu. Step Two: Enter the Ranger User Info. You will need to enable the User Sync. Once enabled, all of the sync information will be shown. You'll need to select:
Step Three: On the next tab, User Configs change the:
Group Configs will stay the default, not synced. 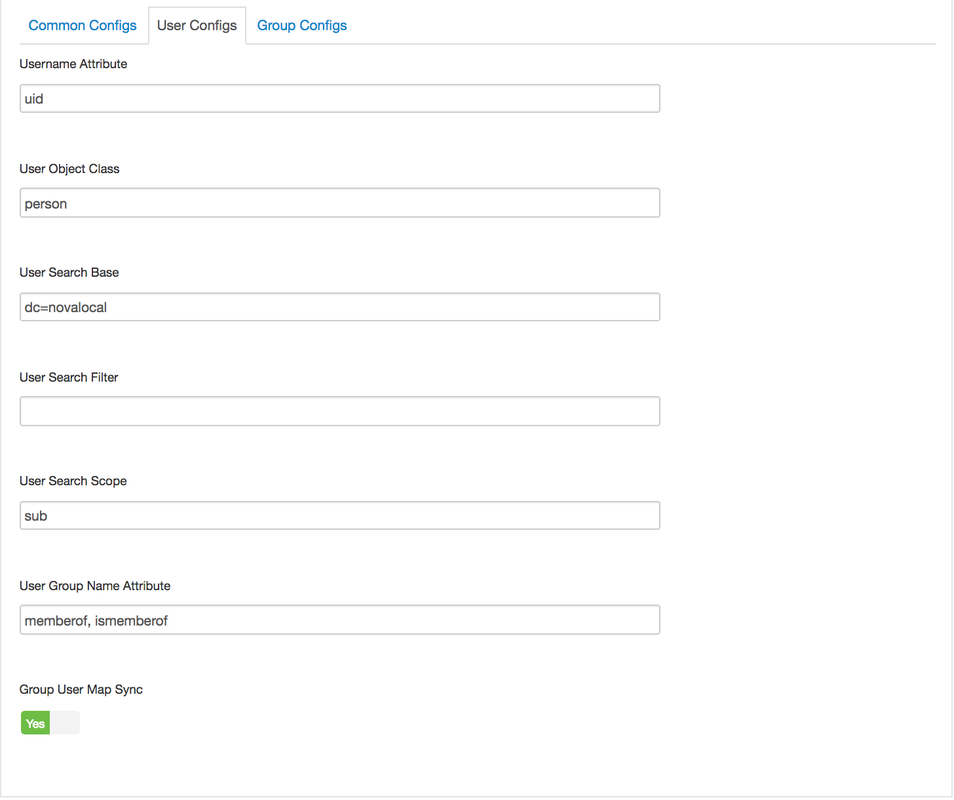
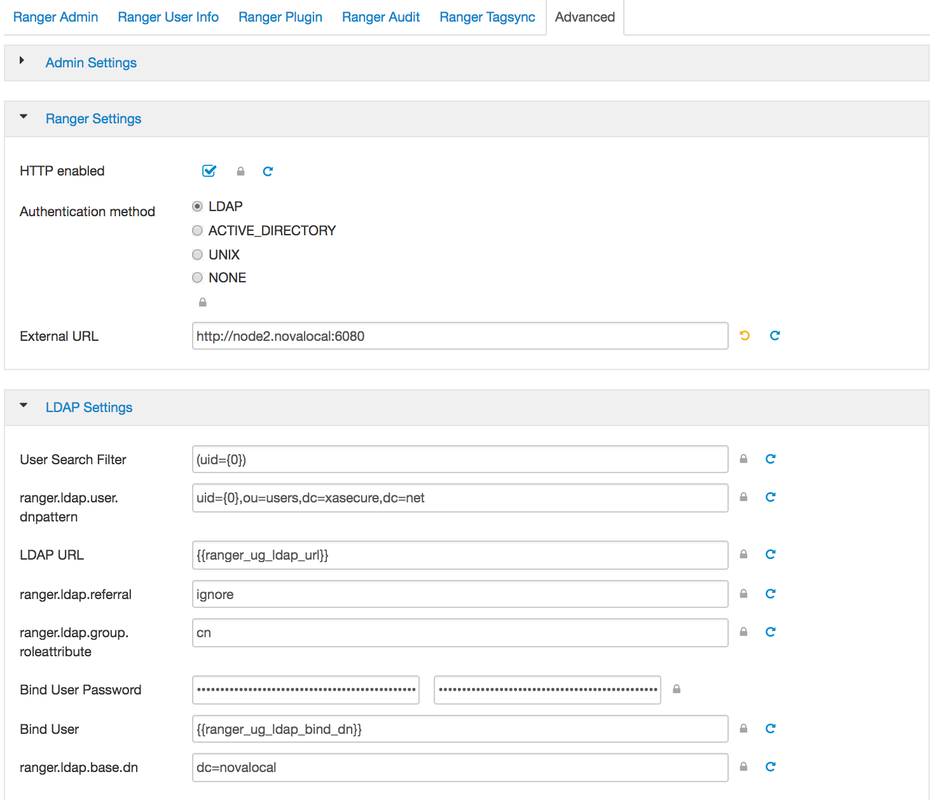
Step four: Go from the Ranger User Info to the Advanced tab all the way at the top of the screen and we will need to modify two spots, Ranger Settings, and LDAP Settings.
In Ranger Settings:
In LDAP Settings,
At this point you can hit save and restart the necessary services for it to work.
To have Ranger update the users/groups it will do it regularly, however to force an update, you can manually restart the ranger usersync process. One thing I noticed right away was that in ranger, groups were not syncing. You can verify this by kinit as a user which is part of a specific group, for example group1. kinit user01 > kinit user102 > groups user102 user102 : user102
So to correct this, put following line into domain section in /etc/sssd/sssd.conf
ldap_group_object_class = ipaUserGroup Now, when you do your group check, it'll report back correctly. If it still doesn't report back, you might need to clear your SSSD cache, to clear the cache and update all records: sss_cache -E > kinit user102 > groups user102 user102 : user102 group1 I hope this tutorial was helpful for you. If you have any questions, please let me know in the comments below!
There are a lot of things that you might not know how to do with SSH that can be helpful. Here are a few tricks that I've learned over time....
Accidently deleted your public key? This command will regenerate the public key for you. ssh-keygen -y -f ~/.ssh/id_rsa > ~/.ssh/id_rsa.pub Need to convert that RSA key to a PEM key for a windows box? Here you go openssl req -x509 -new -key ~/.ssh/id_rsa -out id_rsa.pem Forgot how many bits that private key was? openssl rsa -text -noout -in ~/.ssh/id_rsa | grep Private-Key: Private-Key: (8192 bit) Have a few SSH keys and can't keep track of which goes to what server? Want an easier way to log into your servers?
vi ~/.ssh/config

#Insert these lines:
Host server1 192.168.1.100
    HostName 192.168.1.100
    IdentityFile ~/.ssh/id_rsa
    User ubuntu

Host server2 192.168.1.150
    HostName 192.168.1.150
    IdentityFile ~/.ssh/id_rsa-2
    User centos

Host server3 192.168.1.200
    HostName 192.168.1.200
    IdentityFile ~/.ssh/id_rsa-3
    User dev
Once this is done, you can do things like: # To SSH into server1: ssh server1 # To copy a local file to server1: scp myfile server1:~ #sftp with options: sftp -oPort=24 server1 Need to forward local ports to a remote machine: ssh -L 3306:localhost:3306 username@hostname Some Helpful Commands: To determine how many bits your private key is: openssl rsa -text -noout -in id_rsa | grep Private-Key: Output: Private-Key: (8192 bit) To reproduce your public key in case you lost it: ssh-keygen -y -f ~/.ssh/id_rsa > ~/.ssh/id_rsa.pub To copy your public key to allow for passwordless SSH: ssh-copy-id -i ~/.ssh/id_rsa.pub username@remotehost To create a PEM file from id_rsa (Note: an existing private key is needed): openssl req -x509 -new -key id_rsa -out PEM_ID_RSA_FILE.pem Output: PEM_ID_RSA_FILE.pem To send a command over SSH: ssh user@ipaddress 'ls -lrt' To send a command over SSH that requires user interaction: ssh -t user@ipaddress 'top' References: https://linux.die.net/man/5/ssh_config https://stackoverflow.com/questions/2419566/best-way-to-use-multiple-ssh-private-keys-on-one-client https://serversforhackers.com/ssh-tricks
OpenStack Heat can be a powerful tool to help demonstrate a specific environment for testing, for autoscaling real-world applications, and more. I would like to detail a simple example to help a user get started.
Traditionally, if a user was given a new project in OpenStack, a network, subnet, and router would need to be created. The interfaces in the networking would need to be connected and finally a user would be able to create the VM’s. All of this could be done automatically in a HOT template if desired. To begin, lets decipher a simple OpenStack Heat template (written in a yaml format) where we just boot a VM and have it attached to an already existing private network.
If we dissect this template, we see a few main features:
Lets inspect each of these one at a time. Heat_template_version This is a specific date that specifies what features are possible. The options are: 2013-05-23 - Icehouse 2014-10-16 - Juno 2015-04-30 - Kilo 2015-10-15 - Liberty 2016-04-08 - Mitaka 2016-10-14 - Newton 2017-02-24 - Octa Each of these dates, offer different features and possibilities. However, like many things in openstack, many features have been backported to earlier versions if possible. If you attempt a date other than these, your template will be refused. You can use any one of these dates on your OpenStack cluster as long as it is designed for that OpenStack or earlier. For example, you can deploy an Icehouse template on Mitaka, but you wouldn’t be able to deploy a Mitaka heat template on Icehouse. Note: For AWS Cloudformation, they have similar template, however, they have only a single date that is valid: AWSTemplateFormatVersion "2010-09-09" Parameters: This section can be laid out as follows: 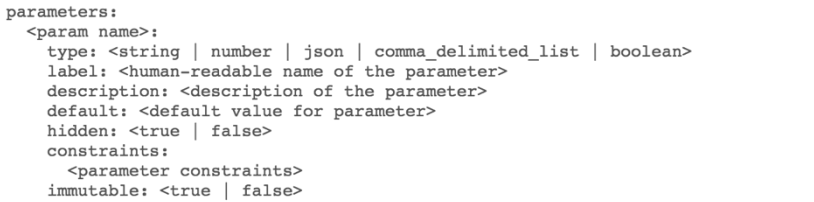
In the case shown above, I used image, flavor, key, and private_network. Any name is possible, but it should include as least the required sections: type and label. A description is, of course, a helpful thing to have and would always recommend it. Likewise, default might be good to help users always have a default keypair selected, or image type. Constraints is nice as well, because you could implement constraints that limit images, for example, to only images that glance recognizes. When you select a constraint, a drop down menu will be shown giving you only those options provided. Also with constraints, you don't need to have all options, you can choose which options are available, like what flavor sizes or images a user can select. Passwords could be required to be somewhere in the range of 8 to 25 characters, etc. Tying constraints and defaults could give a user a standard but also options. Perhaps, you want the user to use a medium sized vm, but the option to go larger if needed. Here are a few constraint examples that could be used.
Constraints examples: - custom_constraint: nova.flavor - allowed_values: [m1.small, m1.medium, m1.large] - length: { min: 8, max: 25 } - custom_constraint: glance.image Resources: This section is what you’ll be creating the resources you need; this is the VM that you’ll be spinning up, the router and network that you’ll be creating, and the floating IP’s that you’ll be allocating and assigning. The following is the syntax for the resources section: 
The only required section here is the type, however, you’ll frequently need to include properties. To boot a server, you’ll need at minimum an image and flavor, to be useful, you’ll also need to include the network and a key.
Depends_on is interesting because it can make servers dependent upon other servers allowing for more complex environments including things like load balancing. Likewise, the deletion policy is great for load balancing as well. This allows for servers to be deleted based off of their utilization, Output: Lastly, a helpful section is the outputs. 
You’ll need to include a value here, but this can be helpful in displaying items such as the instances floating IP. However, it can also be rather advanced by displaying web-hooks to dynamically scale a cluster, links to storage clusters, and display randomly generated passwords used in the cluster creation.
You can find more OpenStack Heat templates on my github page that detail assign floating IP's, create networking, even autoscaling. All of them have been tested using OpenStack Mitaka. You'll find that heat templates are relatively easy to create and manipulate once you understand the basics. References: https://github.com/JamesOBenson/OpenStack-Heat-Templates https://github.com/openstack/heat-templates/tree/master/hot http://docs.openstack.org/developer/heat/template_guide/hot_spec.html#heat-template-version https://docs.aws.amazon.com/AWSCloudFormation/latest/UserGuide/format-version-structure.html
I know most of us just blindly type in ssh-keygen, go through the prompts and have our key. However, there is much more to it than that if you dig into it a little.
There are a few different types of cryptographic options available, RSA (default), DSA, ECDSA, ED25519, and RSA1. Some of these are stronger, cryptographically than RSA, others have known weaknesses. Then you can generate the number of bytes in some cases, use a passphrase, etc. So what do we use? How do we generate a suitable SSH key? And how do we know what is compatible with what we use? I've included a great graphic down below detailing what OS uses what OpenSSH version and which types of encryption is used. Lets start by issuing the command with options (both in bold with comments on the side): ssh-keygen #(choose one '-t' below) -t ed25519 # for greatest security (bits are a fixed size and -b flag will be ignored) -t rsa # for greatest portability (key needs to be greater than 4096 bits) -t ecdsa # faster than RSA or DSA (bits can only be 256, 284, or 521) -t dsa # DEEMED INSECURE - DSA limited to 1024 bit key as specified by FIPS 186-2, No longer allowed by default in OpenSSH 7.0+ -t rsa1 # DEEMED INSECURE - has weaknesses and shouldn't be used (used in protocol 1) -b 4096 # bit size -a 500 # rounds (should be no smaller than 64, result in slower passphrase verification and increased resistance to brute-force password cracking) -C "[email protected]" # comment.. -o # Saves key in new ED25519 format rather than more compatible PEM Format. New format increases resistance to brute-force password cracking but not support by OpenSSH prior to 6.5 Both ED25519 and ECDSA are signature algorithm based on elliptic curves, which means that they are capable of having an equivalent level of encryption using less bits. I will note that there are some hesitations around ECDSA due to a Sony hack and some improper used of the key generation. If you open up a key that was generated using one of these two, and compare it to an RSA, you'll see that the bits are significantly more with RSA. I used 500 rounds to help increase the brute-force time. A typical login will notice minimal delay when using 500 rounds, so it could be reduced if necessary or an older machine. However, be sure to keep it above 64 at a minimum. Example usage (in order of preference - security): ssh-keygen -o -a 500 -C "[email protected]" ssh-keygen -t rsa -a 500 -b 4096 -C "[email protected]" ssh-keygen -t ecdsa -a 500 -b 521 -C "[email protected]" Example usage (in order of preference - usability): ssh-keygen -t rsa -a 500 -b 4096 -C "[email protected]" ssh-keygen -t ecdsa -a 500 -b 521 -C "[email protected]" ssh-keygen -o -a 500 -C "[email protected]"
To verify: ssh-keygen -l -f ssh/id_ed25519 256 SHA256:2..............w [email protected] (ED25519) ^^^ ^^^^^^^^^^^^^^^^^ ^^^^^^^^^^ ^^^ |__ Size |__ Fingerprint |__ Comment |__ Type To copy public key: Using ssh-copy-id: ssh-copy-id username@remote_host
Manually, one-line:
cat ~/.ssh/id_rsa.pub | ssh username@remote_host "mkdir -p ~/.ssh && cat >> ~/.ssh/authorized_keys"
Manually, copying (appending) public string into auth keys:
echo public_key_string >> ~/.ssh/authorized_keys
Notes: NSA has requirements for what can be used on the different classifications. Their requirements are: RSA @ 3072 bits for all classifications. RSA1 is prohibited (it uses SSHv1 protocol which is deemed insecure) My two cents are for security, use the ED25519, but for compatibility, stick with the RSA. Resources: https://blog.cloudflare.com/ecdsa-the-digital-signature-algorithm-of-a-better-internet/ https://chealion.ca/2016/06/20/ssh-key-types-and-cryptography-the-short-notes/ https://www.digitalocean.com/community/tutorials/understanding-the-ssh-encryption-and-connection-process 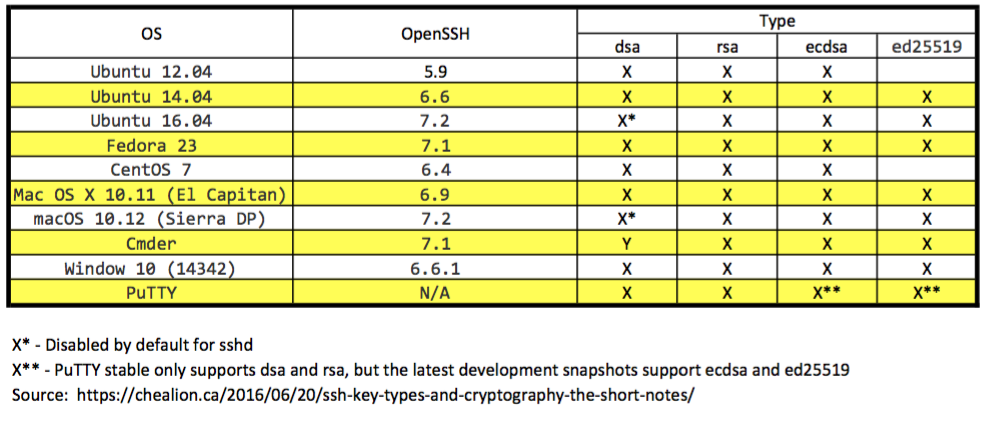
I want to keep a list of resources that I've found that are really wonderful. I'll update it periodically and try to organize it the best I can. So there might be redundancies (Sorry for that!) Training: Plumgrid (Free Openstack Associate certification) A Cloud Guru (Fee based - AWS Training) Spark Fundamentals (Free Spark 101 Training with cert. of completion) Linux Academy (Fee based - AWS, Linux, Openstack Training) Python Training (Python testing is linked) Programming: Python programming List (A huge list of everything python (python, django, data science, neural networking, etc) programming training and details about them) Hackerrank (A.I., data structures, machine learning, python, C++, SQL, databases, security, everything!) Learn Python the hard way (Online book) Testing Regex LeetCode ( Preparing for technical coding interviews in C, C++, Java, Python, C#, JS, Ruby, Bash, MySQL) Software: Github BitBucket TravisCI Jenkins Vagrant VirtualBox Electronics: CircuitLab (Online circuit simulator) Books (either open source books or places that give books away): PacktPub (free books everyday!) Data Structures and python An introduction to Algorithms & Data Structures in Python Pro Git Security: One time secrete sharing (Creates a 1 time website that is encrypted and expires after 7 days)
I used IRC sparcely when I was a kid and honestly thought it had died out or wasn't heavily used anymore. That is, until I started doing more with OpenStack and found out the community is alive and well. I know that there are websites out there on how to set up either an IRC client or a ZNC broker, but nothing that put it all together. So this post is for you as much as it is notes for me incase I need to redo my setup. So lets begin...
The easy way of connecting to an IRC server is directly, however, there is an issue with that. First, when you disconnect, you'll lose all chats that are happening, or maybe someone did a shoutout to you and it is now unheard. So that's why we add an IRC broker, ZNC, as shown below (Image from ZNC's website). 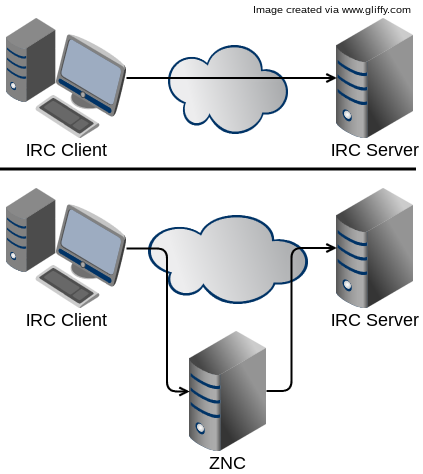
For my setup, I used:
In this process, I compiled the source for ZNC since there have been many security and stability updates not included in the apt-get install version.... $ apt-cache show znc | grep Version Version: 1.4-2
So first, I installed all of the dependancies necessary for ZNC:
sudo apt-get update && sudo apt-get install build-essential libssl-dev libperl-dev
Then I downloaded the source code, untarred it and went into that directory.
wget http://znc.in/releases/znc-latest.tar.gz
sudo tar -xzvf znc-latest.tar.gz
cd znc*
Next I configured the source, and compiled the source using the make command:
./configure
make
The make command is going to take a bit of time, 20-30 minutes depending on which Pi you have and how it is configured. After that, we can install ZNC and do the setup, don't forget that you'll need to be sudo.
sudo make install
znc --makeconf
Here are the setup questions/answers...
-- Global settings --
[ ** ]
[ ?? ] Listen on port (1025 to 65534): 6667
[ ?? ] Listen using SSL (yes/no) [no]: yes
[ ?? ] Listen using both IPv4 and IPv6 (yes/no) [yes]: no
[ .. ] Verifying the listener...
[ >> ] ok
[ ** ] Enabled global modules [webadmin]
[ ** ]
[ ** ] -- Admin user settings --
[ ** ]
[ ?? ] Username (alphanumeric): USERNAME
[ ?? ] Enter password:
[ ?? ] Confirm password:
[ ?? ] Nick [USERNAME]:
[ ?? ] Alternate nick [USERNAME_]:
[ ?? ] Ident [USERNAME]:
[ ?? ] Real name [Got ZNC?]: James
[ ?? ] Bind host (optional):
[ ** ] Enabled user modules [chansaver, controlpanel]
[ ** ]
[ ?? ] Set up a network? (yes/no) [yes]: no
At this point, your ZNC broker is roughly set up on what ever port (Default is 6667) you specified above and your IP address. Be sure to choose your Username carefully, as that will become the default option for the next few questions. That IRC info you'll need to enter in the ZNC server as well. You'll want to add networks to your ZNC broker. The main one for me was the irc.freenode.net server, port 6697. You can install some additional features like Fail2Ban under the Global Modules, and setup IP limits, buffer sizes, connection delays, etc. For me under the webadmin Settings, I have SSL, IPv4, IRC and Web checked in my listening ports. And a maximum buffer size of 500, Connect Delay: 5, Server Throttle: 30, and Anon. IP Limit of 10. Also I have the 2 boxes checked: Disallow IP changing during each web session and Hide version number from non-ZNC users. Don't forget, if you lose power, your Raspberry pi will need to have these services started back up again. You can set them up as services later too so they autostart with the boot up. 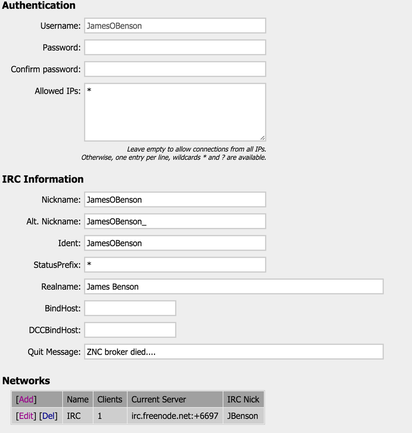
Setting up Colloquy...
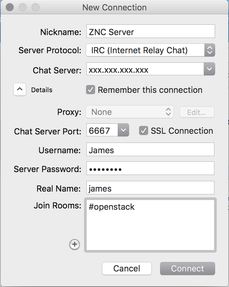
Now, we need to set up Colloquy. The information here is the standard info you provided above: Chat Server should be your IP address of your home or of the ZNC broker depending on your setup, Port # should match the port you set above, and Username mentioned above.
There not a whole lot more to it than that. I hope this helps and if I forgot anything or you need help, let me know!
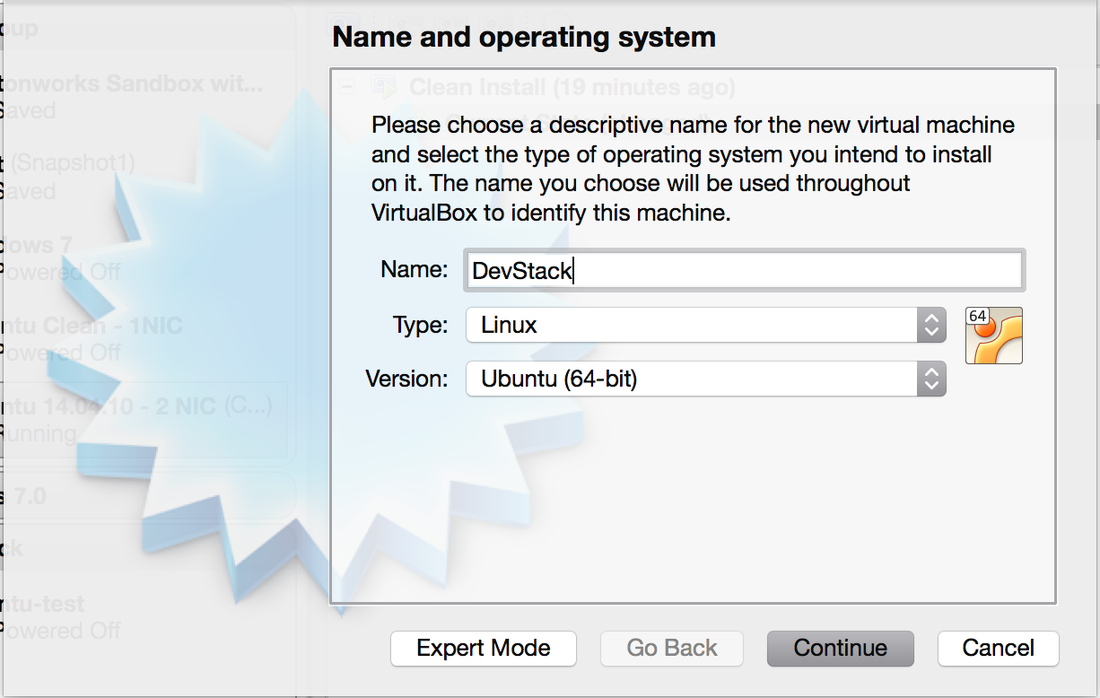
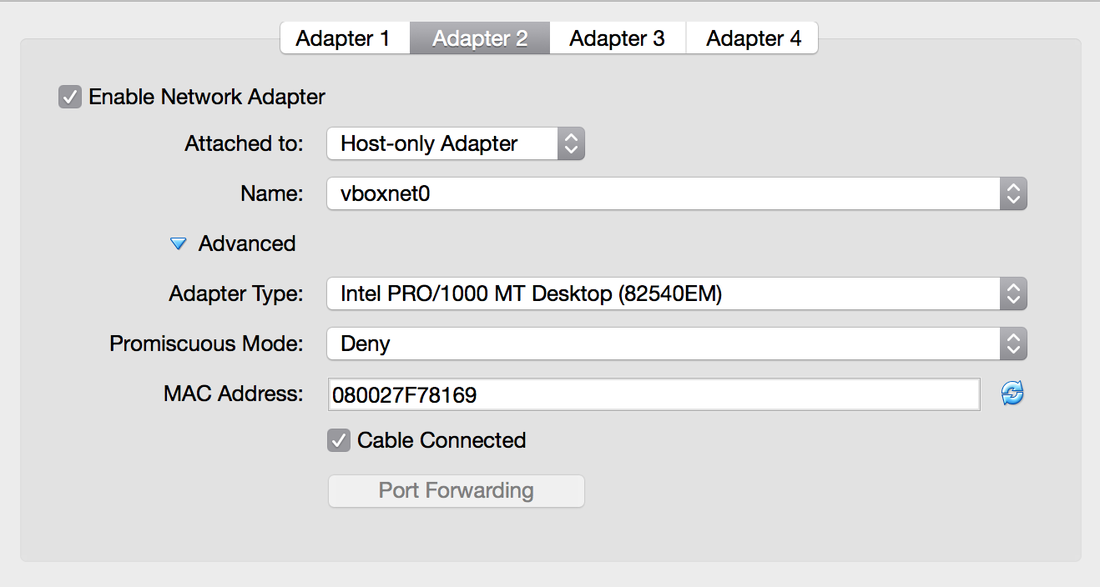
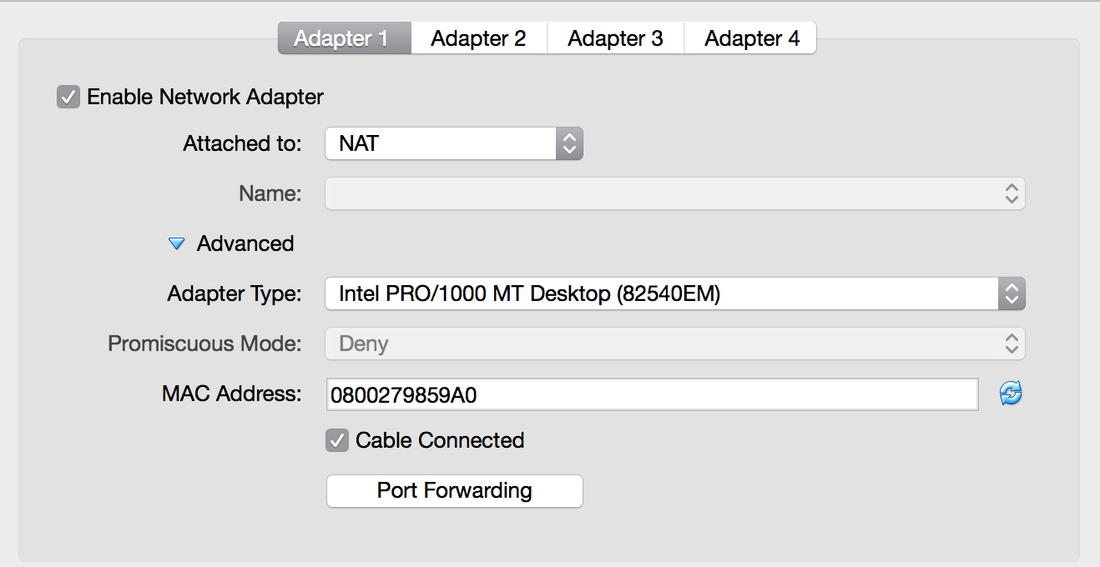
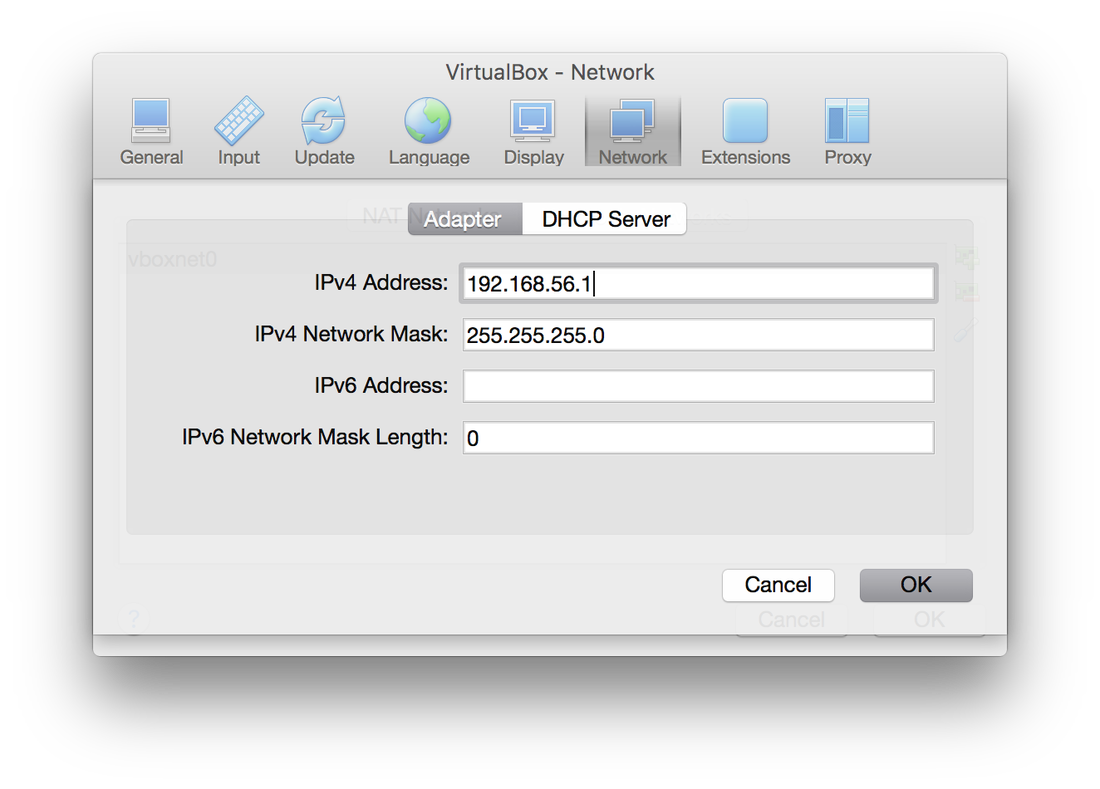
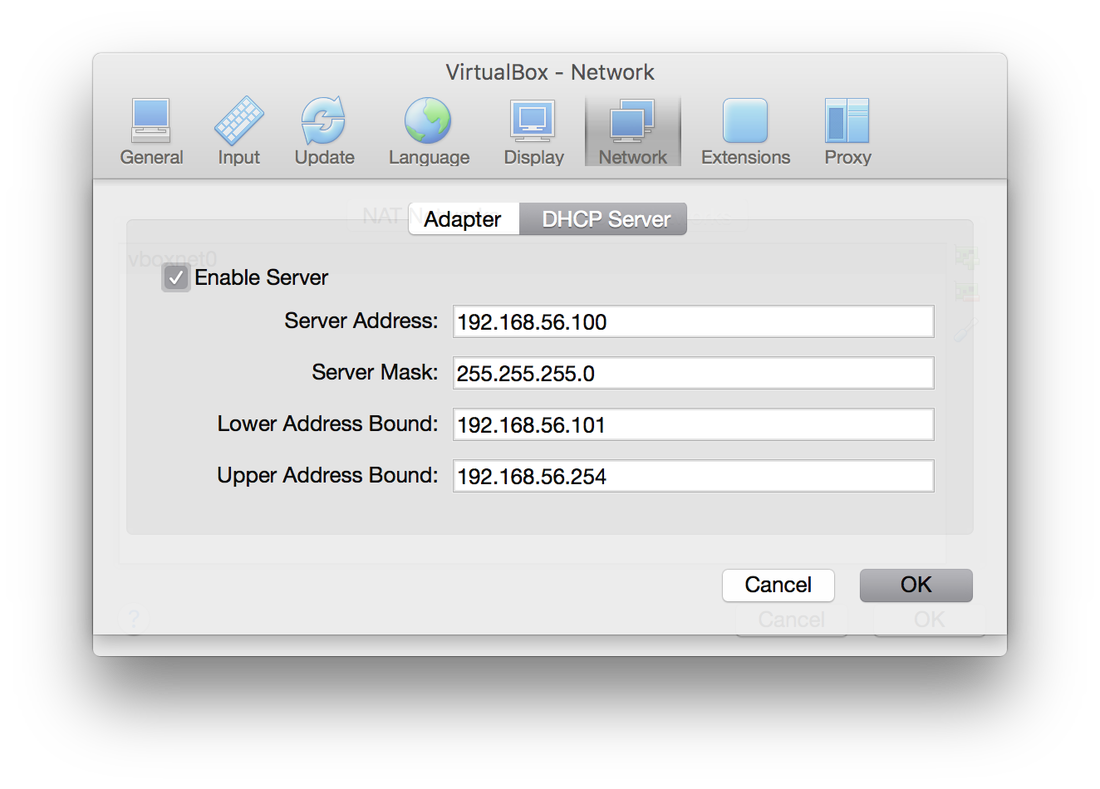
I recently installed LaTeX for Mac OS and ran into some hiccups. So as a reminder to myself and perhaps help for everyone else, I thought I would quickly detail what I did and how to make sure it was all working properly. Sources: At the time of this writing TexStudio is version 2.10.4 and MacTex is version 20150613. Go ahead and install both in either order. I installed TexStudio first and then MacTex and ran into some issues, but I believe that they persist even if you install MacTex first. Once installed, in TexStudio, go to preferences and commands. You will probably see many things referencing /dev/null. If that is the case, you'll need to update the following lines as shown in the image below. This came from another website, so a big thanks to them for helping everyone out in getting this installed. Latex "/Library/TeX/texbin/latex" -synctex=1 -interaction=nonstopmode %.tex PdfLaTeX "/Library/TeX/texbin/pdflatex" -synctex=1 -interaction=nonstopmode %.tex DviPs "/Library/TeX/texbin/dvips" -o %.ps %.dvi DviPng "/Library/TeX/texbin/dvipng" -T tight -D 120 %.dvi DviPdf "/Library/TeX/texbin/dvipdfm" %.dvi BibTeX "/Library/TeX/texbin/bibtex" %.aux Makeindex "/Library/TeX/texbin/makeindex" %.idx Metapost "/Library/TeX/texbin/mpost" --interaction nonstopmode Asymptote "/Library/TeX/texbin/asy" %.asy Likewise, if you are interested in getting SVN to work and have git on your computer, you can execute the following command (This came from the same source as above, or directly): git config --global alias.ci "commit" Then just change SVN and SVNadmin to both: git 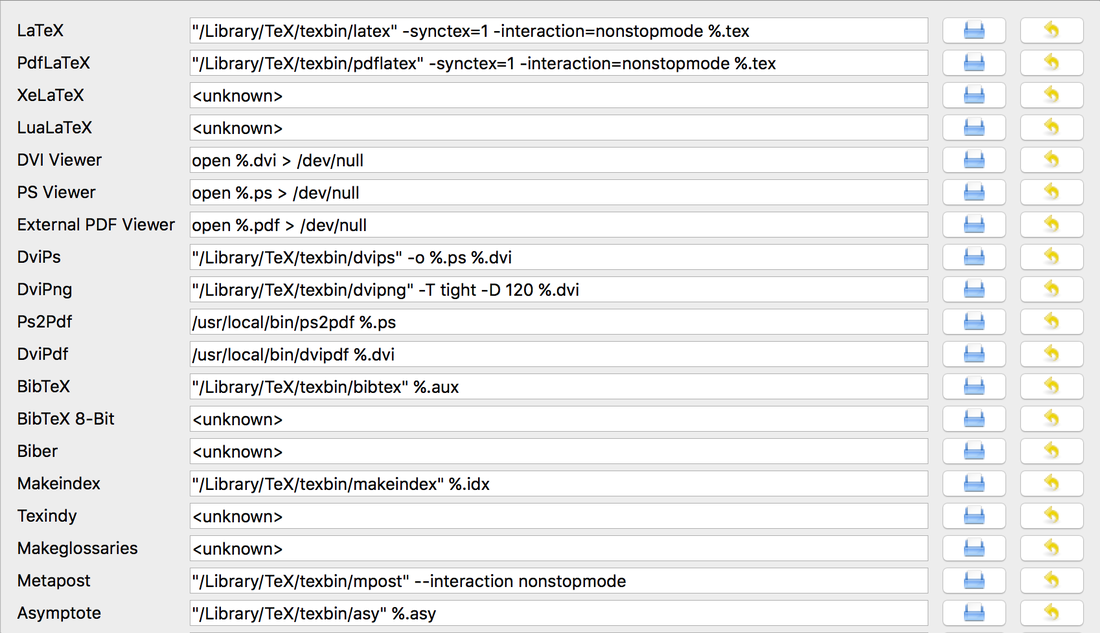  Also, if you need to create some great graphics, flowcharts, or anything else like that, I would highly recommend checking out draw.io. It's a great free website that allows you to draw great flowcharts, electronic circuitry, mockups, networking, Venn diagrams, anything. It's really excellent and I'm using them for some of the papers I'm doing in LaTeX. Here are some tutorial video's from them incase you are curious.  OpenStack just recently came out with their latest version - Liberty. Below I will show you a quick tutorial on how to install your own DevStack on your laptop inside of a VirtualBox environment. Things you need: 64-Bit Laptop (I'm using a macbook pro running Mac OS 10.11.1) VirtualBox (I'm using 5.0.8 r103449) Ubuntu Server Image. Setting up VirtualBox I started off by creating a new VirtualBox Image called DevStack with 8192MB (8GB of RAM), 2 cores, and a 60GB Dynamically Allocated VDI storage. These are DevStacks recommended settings and will allow you to create a few instances of larger sizes. Please note, DevStack states that you can go as low as 1GB of RAM, however, I had issues with the installation completing. They recommend those settings for only creating one small instance. I would highly recommend doing as close to the recommended settings as possible or better if available. First create a Host-only Network called vboxnet0 (this can be found in the preferences of VirtualBox itself). The properties of that network are as follows (Pictures can be seen in the gallery). Once created go into the settings of your instance and modified the network adaptors. Adaptor 1 will be NAT, Adaptor 2 is a Host-only Adaptor attached to vboxnet0. Adaptor: IPv4 address: 192.168.56.1 IPvNetwork Mask: 255.255.255.0 DHCP Server Enabled: Server Address: 192.168.56.100 Server Mask 255.255.255.0 Lower Address Bound: 192.168.56.101 Upper Address Bound: 192.168.56.254 Installing Ubuntu Server and configurations At this point, I installed Ubuntu Server 14.04.3 LTS. I wont go through all of the details of setting up a server. But a few quick highlights:
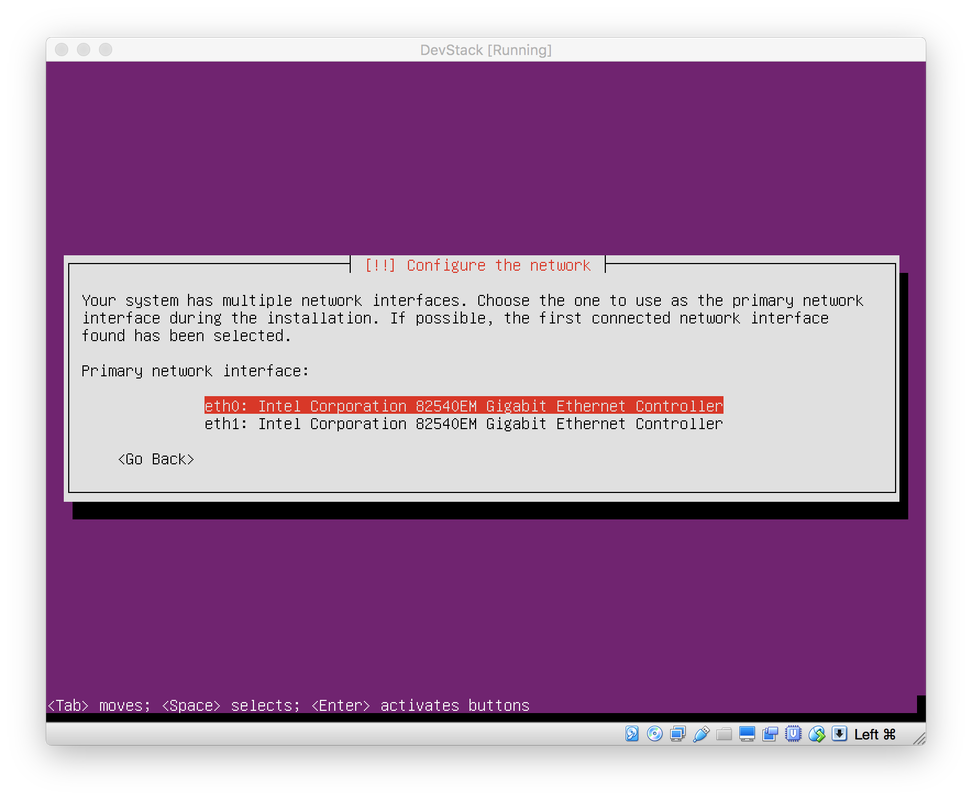
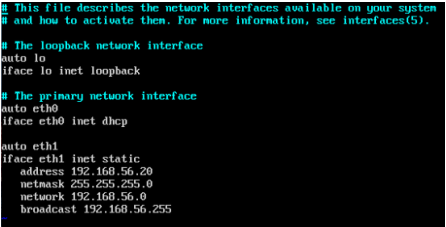 Now that we have Ubuntu server installed, we can get into the meat of installing DevStack (It's very simple, honest). Before we start to install DevStack, we want to make sure your network configurations are configured properly. $ ifconfig What you want to see is both eth0 and eth1 with an ip address. However, you'll likely only see eth0 with an IP address and nothing for eth1. So eth1 will need to be created and made a static IP that way you can always access it on the same IP address and also so that DevStack doesn't get crash because the IP changes due to eth0 being dynamic. So, first go to the following file: /etc/network/interfaces. You will need to add the following 6 lines to the end of the file so it can be reflected like the image on the right. auto eth1 iface eth1 inet static address 192.168.56.20 netmask 255.255.255.0 network 192.168.56.0 broadcast 192.168.56.255 Once this is complete, you can reboot your instance and run the ifconfig command once more and you should see both eth0 and eth1 appear. At this point you can SSH into your instance using your normal SSH client with the IP address used above, 192.168.56.20. Installing DevStack $ sudo apt-get install git $ git clone https://git.openstack.org/openstack-dev/devstack -b stable/liberty These two commands install git and clone the DevStack repository for the stable version of liberty. Next, change directory into DevStack and launch the installer: $ cd devstack/ $ ./stack.sh Now DevStack will install. Throughout the installation it will ask you for passwords. You can fill them out or let the be generated automatically. The file that they get saved to will be in: /devstack/samples/local.conf Once the installation is complete, you should see a nice printout on the screen indicating how to connect to horizon, keystone, how to run some examples and the default users and their passwords. It also mentions your host IP and how long it took to complete. At this point, you will likely notice that your host IP is different than the static IP that you created earlier, it's time to change it. 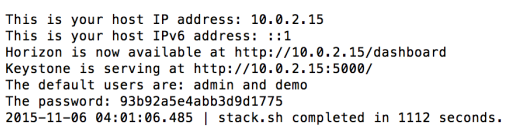 How to Migrate Keystone to Another IP address: This process is important for me at least to always have a uniform IP address on what is public and on how to access it. The IP address that DevStack uses are linked in a database and files. That means as you reboot your system or bring your laptop to other location and your instance acquirers a new IP, DevStack will cease to function properly. There are many ways to update the IP address. I perhaps do a simpler method, but have yet to find any issues with it. First go into your openrc file and search for these lines: if [[ $SERVICE_IP_VERSION == 6 ]]; then HOST_IPV6=${HOST_IPV6:-::1} SERVICE_HOST=${SERVICE_HOST:-[$HOST_IPV6]} GLANCE_HOST=${GLANCE_HOST:-[$HOST_IPV6]} else HOST_IP=${HOST_IP:-127.0.0.1} SERVICE_HOST=${SERVICE_HOST:-$HOST_IP} GLANCE_HOST=${GLANCE_HOST:-$HOST_IP} fi I am not using IPv6, so, I updated the HOST_IP line to the following: HOST_IP=${HOST_IP:-192.168.56.20} Once this was complete, I ran $ source openrc What this does, is many of the services reference that initial HOST_IP so updating that, will update all of them once you source it. At this point you can open your favorite web browser and type in 192.168.56.20 and your horizon dashboard should appear. Remember! That password that was printed out just after DevStack finished is your password for the admin account. Also, this is a GREAT time to take a snapshot in VirtualBox so you can always revert back to a fresh install of DevStack. Good luck coding! UPDATE (12/28/2015): I realized that my OS_AUTH_URL still reported as wrong when I downloaded my credentials, so here is how to fix that. First, you'll need to log into the sql database. $ mysql -u root keystone $ select id, url from endpoint where interface='public'; You should see a list of url's and id's, for my auth_url, I used the following command to update it to my static IP: $ update endpoint set url='http://192.168.56.20:5000/v2.0' where id='f268eed3e55c4395831809546e36acd8'; then restart your apache2 service: sudo /etc/init.d/apache2 restart at this point when you download your source file, you'll see that the auth_url is now correct.
Here is a quick and dirty guide on how to setup FreeIPA, an open source LDAP and Kerberos server. FreeIPA works best on Fedora, CentOS, and RedHat. Currently, the latest release, FreeIPA 4.2, are included in Fedora, however 4.1 is included in CentOS. This guide will help show you how to install FreeIPA 4.1 on CentOS 7. However, for those of you interested in installing it on a Ubuntu box, please add FreeIPA to your repository by:
# apt-add-repository ppa:freeipa/ppa # apt-add-repository ppa:sssd/updates # apt-get -y install openssh-server freeipa-client sssd However for CentOS you will need to: # yum install ipa-server Next we need to setup your freeipa server, I'll assume you know how to find your IP, but enter your IP and FQDN to the /etc/hosts file as shown below: # echo 192.168.1.2 ipa.mynetwork.local ipa >> /etc/hosts # echo ipa.mynetwork.local > /etc/hostname Next you have two options, you can manually go through the installation or you can enter a line similar to below to configure it all by you automatically. Using a one-liner like below has some additional benefits, for example, you cannot set the mkhomedir through the walk-through installation. However you can set it afterwards when you log into the system. # ipa-server-install -r MYNETWORK.LOCAL -n mynetwork.local --setup-dns --mkhomedir -p DirPass1234 -a AdminPass1234 --no-forwarders -U For those who are interested this is a break-down of the commands listed above. You'll want to be sure to change both the Directory and Administrator password to something secure.
Once this is complete you will need to be sure to open up your firewall by executing the following command: # firewall-cmd --permanent --add-service=ntp # firewall-cmd --permanent --add-service=http # firewall-cmd --permanent --add-service=https # firewall-cmd --permanent --add-service=ldap # firewall-cmd --permanent --add-service=ldaps # firewall-cmd --permanent --add-service=kerberos # firewall-cmd --permanent --add-service=kpasswd # firewall-cmd --reload Next you'll be able to log into your new server at: https://ipa.mynetwork.local/ipa/ui/ Be sure to log into it using the username admin, and the password you set up during the installation. |
AuthorJames Benson is an IT professional. 
Archives
August 2022
Categories
All
|
 RSS Feed
