 At work we have been using Raspberry Pi's a lot lately building up devices for the "Internet of Things" (IoT) along with many other purposes. However, finding a simple guide on securing the device along with useful code has been challenging. So here is a small guide from unboxing it to securing your raspberry pi.
First lets look at the basics:
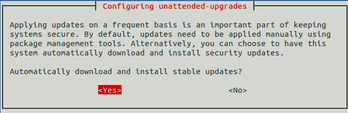
First lets create a new user, log into the RPi as pi and look at what groups you currently have: $ groups pi adm dialout cdrom sudo audio video plugdev games users netdev input And create a new user with all of the same groups. At the end of the line, make sure you enter your new username: $ sudo useradd -m -G adm,dialout,cdrom,sudo,audio,video,plugdev,games,users,netdev,input USERNAME Change the password: $ sudo passwd USERNAME Shutdown the pi and $ sudo shutdown -h now Once you boot up, login as the new user you just created and delete pi.... bye-bye pi! $ sudo deluser --remove-all-files pi Update the system and set it to auto update Next, lets update the OS, software, and firmware manually, then set it to do it automatically everyday. To update the system: $ sudo apt-get update && sudo apt-get upgrade And then update the distribution: $ sudo apt-get dist-upgrade Now we can check what our firmware version is: $ uname -a and upgrade the firmware to the latest version: $ sudo rpi-update If you want to know more about the change log, you can find it here: https://github.com/Hexxeh/rpi-firmware/commits/master At this point you can verify the new version by running the same code again and compare: $ uname -a We can't easily do all of the updates everyday, but we can do security updates and some other software updates daily. First login as root, and install unattended-upgrades: $ sudo su $ apt-get install unattended-upgrades We are going to modify a file, again you need to be as root here: $ nano /etc/apt/apt.conf.d/10periodic Inside that file, make sure you have the following 4 lines of code and make sure they have the respective values: APT::Periodic::Update-Package-Lists "1"; APT::Periodic::Download-Upgradeable-Packages "0"; APT::Periodic::AutocleanInterval "1"; APT::Periodic::Unattended-Upgrade "1"; The AutocleanInterval in case you were wondering clears out the local repository of retrieved packages that can no longer be downloaded. Due to this fact, I believe, that they are largely useless, so we can clear them out, save cache and hopefully by doing so not have our device fill up and quickly run out of space. Next, because the RPi wont reboot automatically even if you ask it to, you can configure it as follows: $ dpkg-reconfigure -plow unattended-upgrades This will prompt you if you want to "Automatically download and install stable updates?" select yes. You will also need to modify one other file and again make sure it is not commented and the value set to true: $ nano /etc/apt/apt.conf.d/50unattended-upgrades Unattended-Upgrade::Automatic-Reboot "true"; And lastly, install update-notifier-common package to allow the system to reboot successfully. $ apt-get install update-notifier-common Set the Memory Split & Disable boot to desktop The next couple of items are really "free" optimization tricks and best practices. If you choose to only use terminal, as I do, you can go ahead and disable boot to desktop. This is found under the raspi-config. In this menu you'll see an option for "boot to desktop/scratch" and you can opt to only boot to console from this submenu. If you choose to go this route, I would then recommend freeing up some of the ram dedicated to the graphics card and instead reallocate it to the system. You can check what it is now from the raspi-config menu under the advanced setting or in terminal: $ vcgencmd get_mem arm && vcgencmd get_mem gpu and if you don't see: arm=992M gpu=16M we can optimize it more. Again, I only recommend this if you plan on using it solely as SSH and without any GUI. Go to your RPi config screen: $ sudo raspi-config Navigate to the "8 Advanced Options" screen and select "A3 Memory Split". How much memory should the GPU have? 16. This will give you a much large chunk of RAM for the system since the GPU wont be used heavily at all. I don't recommend overclocking but if you want you can overclock it in the advanced menu as well. Set the Hostname & Locale While you are at the configuration tool, I would recommend changing your Hostname under the advanced options along with the locale which is under the International Options. I didn't see many unnecessary services running, but if you want you can stop services by executing: $ sudo update-rc.d <service name> disable And if you are concerned about the RPi being too hot or want to see what the current temperature is, you can use: $ /opt/vc/bin/vcgencmd measure_temp Anything under 45'C I would say is perfectly fine. The Pi starts to throttle back at 85'C to help prevent lifespan degradation. Another potential performance increase would be by changing the SD card to a class 10 card. I would recommend the SanDisk Extreme 16GB UHS-I/U3 Micro SDHC. According to this link, they seem to have the best throughput and a good size. A more secure SSH client A more secure version of SSH and also more lightweight is a program called DropBear. DropBear does not support SSHv1, telnet, or rlogin which all have some serious security holes. To install you'll need to do the following commands: $ sudo apt-get install dropbear $ sudo nano /etc/default/dropbear edit the line called to reflect this: NO_START=0 Lets turn off our current SSH server. At this point you want to make sure you have a stable connection to the Pi. This command wont kill you current connect, but you want to be careful so you don't lose access. $ sudo /etc/init.d/ssh stop and start up our new dropbear $ sudo /etc/init.d/dropbear start Now open up a second SSH terminal and try to ssh into the pi to make sure you can reconnect without issues. Once you can, lets continue: $ sudo apt-get remove openssh-server Your comment will be posted after it is approved.
Leave a Reply. |
AuthorJames Benson is an IT professional. 
Archives
August 2022
Categories
All
|
 RSS Feed
